Sunday, February 28, 2010

Daring Baker's Tiramisu

The February 2010 Daring Bakers’ challenge was hosted by Aparna of My Diverse Kitchen and Deeba of Passionate About Baking. They chose Tiramisu as the challenge for the month. Their challenge recipe is based on recipes from The Washington Post, Cordon Bleu at Home and Baking Obsession.

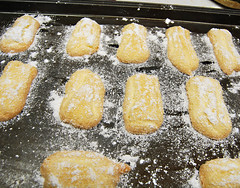
I LOVE tiramisu, and had previously never made it, so when I saw the February challenge, I was definitely excited. For this challenge, we were to make tiramisu from scratch -- meaning all of the components had to be made from scratch, including the lady fingers and the mascarpone cheese.

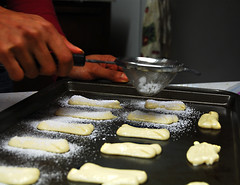
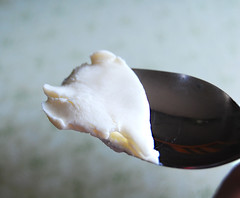
There were many components to this recipe. From experience, I've learned that for the sake of my mental health, I should never expect to complete a Daring Bakers challenges in one day. This dessert consisted of lady fingers, mascarpone cheese, zabaglione (Italian custard), pastry cream, and whipped cream. So, for this challenge, I split up the work over a span of a few days, and it worked out very nicely. I made the lady fingers and mascarpone one day, the zabaglione, pastry creams, and whipped creams 3 days later, assembled the dessert the following day, and let it chill overnight.


What I really loved about this recipe is that although there were many components, I didn't find any of them to be too difficult, just a bit time consuming. The lady fingers were pretty simple and very good, although next time I may add a bit of vanilla to give them more flavor. Since I had made mascarpone once before, this time around was definitely easier.

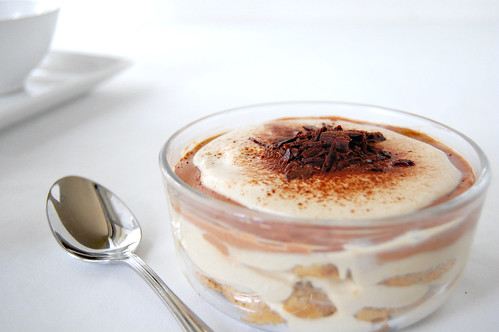
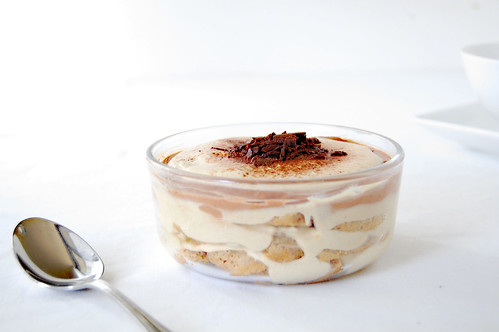
For my version of this decadent dessert, I made an extra chocolate layer by spiking the pastry cream with about 6 ounces of chopped bittersweet chocolate, and topped it with some shaved chocolate. I have a hard time saying no to chocolate. Sorry, it's a weakness.

Please check out Aparna's or Deeba's blogs for the recipe.

Wednesday, February 24, 2010

Indian Cauliflower Curry (Gobi) and Raita

OK, I feel so badly about not putting a recipe on yesterday's post, that I decided to do another post today complete with not just one, but TWO recipes (oooh, ah). I made this cauliflower (or gobi) curry along with the Chicken (and Chickpea) Makhani when my friend E was over.

I was very proud of this dish because in the past when I've tried to make this, it always ended up not as cauliflower curry, but more like cauliflower mush - curry flavored cauliflower mush, to be exact. But this time was different. I made sure not to cut the cauliflower too small, cooked it for much less time, and tah dah! -- curry not mush. Woot!

What's the white stuff on top you ask? It is a Indian yogurt-based sauce called raita. It is traditionally used as a dip but I say dip shmip; I eat this stuff with just about everything. It has a mild tang that complements the heat of many Indian dishes, and it is served cold as to complement the heat (different "heat" this time) of many Indian dishes. Try it with the Makhani too. It won't disappoint.

Cauliflower Curry

*2 tablespoons olive oil
*1 large onion, chopped
*1 large head of cauliflower, chopped into 3 inch pieces
*3 cloves garlic, chopped
*1 cup water
*1 teaspoon fresh grated ginger
*1 teaspoon cumin
*1 tablespoon + 1 teaspoon tumeric powder
*1/2 teaspoon coriander
*1/4 teaspoon (or more if you can handle it) crushed red pepper
*1/2 teaspoon sugar
*1 1/2 cups fresh or frozen peas (I used frozen; if using frozen, do not thaw)
*salt, pepper to taste

1. Heat oil in a large skillet. Add onions and cook until softened. Add garlic and cook for about 1-2 minutes. Add water, and stir in ginger, cumin, tumeric, and coriander, and red pepper. Cook for about 3-4 minutes. Pour contents of skillet into a separate bowl. Do not discard any remnants in the skillet.
2. Add the cauliflower to the same skillet and cook for about 4-5 minutes, stirring occasionally. Pour in the water mixture and stir to coat the cauliflower evenly. Cover and cook for about 7-8 minutes until the cauliflower is softened.
3. Stir in the sugar and peas. Add salt and pepper to taste.

Raita
* 1 cup plain yogurt
*1 tablespoon water
*1/2 large cucumber chopped
*1/4 red onion, finely diced
*1/2 teaspoon cumin
*1/2 teaspoon salt (or more if you like)
*couple of grinds of fresh ground pepper

In a medium sized bowl, mix together yogurt and water until smooth. Stir in remaining ingredients.

Saturday, February 20, 2010

Whole Wheat French Baguette and an Award

This bread brings back memories of my trip to Paris a few years ago. Out of college, with no job, a friend and I backpacked around Europe for a month, and Paris was our last stop. At this point in the trip, I was exhausted and almost ready to go home, so honestly, I did not have high hopes for this city. But I was totally wrong - there was something very unique and comforting about Paris and I LOVED it.

Our budget was tight, so we stayed at a less than pleasant youth hostel. Till this day, there are two memories that still stick with me about this place: 1) the awful co-ed bathrooms - these were so gross that I seriously could not spend more than 5 minutes in the shower, and 2) the free breakfasts: a cup of orange juice, a small plastic container of jam, and a mini french baguette. The bread was so simple, yet SO amazingly delicious. It was seriously some of the best bread I'd ever had: warm, chewy, crusty, and perfect with that small amount of jam.

The recipe for this bread is in Peter Reinhart's book The Bread Baker's Apprentice. As much as I want to share this recipe, I won't out of fear of the copyright police coming to get me. Seriously, there must be some top-secret law that prohibits food bloggers from posting recipes from this book because I cannot find any of these recipes online. Try for yourself: do a Google search on Bread Baker's Apprentice French Bread -- see? lots of nice posts and pictures but NO recipes. Coincidence? I think not!

I cannot take credit for this bread, as much as I want to. Last week as I was visiting the east coast, BF discovered my Bread Bakers Apprentice book and made this bread. He followed the recipe for French baguette and replaced all of the bread flour with whole wheat (yes! I've taught him well). The result was a chewy, crusty and hearty french bread that is unbelievably good for sandwiches.
Now, on to the award...A while back, Jill from JilliciousDiscoveries, awarded me the Honest Scrap award. Jill is a fantastic baker and a master cake decorator (a skill I clearly lack). She has also been very supportive of my blog by taking the time to leave thoughtful comments on so many of my posts. Thank you for your support Jill!
I'd like to pass on this award to some other fabulous food bloggers. Since there are so many fantastic food blogs I've discovered within the last few months, it was really difficult for me to decide which blogs to choose. Honestly, I think they all deserve an award. In the end, I realized that it has been almost a year since I started this blog, so I decided to pass this award along to relatively new bloggers who have been blogging for less a than year (my apologies if you have already received this award, you still deserve it!):
1. Memória at Mangio da Sola - a gorgeous blog with beautiful photos and fantastic recipes like homemade tamale and chocolate mousse cheesecake (oh my!).
2. Marcellina at Marcellina in Cucina - lovely blog with a great mix of savory and sweet recipes
3. Rebecca at CakeWalk - tons of tasty and interesting recipes with an emphasis on using healthy and all-natural ingredients.
4. Valerina at Une Gamine dans la Cuisine - delicious photos and recipes with an emphasis on sweet treats.
5. Ju at The Little Teochew - always a fun read, lots of unique recipes and culinary stories.

Congratulations!

Wednesday, February 17, 2010

Easy Chicken Makhani

Last weekend a friend of mine (hi E!) came over for dinner. The plan was to cook some Indian dishes together so she could learn some new things about preparing Indian food. Unfortunately, I think I am about the worst person to learn from in the kitchen. I could never have my own cooking show (as much as I like to pretend that I already do) because I rarely have any idea what I'm doing. Mostly, I just add ingredients and taste along the way. I never make a dish without tasting it about a gazillion times in the process. I never make one of those meals where you have the first bite and say "WOW. I can't believe this is so good." Because before I sit down to eat, I already know how good it is or how much it sucks. Of course, this is definitely not true for baking. But that's another story.

Since I'm pretty sure that E learned nothing from our cooking "class", I am dedicating this post to her -- complete with actual recipes for some of the dishes we made.

The first recipe is for Chicken Makhani - a popular north Indian dish of chicken cooked in a creamy tomato sauce. Traditionally this dish is rather artery-clogging, so I lighten it up a bit by using milk and yogurt to replace most of the cream. I also made a vegetarian version for myself, using chickpeas instead of chicken - chickPEAS, chickEn - they're practically the same thing, no?

Chicken Makhani

For chicken
*1 Tb butter
*1 Tb olive oil
*2 lbs, boneless skinless chicken breasts, cubed (see below for vegetarian version)**
*1 onion, sliced
*4 cloves garlic, chopped
*1 teaspoon fresh grated ginger
*1 tablespoon cumin
*1 teaspoon coriander
*2 teaspoons paprika
*1 teaspoon garam masala (how to make your own)
*2 teaspoons crushed red pepper

For sauce
*2 cups tomato puree
*2 Tablespoons milk
*1/4 cup plain yogurt
*1 tablespoon heavy cream
*1 or 2 dried chili peppers (optional)
*1 tablespoon sugar
*salt, to taste

Directions:
1. In a large pan, melt the butter and heat the oil. Add onions and cook until slightly softened.
2. Add the chicken and cook for 3-4 minutes. Add garlic, ginger, cumin, coriander, paprika, garam masala, and crushed red pepper, and continue cooking chicken until outsides are browned (chicken will finish cooking later in the sauce). Remove just the chicken pieces from pan (LEAVE onions, garlic, and spices).
3. In the same pan, add tomato puree, milk, yogurt, and cream. Cook over low-medium heat for about 5 minutes. Return chicken back to pan along with the dried chilis, sugar, and 1-2 teaspoons of salt. Cook for an additional 8-10 minutes until chicken is completely cooked.

**For vegetarian version, substitute chicken with 2-3 cups (depending on how saucy you like it) cooked chickpeas. Follow step 1 above. Add garlic, ginger, and all spices. Cook for 3-4 minutes. Follow step 3 above adding the chickpeas instead of chicken.

Saturday, February 13, 2010

Chocolate Cupcakes


As I've mentioned a few times on this blog, I am a lover of all things desserts. Brownies, cookies, and pies are high up on the list, but my all time favorite dessert is chocolate cake with vanilla frosting. OK, I know it's not the most exciting dessert, but something about the contrast of the rich chocolate and the creamy sweet frosting is incredibly satisfying.

This is the chocolate cake recipe that I always make. Although Ina Garten is a culinary genius, she is not known for making low-fat recipes (take a look at this). But as I was preparing the batter for these cupcakes, I realized they are actually relatively low in fat: 14 (unfrosted) cupcakes require just 1 egg, and only 1/4 cup of oil. So that's 1/14 of an egg and .85 teaspoons (NOT tablespoons) of oil per cupcake. The frosting is a bit more sinful, but only a small amount is needed per cupcake. Me? I start with a small amount, but always have more on the side for dipping. Yum.

I'm not a big fan of sprinkles, but since I was making these cupcakes for a birthday party, I decided to be festive.

Chocolate Cupcakes (adapted from Ina Garten)
*3/4 cup + 2 tablespoons all-purpose flour
*1 cups sugar
*1/4 cup + 2 heaping tablespoons cocoa powder
*1 teaspoon baking soda
*1/2 teaspoon baking powder
*1/2 teaspoon kosher salt
*1/2 cup buttermilk, shaken
*1/4 cup vegetable oil (I use canola)
*1 egg at room temperature
*1/2 teaspoon vanilla extract
*1/2 cup strong brewed
*sprinkles (optional)

Vanilla Buttercream Frosting (adapted from Smitten Kitchen)

*2 cups confections sugar
*1/2 stick butter, at room temperature
*1/2 tablespoons milk
*1/4 tsp pure vanilla extract

To make the Frosting:
1. Whip the butter in the bowl of an electric mixer, or with a hand mixer, for several minutes, until light and fluffy. Slowly add the powdered sugar, a few tablespoons at a time.
2. When the frosting looks thick enough to spread, add 2 more tablespoons of the confectioners sugar, one at a time. Drizzle in the milk, and mix it until combined. Add one more tablespoon of the sugar, then drizzle in the vanilla and mix until combined.

To make the cupcakes:
1. Preheat the oven to 350 degrees F. Line a muffin pan with cupcake liners.
2. Sift the flour, sugar, cocoa, baking soda, and baking powder into a large bowl. Add salt. Mix with an electric mixer (if using stand mixer, use paddle attachment) on low speed until combined.
3. In another bowl, combine the buttermilk, oil, eggs, and vanilla. With the mixer on low speed, slowly add the wet ingredients to the dry. With mixer still on low, add the coffee and stir just to combine, scraping the bottom of the bowl with a rubber spatula.
4.Pour the batter into the prepared pan and bake for 35 to 40 minutes, until a toothpick inserted in the center cupcake comes out clean. Place cupcakes out onto a cooling rack and cool completely.
5. Frost with vanilla frosting and top with sprinkles.

Tuesday, February 2, 2010

Winter-Time Tamale Pie


One of the best things about living in California is the plentitude of local fruits and vegetables we can get pretty much all year round. In the summer time, the farmers market in my town is THE place to be. The stands are always stocked with tons of zucchinis, peppers, and tomatoes. The winter months are a bit quieter, but offer a whole different array of produce – colorful squashes, tons of leafy greens, and lots of citrus. As much as I enjoy the summer produce, I actually think I enjoy Winter's creations even more. Something about those squashes and greens is so hearty and satisfying, especially when they mingle together in a warm dish.

I usually make this tamale pie with zucchini and peppers, but this time I decided to try a variation: butternut squash and kale; and let me tell you: this is better than the summer version. A key component of the deliciousness of a tamale pie is the cornbread-like topping, but I could seriously eat just the filling and call it dinner, happily.

Butternut Squash and Kale Tamale Pie

Filling
*1 large butternut squash, peeled, and cut into 1 inch cubes
*2 Tb olive oil
*1 large onion, diced
*4 cloves garlic, minced
*1 bunch kale, with large stems stripped and discarded, leaves chopped
*3 cups (or 2 15 oz. cans) cooked beans (pinto, black, kidney, I used pinto)
*1 1/2 cup shredded cheddar cheese
*1 15 oz can diced tomatoes, undrained
*1 tablespoon cumin
*2 teaspoons coriander
*1 teaspoon dried oregano
*salt and pepper to taste


Topping
*1 1/2 cup cornmeal
*2 Tb flour
*1 teaspoon salt
*2 teaspoons baking powder
*1/2 teaspoon baking soda
*2 eggs, beaten
*1 cup buttermilk
*2 tablespoons melted butter

For the Filling:
1. Preheat oven to 350 degrees. Lightly oil a baking pan. Add the squash and toss to coat. Roast the squash 35 minutes.
2. Heat the oil in a skillet over medium heat, add the onions, and cook for about 2 minutes until softened. Add the garlic and cook for about 1 minute.
3. Add the kale and cook for about 2-3 minutes until tender. Add the roasted squash and cook for about 3 minutes. Add beans and diced tomatoes. Stir in cumin, coriander, oregano, salt, and pepper. Heat for about 3 minutes.
4. Spread filling into lightly oiled 9x13 glass dish. Sprinkle cheese on top.

For the Topping:
1. Mix cornmeal, flour, salt, baking powder, and baking soda in a mixing bowl.
2. In a separate bowl, stir together buttermilk, melted butter, and eggs. Gently fold wet ingredients into dry ingredients.
3. Evenly spread the batter over the filling.
4. Bake 20 min or until top is lightly browned.