Friday, March 26, 2010

Sooji Halwa

"Everything in moderation, including moderation." --Julia Child

This is my favorite quote from one of my favorite chefs, and pretty much sums up my attitude towards food. Yes, I know that moderation is the key to staying healthy and still being able to enjoy rich foods and sweet desserts, and I'm all for it. But sometimes a girl (and by girl I mean me), just needs to sit down and pig out on dessert, and not feel like she's committed a sin. I know they say to eat until you are just satisfied, but sometimes I'm not satisfied until I know I'm over-satisfied. Sometimes I'm not full until I'm over-full. Sometimes moderation just does not cut it.

Sooji halwa is a very popular Indian dessert, often translated as 'semolina pudding'. It is the kind of dessert that you can eat a whole lot of without feeling the need to throw up or run a marathon afterward. It is light but extremely satisfying, sweet but not overly so, creamy but not too rich - all in all, the perfect dessert for assuaging all those sweet cravings that beg for more than just a few little bites.

Sooji Halwa (Semolina Pudding)
*1/4 cup butter
*1 cup semolina (cream of wheat)
*2 bay leaves
*1 cup sugar
*pinch of salt
*1/2 cup water
*1 cup milk
*1/8 teaspoon ground cardamon
*1/2 cup raisins
*1/2 cup chopped walnuts, almonds, pistachios, or cashews (or a combination)

1. In a large skillet (cast iron works well), melt the butter over medium heat.
2. Add the semolina and bay leaves, and cook for about 7-8 minutes until the semolina is reddish-brown in color but not burnt! Stir constantly, being careful not to burn it.
3. Add the sugar, and stir for about 15-20 seconds. Add the salt, water, milk, cardamom, raisins, and nuts, and stir for about 2 minutes. The mixture should still be somewhat wet.
4. Remove from heat and serve.

Wednesday, March 24, 2010

Creamy Buttermilk Coleslaw

I can't believe it has taken me this long to discover the greatness of cabbage. It is so versatile, extremely healthy, and amazingly cheap. Last week I found cabbage for 33¢ a pound. 33¢!! I was very excited. I made a Indian-style cabbage and potato curry, and this tri-color coleslaw.

The original recipe is from Cooks Illustrated, and although the texture was great, I felt it was lacking a bit in flavor. So I increased many of the ingredients -- a few more spoons of mustard, vinegar, and sugar, and used a mix of green and purple cabbage, and ended up with a deliciously creamy, flavorful, and colorful coleslaw.

I think this recipe begs to be tweaked according to taste. My suggestion is to start with the original and add more of this and that depending on how flavorful you like your slaw. Since I made so many changes to the original recipe, below I give both the original and note my changes.Creamy Buttermilk Coleslaw (adapted from Cooks Illustrated)

Serves 8-10

Ingredients

*2 pounds cabbage (about 1 large head), red or green (I used a combination of the two), shredded fine
*salt, to taste
*2 medium carrots, shredded
*1 cup buttermilk
*1/4 cup mayonnaise (I used low-fat)
*1/4 cup sour cream (I used ½ cup yogurt)
*2 small shallot, minced (I used red onion)
*4 tablespoons minced fresh parsley leaves
*1 teaspoon cider vinegar (I used 4 teaspoons)
*1 teaspoon granulated sugar (I used 4 teaspoons)
*1/2 teaspoon Dijon mustard (I used 4 teaspoons)
*1/4 teaspoon ground black pepper

1. Toss shredded cabbage and 1 teaspoon salt in colander or large mesh strainer set over medium bowl. Let stand until cabbage wilts, at least 1 hour or up to 4 hours. Rinse cabbage under cold running water. Press, but do not squeeze, to drain; pat dry with paper towels. Place wilted cabbage and carrot in large bowl. (The folks at CI recommend doing this to prevent a watery coleslaw. Unfortunately, I was in a rush so I skipped this step, but will probably do it next time as my coleslaw was a bit watery the next day).

2. Stir buttermilk, mayonnaise, sour cream, shallot, parsley, vinegar, sugar, mustard, salt (to taste), and pepper together in small bowl. Pour dressing over cabbage and carrots, and toss to combine; refrigerate until chilled, about 30 minutes.

Monday, March 22, 2010

Whole Wheat Cinnamon Rolls

I hate flying. Hate it. Love traveling, but hate flying. This is a difficult feeling to manage when you live 3000+ miles away from all of your family and most of your closest friends. Almost every year, I swear to myself that I will not fly home for the holidays this year, just to find myself frantically searching for flights come December. The worst part about flying to New York from California is having a lay-over in some city which will inevitably have some sort of weather problem. Yes, I know there are direct flights from California to New York, but I am too cheap for those (please see profile: graduate student=no money).

My worst trip home was a few years ago when two days before Christmas, during my layover in Indiana, my flight was canceled, and I had to spend the night in an airport hotel. The compensation from the airlines was a $15 food voucher to buy dinner from any airport restaurant. As appetizing as fast food and greasy pizza sounded, I opted for another airport classic: a giant cinnamon roll from no other than Cinnabon.

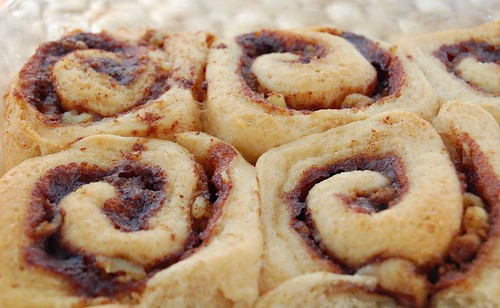
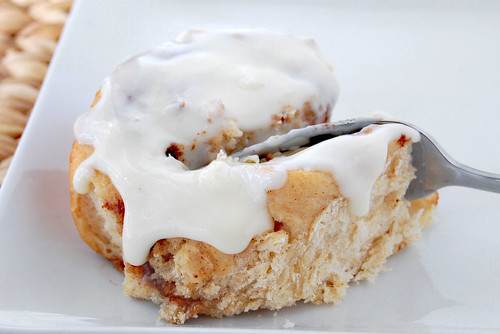
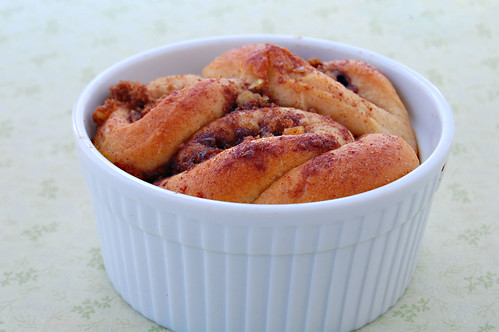
What is it about a cinnamon roll that is so comforting and satisfying? The soft and warm bread slathered in cinnamon and butter, and topped with gooey, tangy, and sweet frosting. Yum. Luckily, you don't have to be stuck in an airport to enjoy this warm, gooey goodness - delicious cinnamon rolls are pretty simple to make at home. I have made cinnamon rolls using all purpose flour in the past, but this time wanted to try whole wheat. I used white (rather than regular) whole wheat, and the results were amazing -- taste-wise, these rolls are just as delicious as their all-purpose cousins. Visually, they were a bit browner, and therefore require a bit more care to make sure they don't overcook.

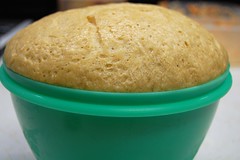
Once the dough is mixed up, it must rise for at least 2 hours. Then it is rolled
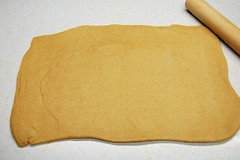
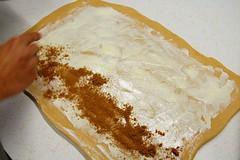
into a large rectangle and sprinkled with butter and a generous helping of
cinnamon sugar.


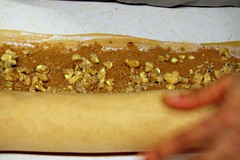
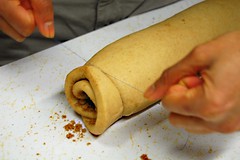
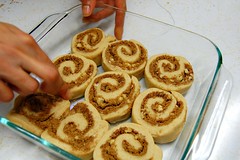
The dough is then rolled up and cut into individual rolls. Using thread
(or unwaxed dental floss) to cut the dough helps prevent it from sticking
to itself.


I baked the ends in a ramekin - a trick I learned from here (woops, somehow I ended up with 3 ends instead of 2).
Whole Wheat Cinnamon Rolls (Adapted from Molly Wizenberg’s recipe in Bon Appetit, March 2008 via SmittenKitchen).

Dough:
*1 cup whole milk
*3 tablespoons unsalted butter
*3 1/2 cups (or more) white whole wheat flour, divided
*1/2 cup sugar
*1 large egg
*2 1/4 teaspoons rapid-rise or instant yeast (from 1 envelope yeast)
*1 teaspoon salt
*Nonstick vegetable oil spray or butter, for greasing bowl

Filling:
*3/4 cup (packed) brown sugar
*2 tablespoons ground cinnamon
*1/4 cup (1/2 stick) unsalted butter, at room temperature
*Pinch of salt

Glaze:
*8 ounces cream cheese, at room temperature
*1 cup powdered sugar
*1/2 teaspoon vanilla extract

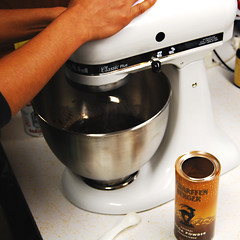
For dough: Combine milk and butter in glass measuring cup. Microwave on high until butter melts and mixture is just warmed to 120°F to 130°F, about 30 to 45 seconds. Pour into bowl of stand mixer fitted with paddle attachment. Add 1 cup flour, sugar, egg, yeast, and salt. Beat on low speed 3 minutes, stopping occasionally to scrape down sides of bowl. Add additional 2 1/2 cups flour. Beat on low until flour is absorbed and dough is sticky, scraping down sides of bowl. If dough is very sticky, add more flour by tablespoonfuls until dough begins to form ball and pulls away from sides of bowl. Turn dough out onto lightly floured work surface. Knead until smooth and elastic, adding more flour if sticky, about 8 minutes. (You may also use a KitchenAid’s dough hook for this process.) Form into ball.

Lightly oil large bowl with nonstick spray or thin layer of butter. Transfer dough to bowl, turning to coat. Cover bowl with plastic wrap, then kitchen towel. Let dough rise in warm draft-free area until doubled in volume, about 2 hours.

For filling:

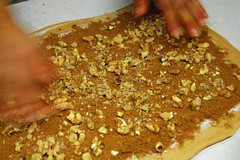
Mix brown sugar and cinnamon in medium bowl. Punch down dough. Transfer to floured work surface. Roll out to 15x11-inch rectangle. Spread butter over dough, leaving 1/2-inch border. Sprinkle cinnamon sugar, then walnuts, evenly over butter. Starting at 1 long side, roll dough into log, pinching gently to keep it rolled up. With seam side down, trim ends straight if they are uneven (bake separately in ramekin), and cut dough crosswise with thin sharp knife into 18 equal slices (each about 1/2 to 3/4 inch wide).

Spray two 9-inch square glass baking dishes with nonstick spray. Divide rolls between baking dishes, arranging cut side up (there will be almost no space between rolls). Cover baking dishes with plastic wrap, then kitchen towel. Let dough rise in warm draft-free area until almost doubled in volume, 40 to 45 minutes.

Position rack in center of oven and preheat to 375°F. Bake rolls until tops are golden, about 20 minutes. Remove from oven and invert immediately onto rack. Cool 10 minutes. Turn rolls right side up.

For glaze:
Combine cream cheese, powdered sugar, and vanilla in medium bowl. Using electric mixer, beat until smooth. Spread glaze on rolls. Serve warm or at room temperature.

Tuesday, March 16, 2010

Almond Brittle


The local co-op in my town has one of the largest bulk sections I have ever seen in a grocery store: two large walls FULL of containers of various flours, nuts, grains, spices, and so much more. Walking through this aisle, I feel like a kid in a candy shop or a Carrie Bradshaw in a Mahnolo Blahnik store. Have you ever walked out of a shoe sale and painfully wondered how you just managed to spend hundreds on a pair of strappy stilletos or knee-high boots? Well, I haven't, but too many times I have walked out of this co-op wondering how I spent $50 on a bunch of groceries, most of which cannot be eaten without first being baked or cooked.

Although my main weaknesses are the bulk flours and grains, I also cannot resist the bulk almond brittle. 8 bucks a pound will get you the yummiest locally grown almonds, roasted, and smothered in a sugary-buttery caramel coating. Oh. My.

This here is my attempt to recreate this almond treat; because although kids can't make candy (not any that I know of, anyway) and Carrie Bradshaw can't make shoes, I CAN make almond brittle, and I did.

Although this brittle is a bit different than the one at my co-op (their's is more like caramel-covered almonds than brittle), I think it is just as good (maybe even better). It is sweet without being overly so, crunchy and not at all chewy, and extremely satisfying. Now, if only I could make my own flour, I'd be set!
Almond Brittle
*1 cup white sugar
*1/2 cup brown sugar
*1/2 cup butter
*3 tablespoons water
*3 cups whole almonds (or use 3 cups peanuts)

1. In a deep, heavy-bottomed saucepan, heat the sugars, butter, and water. Stir the mixture constantly to prevent scorching. Using a candy thermometer and medium heat, bring the mixture to 300 degrees. Do not stir. The temperature will rise as the water is boiled off, and this can happen quickly, so be prepared to lower the heat or remove the candy from the heat as needed.
2. As soon as the mixture reaches the desired temperature, remove it from the stove and add the nuts. Mix until all nuts are coated. Pour the nut mixture onto a greased cookie sheet and separate the nuts. Let cool for at least 15 minutes, then break into pieces.

Wednesday, March 10, 2010

King Arthur Brownies

My BF tells me that I quantify things too much. Maybe he's right. Maybe it has something to do with my mathematics background, but there is definitely something that just feels right about quantifying things, especially when it comes to food.

After preparing a bunch of different dishes for dinner, my first instinct is to mentally rank them, and then of course, to ask him to rank them. Whenever we go out to eat or even attend dinner parties, I mentally rate everything I taste, and then of course, ask him to do the same. I also keep several mental lists: favorite restaurants, favorite types of cuisines, favorite savory foods, and my favorite favorites list: desserts. Unfortunately, this is a difficult list to maintain because it changes frequently and often based on my moods (certain times of the month,etc.). Often times, I find two contenders on this list battling it out for first place: chocolate cupcakes and the ever-popular chocolate brownies. They both hold a special place in my heart, but today brownies is number 1 on my list.


I am definitely a chewy fudgy brownie person. To me, the fate of a cakey brownie is to be melted down, combined with more butter and chocolate and turned into a chewy fudgy brownie. I have tried a few brownie recipes including Dorie Greenspans classic brownies (me likey!) and another recipe I have taped to my cabinet (no joke) but forgot where I got it from. This time I decided to try the highly coveted King Arthur Flour brownies.
The verdict? These brownies get an A (here's me quantifying again) for texture: they were very chewy and fudgy and not at all gummy. Unfortunately, they get a B+ for flavor. To me, these brownies did not yield a profound chocolate flavor, I actually found the chocolate level to be rather mild and disappointingly flat. I thought that they would improve over time, but 2 days later they were still a bit disappointing. Don't get me wrong -- they are not bad brownies, just not the sublime ones I was hoping for. Ok, so maybe it was my fault: I didn't add the optional espresso powder, and I'm not sure if the cocoa I used was Dutch processed. I will definitely try these brownies again with those changes, but next on my list is the Baked Brownie. If you've tried it, I'd love to hear how they turned out for you.
King Arthur's Fudge Brownies (adapted from here)
*1 cup (2 sticks) unsalted butter
*2 1/4 cups sugar
*4 large eggs
*1 1/4 cups Dutch-process cocoa
*1 teaspoon salt
*1 teaspoon baking powder
*1 teaspoon espresso powder, optional
*1 tablespoon vanilla extract
*1 1/2 cups all-purpose flour
*2 cups chocolate chips

1.Preheat the oven to 350°F. Lightly grease a 9" x 13" pan.
2. In a medium-sized microwave-safe bowl, or in a saucepan set over low heat, melt the butter, then add the sugar and stir to combine. Return the mixture to the heat (or microwave) briefly, just until it's hot (about 110°F to 120°F), but not bubbling; it'll become shiny looking as you stir it. Heating this mixture a second time will dissolve more of the sugar, which will yield a shiny top crust on your brownies.
3. While the sugar heats a second time, crack the 4 eggs into a bowl, and beat them with the cocoa, salt, baking powder, espresso powder, and vanilla till smooth.
4. Add the hot butter/sugar mixture, stirring until smooth.
5. Add the flour and chips, again stirring until smooth. Note: If you want the chips to remain intact in the baked brownies, rather than melting in, let the batter cool in the bowl for about 20 minutes before stirring in the chips.
6. Spoon the batter into a lightly greased 9" x 13" pan.
7. Bake the brownies for about 30 minutes, until a cake tester inserted into the center comes out clean, or with just a few moist crumbs clinging to it. The brownies should feel set on the edges, and the center should look very moist, but not uncooked. Remove them from the oven and cool on a rack before cutting and serving.