Saturday, June 26, 2010

Homemade Crème Fraîche

This will be a quick post with a simple recipe. Crème Fraîche is a thickened cream that has recently gotten much press throughout the food blogosphere. It is similar to sour cream, but less tangy with an amazing but subtle nuttiness. Grocery stores like to overcharge you for this stuff, which is silly to me, since it is very simple (and kind of fun) to make at home. After making this recipe and tasting how delicious the homemade version is, I will never consider buying this from a store.

I have also tried this other recipe that calls for heating the heavy cream, and it did not work for me. Instead of crème fraîche, I ended up with sour heavy cream - definitely not good eats. Below is the simplest recipe I have found for homemade crème fraîche, and it comes out beautifully. No heating, no fear of burnage, just mix, wait, and enjoy.

Homemade Crème Fraîche (from Dorie Greenspan)

1 cup heavy cream
1 tablespoon buttermilk or plain yogurt (I used yo

1. Put the cream and buttermilk or yogurt in a clean jar with a tight-fitting lid. Cover the jar and shake for a minute or so.
2. Put the jar on a counter in a warm location (I placed it on top of my water heater) and leave it for 12 to 24 hours, or until the cream thickens slightly.
3. When the cream thickens, place the jar in the refrigerator and let it chill for 1 day.

Monday, June 21, 2010

Applesauce Spice Cake

Can you tell I've had some free time on my hands? After making all the edits on my thesis, filling out a hundred forms about my graduate school experience, and setting up my meeting to officially submit my thesis (tomorrow at 10am!), I spent a few hours pimping up this blog. You like? Suggestions anyone?

I also thought and thought about what to write for this post. I know I have been trying to advocate local and seasonal recipes here on CCT, and as much as I try to eat locally and seasonally, I have a little confession everyone. Here goes...I eat apples. Every. Single. Day. Of the year. Just about. Fall? Yes, of course. Winter? Sure, cold storage apples are pretty awesome too. But then, I also eat apples in the spring...and summer (gasp!). Not sure why -- just trying to keep the doctor away, I guess.

And hence, the apples in the background of this picture. But here's the thing about this recipe...it doesn't call for apples, it calls for applesauce. So even if you abide by all the local and seasonal rules, you can still enjoy this cake all year long.

I'm not sure what prompted me to make this very autumn-esque cake in the middle of June. I was craving something sweet and spicy and nutty, and this just fit the bill. Maybe it was the countless number of yummy looking cake recipes I've been seeing on Grace's lovely site. Maybe I was just longing for Fall. Maybe I'm trying to use up what seems like hundreds of jars of Trader Joe's applesauce before I prepare for my big move across the country. Whatever the reason, I made this cake, and it made me happy.

Applesauce Spice Cake with Cream Cheese Frosting (adapted from Joy of Cooking, makes about 12 servings)

*This cake was very spicy and moist, but a bit dense. I think next time I will increase the oil to 1/2 cup and reduce the flour by about 1/4 cup.

For cake:
1 cup sifted all-purpose flour
1 cup sifted whole wheat flour
1 teaspoon baking soda
1 teaspoon ground cinnamon
1/2 teaspoon ground cloves
1/2 teaspoon ground allspice
1/2 teaspoon salt
1/3 cup oil (I used canola)
1 cup packed brown sugar
1 large egg
1/4 cup buttermilk or yogurt (I used a mix)
1 cup unsweetened applesauce
1 cup chopped walnuts

For Cream Cheese Frosting:
1 8oz package cream cheese
2 tablespoons softened butter
1 cup confectioners' sugar, sifted
1/2 teaspoon vanilla extract

To make cake:
1. Preheat oven to 350F. Grease and flour an 8-inch square baking pan.
2. In a large bowl, whisk together the sifted flours, baking soda, cinnamon, cloves, allspice, and salt.
3. In a separate bowl, using a mixer on high speed, beat together the oil and sugar for about 3 minutes.
4. Set the speed to low, and beat in the egg. Stir in the flour mixture in 3 parts, alternating with the applesauce. Do not overmix. Finally, stir in the walnuts.
5. Scrape batter into pan and spread evenly. Bake for 25-30 minutes or until a toothpick inserted into the center comes out clean. Once cool, top with cream cheese frosting.

To make frosting:
In a large bowl, cream together cream cheese and butter until creamy. Gradually beat in the sugar until smooth. Beat in vanilla extract.

Sunday, June 13, 2010

(Lighter) Spinach Artichoke Dip

I can't even remember the last time I've had spinach artichoke dip at a restaurant - it must have been at least 10 years ago. So I guess I can't completely attest that this version of the popular dip will be exactly like the kind you find at the restaurants, but I will say that this dip is truly delicious.

The flavors of this dip are so robust. The tart from the sour cream and the salty from the cheeses create a delicious contrast; the spinach and artichoke play so well together, you almost want to give them an award.

Below is my lightened version of this classic dip, which I think is just as good as the full-fat version. I say "lightened" instead of "light" because this dip is still rich, creamy, and cheesy. Use it as an accompaniment for bread, crackers, and carrot sticks, or do what I do: slather it on two pieces of good wholesome bread, add some sliced tomato, and call it lunch.

(Lighter) Spinach Artichoke Dip

* 1 1/2 cups thawed, chopped frozen artichoke hearts
* 1 cup thawed, chopped frozen spinach
* 1/2 cup sour cream (I use low-fat)
* 1/2 cup cream cheese, softened
* 1/4 cup grated Parmesan or Pecorino cheese (or combination of the two)
* 4 cloves garlic, chopped
* 1/2 cup grated mozzarella cheese

1. Preheat oven to 375 degrees F (190 degrees C).
2. In a 8x8 inch baking dish*, mix together artichoke hearts, spinach, sour cream, cream cheese, parmesan and pecorino cheese, and garlic.
3. Bake until heated through and bubbly, about 20 minutes.
4. Remove dish from oven and set oven to broil. Spread an even layer of mozzarella cheese over the top. Return to oven and broil until top is lightly browned and bubbly.
5. Cool for 5 minutes before serving.

*I baked this is a 8x8 inch dish and later transferred some to ramekins shown in the photos.

Wednesday, June 9, 2010

Whole Wheat Focaccia


I think I've had this blank document up for about 2 hours now, trying to write this post. In the meantime, I've read the news, listened to a Christmas song, bought new running sneakers, and watched an episode of Sex and City (why, oh why can't the movies be as good as the show??). But write this post I did not. So since I could not come up with anything to write, I decided to write about how I could not come up with anything to write.

Truth is, I think I'm all writed-out. Yesterday, after weeks months of writing, editing, writing, editing, and even more writing and editing, I FINALLY submitted my thesis. Hallelujah is all I can say. For now that is. Until my committee members read it, find a million things wrong with it, and ask me to re-write it, edit it, rewrite it and edit...(please pray for me that this doesn't happen).


I now have a new respect for book writers and editors. How do they do it? More times than I'd like to admit, I'd get ready to proofread, red pen in hand, only to find myself...asleep. Face down. On my thesis. With a red ink stain on my cheek.

Don't get me wrong, I am in no way putting down my writing or my research, it's all very interesting (to me at least), but I find few things more boring than reading and re-reading something that I have written, read and re-read about a gazillion times. I'm just saying.

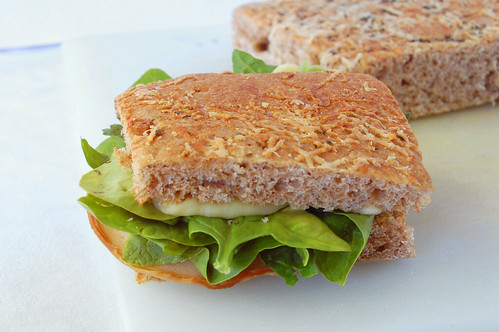
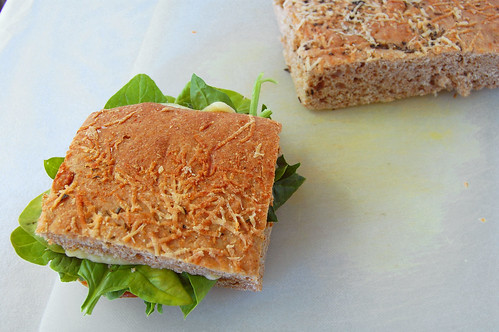
I have been wanting to post about this recipe for a while now - ever since Nancy was here (yes, that long!). It's probably the simplest yeast bread you can make and super tasty. The best thing about it, is the countless ways to flavor it with various combinations of herbs, cheese, and other fixin's: thyme and roasted garlic, caramelized onions and gruyere, or whatever else you fancy. This bread is a palette for your culinary imagination. Start painting!


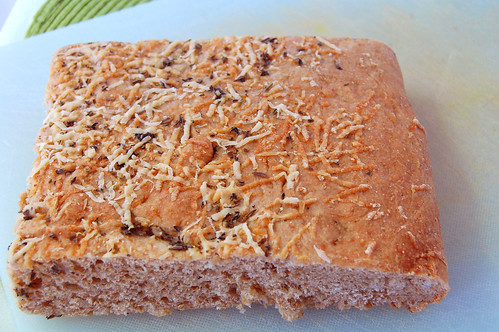
Whole Wheat Focaccia Bread (adapted from allrecipes)

1 tablespoon honey
2 cups warm water
1 tablespoon active dry yeast
1 tablespoon kosher salt
1 tablespoon extra-virgin olive oil
1/2 cup diced onion

3 cups all-purpose flour, plus a bit more as needed
2 cups whole wheat flour
3 tablespoons extra-virgin olive oil
2 tablespoons fresh chopped rosemary
1/4 cup freshly grated Parmesan cheese
1 tablespoon kosher salt

1. In a large bowl, dissolve honey in the warm water, then sprinkle yeast over the top. Let stand for 5 minutes until the yeast softens and begins to foam. Stir in 1 tablespoon of salt, 1 tablespoon olive oil, onions, and flour and form into a dough. Knead on a well floured surface until smooth and elastic, about 5 minutes.
2. Lightly oil a large bowl, place the dough in the bowl and turn to coat with oil. Cover with a damp cloth and let rise in a warm place until doubled in volume, about 20 minutes.
3. Preheat oven to 415 degrees F (215 degrees C).
4. Place dough onto oiled baking sheet, and flatten to cover the whole sheet evenly. Use the tips of your fingers to make indentations all over the dough spaced about 1 inch apart (I forgot to do this). Drizzle the focaccia with 3 tablespoons olive oil, then sprinkle rosemary, Parmesan cheese, and remaining 1 tablespoon of kosher salt over the top. Let rise for 10 minutes.
4. Bake in preheated oven 20 minutes until golden brown.
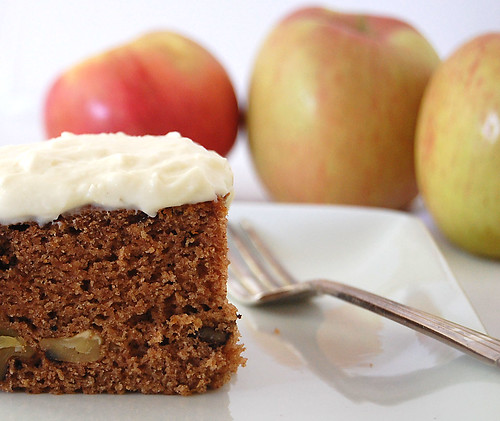