Showing posts with label Indian. Show all posts

Wednesday, April 28, 2010

Palak Paneer (Indian Spinach and Cheese)


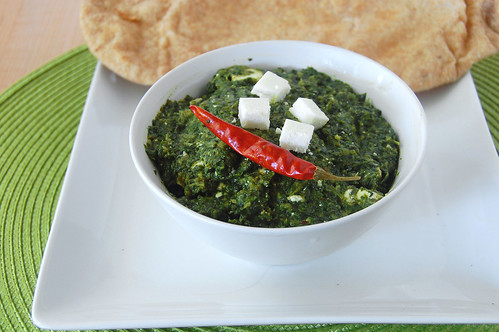
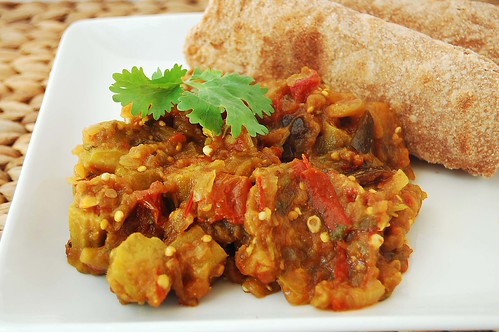
Palak Paneer. Funny sounding but yummy tasting. Palak paneer (or spinach and cheese) is a quintessential vegetarian dish of North India. It is the vegetarian dish that even meat-lovers crave. My mother makes some of the best palak paneer I have ever had. Unfortunately it is almost impossible to get the recipe from her since, well, she doesn't have one. Her technique is to add some of 'this' and 'that' until the taste and texture is perfect. Measurements are a mystery. See, my mother doesn't use measuring spoons for adding spices. I don't even think she uses spoons. She uses her hands and her fingers and her tastebuds. As I stand in my kitchen, measuring out ingredients, desperately trying to replicate her "recipes", I imagine what she'd think if she saw me there. She'd be proud for sure, but she'd probably be laughing too.


My (many) previous attempts to replicate her palak paneer have left me with a dish that was either too bitter, too sour, or lacking of a robust spinach flavor. Until now. This palak paneer has a great creamy spinach flavor, without the bitterness that many spinach dishes tend to have. The addition of spices also gives it a nice kick, so you know you're not just eating creamed spinach. The paneer is firm enough that it won't lose its form but soft enough that it almost melts in your mouth. I think Mama would approve.

Palak Paneer
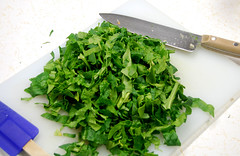
*10 cups of chopped fresh spinach or 10 oz of frozen spinach
*2 tablespoons tomato paste
*2 teaspoons grated ginger
*3 cloves garlic
*1 tablespoon oil
*1/2 teaspoon cumin seeds
*1/2 teaspoon caraway seeds
*1 teaspoon coriander powder
*1/2 teaspoon turmeric powder
*1/2 teaspoon red chili powder
*1 teaspoon sugar
*1/3 cup heavy cream or (not skim) milk
*2 tablespoons flour
*salt and pepper, to taste
*1 1/2 cups of paneer, cut into 1/2 inch cubes

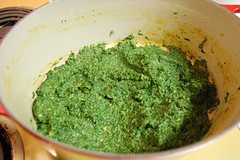
1. Place the spinach, tomato paste, ginger, and garlic in a food processor or blender and blend until smooth.
2. In a large pan, heat the oil until hot, then add the cumin and caraway seeds. Fry the seeds for about 30 seconds. Add the coriander, turmeric, and chili powder, and cook for about 2 minutes.
3. Add the spinach, sugar and milk. Stir to combine. Stir in the flour and season with salt and pepper. Cook, covered, for about 10 minutes.
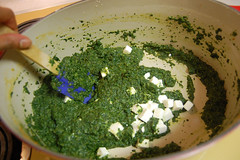
4. Remove from heat and (with a rubber spatula) gently fold in the the paneer.

Tuesday, April 27, 2010

Homemade Paneer


I have been meaning to post about making paneer pretty much since I started this blog, more than a year ago. Paneer is traditional Indian cheese, similar in taste and texture to ricotta. While ricotta is traditionally made from whey, paneer is made from the curds produced from adding an acid to boiling milk. It is a very mild cheese that is popular in many savory and sweet Indian dishes. It is also not very difficult to make at home.

Here are the two most helpful tips I can give about making paneer. (1) Milk is not as innocent as it seems: it can go from hot, to boiling to burnt in a matter of seconds. (2) To achieve a nice, firm, paneer like the kind you can buy in Indian grocery stores, you must drain out ALL of the water from the cheese. The easiest way is to press the paneer under heavy weight.

To prepare, place a colander lined with cheesecloth in the sink.
Then begin heating a gallon of milk in a large heavy-bottomed pan. The milk must be heated slowly and stirred constantly until it comes to the boil. Be very careful to heat the milk slowly, and stir constantly to prevent it from burning.
Once the milk reaches a boil, stir in a half cup of lemon juice or vinegar. The milk will immediately begin to separate into a liquid (whey) and curds. Continue stirring for another minute or two.

Now carefully pour the contents of the pot into the lined colander. Be very carefully since the liquid will be extremely hot. Every time I do this step, it breaks my heart a little to have to throw out the whey. But even after lots of google searching, I still have not found a use for it.
Rinse the paneer with a bit of cold water just so it is warm enough to handle. Then try to squeeze out as much of the liquid as you can using your hands.

The paneer needs to be drained of its liquid, and depending on how firm you'd like it, this could take anywhere from 2 hours to overnight. Most savory Indian dishes require a firm block of paneer, but many desserts call for a softer paneer that can be achieved with 2-3 hours of draining.
My go-to method for draining is to place the paneer (still in the cheesecloth) on a cutting board that is slighty hanging over the sink. Then on top, I place as much weight as possible as I can -- some iron skillets, cans of tomato sauces, textbooks that I don't feel like reading, etc.

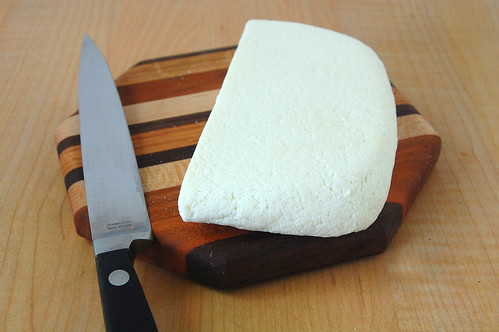
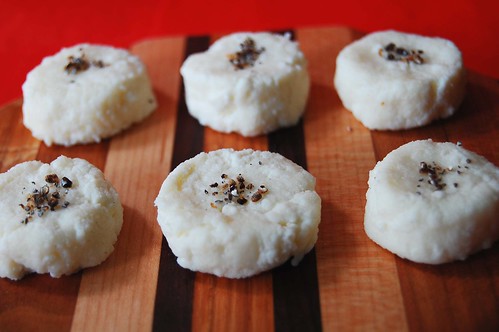
This is what the paneer should look like after being drained overnight. The texture will be just like the kind you find in the Indian grocery stores, but the taste will be at least 10 times better.


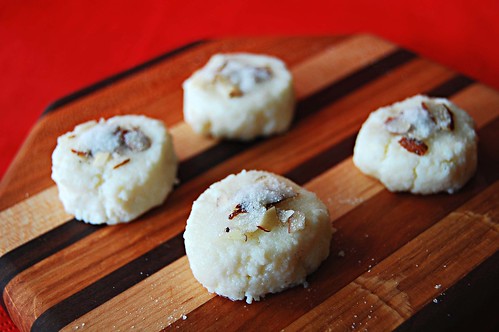
Here is what it looks like cut up. Anyone want to take a guess as to what I made with this?

Homemade Paneer

* 8 cups (half gallon) milk
* 1/2 cup lemon Juice or vinegar

1. Place a colander in the sink and line with a large piece of cheesecloth.
2. In a heavy bottomed pot, over medium heat, cook the milk, stirring occasionally, making sure not it does not burn.
3. As the milk comes to a boil, gradually stir in the lemon juice or vinegar. The curd will begin separating from the whey. Cook for an additional minute, then remove the pot from the heat.
4. Pour the liquid into the prepared colander. Wrap the curds in the cloth and gently rinse under cold water for a few seconds. Then, using your hands, squeeze the cloth to remove the excess water. This also helps to remove some of the sourness from the lemon juice/vinegar.
5. To drain the liquid, place the curds wrapped in the cheesecloth on a cutting board. Place a heavy pan (cast iron works well) on top. Then place a few cans in the pan. Drain for at least 2 hours and at most overnight. The longer the cheese is drained, the firmer the final product.

Friday, March 26, 2010

Sooji Halwa

"Everything in moderation, including moderation." --Julia Child

This is my favorite quote from one of my favorite chefs, and pretty much sums up my attitude towards food. Yes, I know that moderation is the key to staying healthy and still being able to enjoy rich foods and sweet desserts, and I'm all for it. But sometimes a girl (and by girl I mean me), just needs to sit down and pig out on dessert, and not feel like she's committed a sin. I know they say to eat until you are just satisfied, but sometimes I'm not satisfied until I know I'm over-satisfied. Sometimes I'm not full until I'm over-full. Sometimes moderation just does not cut it.

Sooji halwa is a very popular Indian dessert, often translated as 'semolina pudding'. It is the kind of dessert that you can eat a whole lot of without feeling the need to throw up or run a marathon afterward. It is light but extremely satisfying, sweet but not overly so, creamy but not too rich - all in all, the perfect dessert for assuaging all those sweet cravings that beg for more than just a few little bites.

Sooji Halwa (Semolina Pudding)
*1/4 cup butter
*1 cup semolina (cream of wheat)
*2 bay leaves
*1 cup sugar
*pinch of salt
*1/2 cup water
*1 cup milk
*1/8 teaspoon ground cardamon
*1/2 cup raisins
*1/2 cup chopped walnuts, almonds, pistachios, or cashews (or a combination)

1. In a large skillet (cast iron works well), melt the butter over medium heat.
2. Add the semolina and bay leaves, and cook for about 7-8 minutes until the semolina is reddish-brown in color but not burnt! Stir constantly, being careful not to burn it.
3. Add the sugar, and stir for about 15-20 seconds. Add the salt, water, milk, cardamom, raisins, and nuts, and stir for about 2 minutes. The mixture should still be somewhat wet.
4. Remove from heat and serve.

Wednesday, February 24, 2010

Indian Cauliflower Curry (Gobi) and Raita

OK, I feel so badly about not putting a recipe on yesterday's post, that I decided to do another post today complete with not just one, but TWO recipes (oooh, ah). I made this cauliflower (or gobi) curry along with the Chicken (and Chickpea) Makhani when my friend E was over.

I was very proud of this dish because in the past when I've tried to make this, it always ended up not as cauliflower curry, but more like cauliflower mush - curry flavored cauliflower mush, to be exact. But this time was different. I made sure not to cut the cauliflower too small, cooked it for much less time, and tah dah! -- curry not mush. Woot!

What's the white stuff on top you ask? It is a Indian yogurt-based sauce called raita. It is traditionally used as a dip but I say dip shmip; I eat this stuff with just about everything. It has a mild tang that complements the heat of many Indian dishes, and it is served cold as to complement the heat (different "heat" this time) of many Indian dishes. Try it with the Makhani too. It won't disappoint.

Cauliflower Curry

*2 tablespoons olive oil
*1 large onion, chopped
*1 large head of cauliflower, chopped into 3 inch pieces
*3 cloves garlic, chopped
*1 cup water
*1 teaspoon fresh grated ginger
*1 teaspoon cumin
*1 tablespoon + 1 teaspoon tumeric powder
*1/2 teaspoon coriander
*1/4 teaspoon (or more if you can handle it) crushed red pepper
*1/2 teaspoon sugar
*1 1/2 cups fresh or frozen peas (I used frozen; if using frozen, do not thaw)
*salt, pepper to taste

1. Heat oil in a large skillet. Add onions and cook until softened. Add garlic and cook for about 1-2 minutes. Add water, and stir in ginger, cumin, tumeric, and coriander, and red pepper. Cook for about 3-4 minutes. Pour contents of skillet into a separate bowl. Do not discard any remnants in the skillet.
2. Add the cauliflower to the same skillet and cook for about 4-5 minutes, stirring occasionally. Pour in the water mixture and stir to coat the cauliflower evenly. Cover and cook for about 7-8 minutes until the cauliflower is softened.
3. Stir in the sugar and peas. Add salt and pepper to taste.

Raita
* 1 cup plain yogurt
*1 tablespoon water
*1/2 large cucumber chopped
*1/4 red onion, finely diced
*1/2 teaspoon cumin
*1/2 teaspoon salt (or more if you like)
*couple of grinds of fresh ground pepper

In a medium sized bowl, mix together yogurt and water until smooth. Stir in remaining ingredients.

Wednesday, February 17, 2010

Easy Chicken Makhani

Last weekend a friend of mine (hi E!) came over for dinner. The plan was to cook some Indian dishes together so she could learn some new things about preparing Indian food. Unfortunately, I think I am about the worst person to learn from in the kitchen. I could never have my own cooking show (as much as I like to pretend that I already do) because I rarely have any idea what I'm doing. Mostly, I just add ingredients and taste along the way. I never make a dish without tasting it about a gazillion times in the process. I never make one of those meals where you have the first bite and say "WOW. I can't believe this is so good." Because before I sit down to eat, I already know how good it is or how much it sucks. Of course, this is definitely not true for baking. But that's another story.

Since I'm pretty sure that E learned nothing from our cooking "class", I am dedicating this post to her -- complete with actual recipes for some of the dishes we made.

The first recipe is for Chicken Makhani - a popular north Indian dish of chicken cooked in a creamy tomato sauce. Traditionally this dish is rather artery-clogging, so I lighten it up a bit by using milk and yogurt to replace most of the cream. I also made a vegetarian version for myself, using chickpeas instead of chicken - chickPEAS, chickEn - they're practically the same thing, no?

Chicken Makhani

For chicken
*1 Tb butter
*1 Tb olive oil
*2 lbs, boneless skinless chicken breasts, cubed (see below for vegetarian version)**
*1 onion, sliced
*4 cloves garlic, chopped
*1 teaspoon fresh grated ginger
*1 tablespoon cumin
*1 teaspoon coriander
*2 teaspoons paprika
*1 teaspoon garam masala (how to make your own)
*2 teaspoons crushed red pepper

For sauce
*2 cups tomato puree
*2 Tablespoons milk
*1/4 cup plain yogurt
*1 tablespoon heavy cream
*1 or 2 dried chili peppers (optional)
*1 tablespoon sugar
*salt, to taste

Directions:
1. In a large pan, melt the butter and heat the oil. Add onions and cook until slightly softened.
2. Add the chicken and cook for 3-4 minutes. Add garlic, ginger, cumin, coriander, paprika, garam masala, and crushed red pepper, and continue cooking chicken until outsides are browned (chicken will finish cooking later in the sauce). Remove just the chicken pieces from pan (LEAVE onions, garlic, and spices).
3. In the same pan, add tomato puree, milk, yogurt, and cream. Cook over low-medium heat for about 5 minutes. Return chicken back to pan along with the dried chilis, sugar, and 1-2 teaspoons of salt. Cook for an additional 8-10 minutes until chicken is completely cooked.

**For vegetarian version, substitute chicken with 2-3 cups (depending on how saucy you like it) cooked chickpeas. Follow step 1 above. Add garlic, ginger, and all spices. Cook for 3-4 minutes. Follow step 3 above adding the chickpeas instead of chicken.

Monday, August 24, 2009

Indian Chickpea Curry (Chole)


Here is Part III of my Indian Menu: Indian Chickpea Curry aka Chole.
Chole is a very simple, tasty, and healthy Indian dish made from chickpeas and tomatoes and flavored with all sorts of traditional Indian spices. It is very good served with some Indian bread (rotis or naan) or simply rice. The flavors in this dish are so delicious that you won't miss all the cream and butter found in many other Indian dishes. Plus it takes about 30 minutes to make! No joke. This stuff is the bomb.

Indian Chickpea Curry(Chole)
  • 4 medium tomatoes
  • 2 teaspoons peeled and grated fresh ginger
  • 1 teaspoon chopped garlic
  • 3 small green chilies
  • 1 tablespoon olive oil
  • 1 teaspoon cumin seeds
  • 6 bay leaves
  • 1 tablespoon flour
  • 1 teaspoons coriander powder
  • 1 teaspoon turmeric
  • 1 teaspoon red chili powder
  • 3 cups (2 15 oz cans) of cooked chickpeas/Garbanzo beans
  • 1 2/3 cup water
  • 1 1/2 teaspoons salt
  • freshly ground pepper
1. Blend the tomatoes, ginger, garlic, and chiles to make a puree.
2. Heat the oil and lightly fry the cumin seeds and bay leaves for
about 1 minute over medium heat. Add the flour and stir fry until lightly browned.
3. Add the tomato puree, coriander, tumeric, and chili powder, and let cook over for about 5 minutes.
4. Add the chickpeas and water, and let cook, covered, for about 10 minutes.

Thursday, August 20, 2009

Indian Eggplant and Okra Curry

Note to self: I do not have the photography skills to make eggplant curry look good. And actually, that is really sad, because this stuff was sooo good. Out of all the Indian dishes I cooked up last weekend, this was probably my favorite. I bought the eggplant and the okra for 5 bucks (yes $5 TOTAL at the farmers market) and the tomatos were from my own garden. Now how's that for eating local?
I've made an eggplant and tomato curry a few times in the past since I really like that combo, but this time I decided to add in fresh okra. I'm so glad I did too. It really adds a nice flavor and more so an awesome texture to this curry. And guess what? My okra wasn't slimy! For reals!! I really thought it would be, and I was almost expecting it, preparing myself, being ready for it. But I read some tips online and somehow I was able to achieve the deliciousness of okra without the slime. Woot! Don't believe me? Try this recipe. And make it look pretty, and take a picture, and send it to me!

I think the tricks to cooking okra slime-free are (1) use fresh okra, when possible (I've made this recipe with frozen okra in the past and noticed it was definitely slimier) (2) be as gentle as possible when cooking it. Stirring it around like crazy will only bring out more slime, and (3) add an acidic ingredient (eg. tomatoes) to the recipe if possible -- something in the acid helps cut down the slime (don't you just love my very scientific explanations for things).

Indian Eggplant and Okra Curry
  • 2 Tb olive oil
  • 1/2 tsp cumin seeds
  • 1 large eggplant, chopped into 1 inch cubes
  • 5 medium tomatoes, chopped
  • 1 tsp tumeric
  • 1/4 tsp cumin
  • 1/4 tsp coriander
  • 1 1/2 lb okra, trimmed and chopped into 1 inch pieces
  • 2 handfuls of cilantro, chopped
  • salt and pepper, to taste
1. In a large pot, fry the cumin seeds in the olive oil over low heat.
2. Increase the heat, add the eggplant, and let cook for about 10-15 minutes just until it begins to soften.
3. Add the tomatoes and cook for another 10-15 minutes.
4. Add the tumeric, cumin, red pepper, and coriander, and stir the mixture.
5. Add the okra and stir gently so as not to break the pieces. Let cook for 8 minutes.
6. Stir in the cilantro and salt and pepper to taste.

Monday, August 17, 2009

Indian-Style Zucchini Patties with Tamarind Chutney


I'm back! Finally! Things have been pretty hectic this summer since I'm commuting home every weekend from my internship. The little time I've had on the weekends does not want to be spent cooking. So although I neglected my kitchen (and my blog) for a few weeks, last weekend, a sudden cooking urge came over me. So I threw on the old apron (yes, I wear one-I spill A LOT) and got to work. First, I noticed that the majority of the recipes on this site are desserts. Anyone else notice that? Although desserts do make a hefty portion of my diet (chocolate IS a food group, no?), I felt the need to prove to the world or at least all my readers ( all 11 of you) that yes, I do eat other things -- actual non-desserts. Since I've been missing my mom's cooking, I planned a big fat Indian menu and gave myself the whole weekend to make them. Of course I was fooling myself because 2 days is definitely not enough time to prepare all the dishes I had in mind (or at least not enough time for someone as inefficient as I sometimes am in the kitchen). I literally finished cooking at 10pm on Sunday night, right before I took a nap on the kitchen counter.
So here is Part I of my Indian menu: Indian Style Zucchini Patties with Tamarind Chutney. In Bengali, these are called 'chops' (pronounced chawps) and they are usually deep fried in oil. Sorry to mess with tradition, but something was calling me to try baking these. So I made up a batch of the patties, baked half of them (the ones in the photo are baked), and fried the rest. Both were very tasty. Of course the fried ones were a bit more indulgent, but the baked ones were just as satisfying.

Indian-Style Zucchini Patties (makes about 10 patties)

  • 3 medium zucchini, grated and drain (drain by wrapping grated zucchini in paper towels and squeezing out the excess water)
  • 1/2 tsp red pepper (add less if you can't handle the heat)
  • 1/2 tsp cumin
  • 1/8 tsp cinnamon
  • 1/2 tsp coriander
  • salt and pepper to taste
  • 1 + 1/4 cup fresh breadcrumbs, divided
  • 1/4 cup water
  • 2 Tb cornstarch
  • oil for frying or baking (I used canola for frying, olive for baking)
1. Mix the grated zucchini, red pepper, cumin, cinnamon, coriander, salt, pepper, and 1/4 cup of breadcrumbs in one bowl.
2. Mix the 1/4 cup water and cornstarch in a separate bowl.
3. Form the zucchini mixture into small patties (about 1 heaping tablespoon each). Dip each pattie into the cornstarch mixture, then into the remaining 1 cup of breadcrumbs.
4. If baking: Generously (really generously -- I didn't put enough oil, and got some major pan stuckage) grease a large baking sheet. Gently brush both sides of each pattie with olive oil. Bake at 350 degrees for 10 minutes, or until the tops are browned. Then, flip each pattie over, and bake again for an additional 10 minutes.
5. If frying: Fry in oil about 2 minutes on each side or until browned.

Tamarind Chutney (makes about 1 cup)
  • 1/4 tsp cumin seeds
  • 2 Tb tamarind paste (available in International Markets)
  • 3 1/2 cup water
  • 2 Tb tomato paste
  • 1/2 cup sugar
  • 1/4 tsp cumin
  • 3/4 tsp red pepper
Fry the cumin seeds in a bit of oil. Add water and tamarind paste, and cook for about 45 min, until mixture is reduced to about 1 cup. Add the tomato paste, sugar, cumin, and red pepper. Mix well until all is dissolved.

I am submitting this recipe for Weekend Herb Blogging hosted by Prof. Kitty at The Cabinet of Prof. Kitty. Checkout the lovely photos of her garden!

Wednesday, May 27, 2009

Carrot Halwa

Every time I make an Indian dessert, I realize how different they are than most American desserts. For one thing, I don't know of any traditional Indian desserts that are baked -- most likely since back in the day, the typical Indian household didn't have an oven. This means almost all Indian desserts must be cooked on the stove, under a watchful eye, with a good deal of care and patience. Arrghh patience!! Patience -- or I guess impatience -- is the bane of my cooking life. But I will overcome. I will learn to be patient. Otherwise, I can say goodbye to homemade Indian desserts, and plenty of other culinary treats.

Carrot halwa is a sweet Indian dessert and a good recipe to test my patience. Although it does require a bit of stove top watching, it is a really easy recipe with only 6 ingredients.

I've only made it a few times and always following a recipe I found online. But I never achieved the tasty halwa I was wanting, UNTIL...last night -- when I decided to experiment with the recipe and try a few new things. The result was exactly what I was looking for -- a rich and creamy halwa that is not too sweet but very flavorful.

Carrot Halwa (serves 4)
  • 2 cups shredded carrot (about 5 medim-large carrots)
  • 2 cups 2% milk
  • 2 Tb ghee or butter (I made my own ghee: recipe here )
  • 1/2 tsp finely ground cardamom
  • 1/4 cup sugar
  • 4 Tb paneer or ricotta (I used ricotta, but I think paneer would be even better)
  • handful of chopped, roasted cashews (optional, but so good)
1. In a heavy bottom sauce pan, cook the carrots, milk, ghee (or butter), and cardamom, stirring occasionally, until the carrots have soaked up all the milk. This will take at least 30 minutes. Be very careful not to let the milk burn, stirring the mixture will help.
2. Remove from heat and stir in the sugar, paneer (or ricotta), and cashews.
3. Serve warm or when cooled.

Jasmines are very popular in India and fortunately they also grow in California. I picked these flowers from the jasmine bush in my garden.

Thursday, April 23, 2009

My Legume Love Affair: Chana Dal Burfi

I've finally decided to quit being a food blogging hermit and branch out to the rest of the food blogosphere. Here I am! This week I decided to participate in a food challenge presented by My Legume Love Affair. This month is hosted by Glamah from Coco Cooks (who btw has some amazing recipes on her blog, like Pumpkin and Coconut Samosas...I drooled a little bit just typing that) and the challenge is appetizers and desserts. Naturally, being Indian and all, I thought this would be a perfect opportunity to highlight the use of legumes in Indian desserts. Of course I forgot the fact that my mother's and grandmother's skills in preparing Indian desserts have apparently skipped a generation.

This recipe is for a a sweet, fudge-like dessert called burfi or barfi (I know the name doesn't sound appetizing, but trust me, it is so good!) I got the recipe from my mom, but being the pro that I am, I screwed it up. The results were still very good, of course not as good as mama's, but I'm not sure if they'll ever be.

Burfi is made with chana dal (the bf pronounces it 'china doll', which is wrong but kind of funny), a relative of the chickpea. I will post my mom's original recipe with notes on my screw-ups and desperate attempts to remedy them.


Indian Chana Dal Burfi

  • 1/2 c chana dal
  • 1/2 c water mixed with 1 Tb oil (I forgot the oil)
  • 1/2 cup milk
  • 1 Tb oil (I used peanut)
  • 2 Tb butter
  • 1 tsp freshly ground cardamom
  • 1/2 cup sugar (I used 1/4 cup white, 1/4 cup brown)
  • about 2 Tb non fat dry milk powder
  • 1/2 cup roasted pistachios (my addition)
1. Soak chana dal in 1/2 cup of water overnight.
2. After dal has soaked, boil the dal in the same water. When the water starts to boil, lower heat to a simmer. Cook the dal until it is soft enough to mash with your fingers. Once ready, use the bottom of an empty jar (or your hands) to mash the dal. (This is where I messed up -- I drained the water out and mashed the dal without the water. I had to compensate much later on by adding more water).
3. In a separate pan, heat 1 Tb of oil and 1 Tb of butter. Add the dal, milk, and cardamom. Cook over medium low heat, being careful not to burn the milk, for about 10 minutes.
4. Add the sugar, non-fat dry milk powder, and
pistachios, and stir. The mixture should be thick. Add more non fat dry milk if necessary to thicken to a paste-like consistency.
5. Pour the mixture into a dish or pan and allow to cool for at least 2 hours.


Saturday, March 21, 2009

Indian Sandesh

Spring is here.
These cherry blossoms were blooming right outside of the building where my lab is.


And in another part of town (aka my kitchen) something else was blooming (sort of).

Ok, so they may not be as pretty as those cherry blossoms but they sure taste better.
These little blossoms are called sandesh, a really simple Indian dessert made from paneer. Paneer is an Indian cheese that's made by boiling milk, adding lemon juice, and then straining the curds that are produced.
I made these desserts with homemade paneer, which is actually really simple to make. No paneer tutorial this time, but I promise there will be one here soon.

I sprinkled a bit of sugar on them and took this picture -- oh, and I also ate two of them.

You can usually buy blocks of paneer from Indian grocery stores. If you use this kind, just use your hands to crumble it up first.

Sandesh
  • 1 cup paneer, crumbled
  • 1/2 cup sugar
  • 2 tsp freshly ground cardamom
  • 1 Tb almond pieces
Using a potato masher or your hands, mash the paneer and sugar together. Shape into rounds. Sprinkle with cardamom, almond, and extra sugar. Chill for 1 hour.