
One of the most rewarding perks of living in California is the amazing produce we can get pretty much all year round. Many Californians are fortunate enough to have year-long farmers markets that are fully stocked with fresh and local fruits and vegetables. So it's not surprising that one of my main goals for this blog was to post recipes for foods prepared with these seasonal ingredients. Sounds simple right? Maybe for some, but for me? Not so much. Things come up. Interviews, presentations, deadlines. A certain advisor sends a certain angry email regarding a certain thesis that should have been finished some three weeks ago. See, things come up, and although I made this cassoulet a while back, when it was more probable to find fresh local leeks, here I am weeks later finally posting about it, and guess what?...my thesis is
still not done (ssh...don't tell the advisor!)
I have been fascinated by cassoulets ever since I saw a Julia Child recipe in her
Menu Cookbook. Julia's recipe is definitely not for the faint of heart. It requires 3 types of meat- pork, sausage, and goose (I'm not even sure I know
where to buy goose from). The recipe also states that it requires more than 4 hours of cooking time (plus more for preparation). That's the required time for
normal people, so for someone like me, this recipe would take oh, roughly...4 days. Yup, that sounds about right.
One of these days (I'm thinking maybe sometime around retirement?) I'll try Julia's recipe, but until then I will definitely be making this simpler vegetarian version often. It takes about 2 1/2 hours from start to finish - including preparation (and yes, even for me!) and is so delicious and hearty that even my carnivorous BF didn't miss the meat. Although I'm sure a few chunks of chicken or
sausage wouldn't hurt a thing, and would certainly bring you one tiny step closer to Julia's version.
Vegetarian Cassoulet (adapted from
Smitten Kitchen and
Gourmet)
For cassoulet:
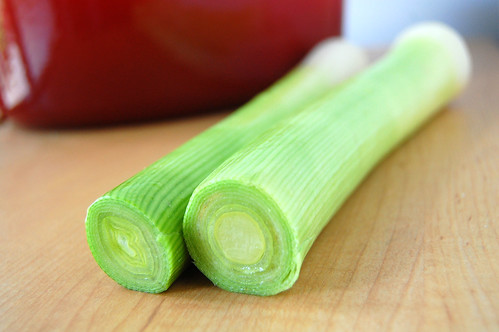
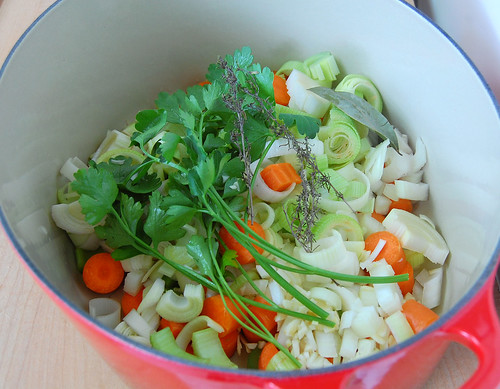
2 medium leeks (spring leeks work well, white and pale green parts only)
1/2 large onion, diced
4 medium carrots, halved lengthwise and cut into 1-inch-wide pieces
3 celery ribs, cut into 1-inch-wide pieces
4 garlic cloves, chopped
1/4 cup olive oil
4 thyme sprigs (I used home-dried thyme sprigs)
4 parsley sprigs
2 Turkish or 1 California bay leaf
1/8 teaspoon ground cloves
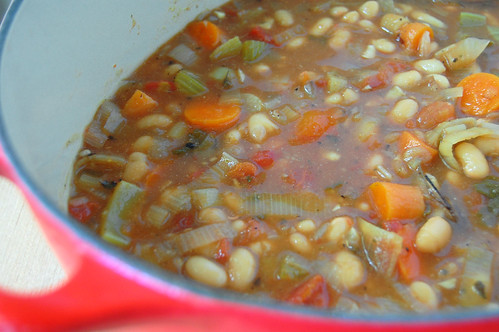
3 (19-ounce) cans cannellini or Great Northern beans, rinsed and drained or 4 1/2 cups cooked dried beans
1 19-ounce can diced tomatoes, with their juice
3 tablespoons tomato paste
1 quart vegetable broth
For garlic crumbs
4 cups coarse fresh bread crumbs
1/3 cup olive oil
1 tablespoon chopped garlic
1/4 cup chopped parsley
To make cassoulet:
Halve leeks lengthwise and cut crosswise into 1/2-inch pieces, then wash well and pat dry.
1. Cook leeks, onion, carrots, celery, and garlic in oil with herb sprigs, bay leaves, cloves, and 1/2 teaspoon each of salt and pepper in a large heavy pot over medium heat, stirring occasionally, until softened and golden, about 15 minutes.
2. Stir in beans, tomatoes, tomato paste, then stock, and simmer, partially covered, stirring occasionally, until carrots are tender but not falling apart, about 30 minutes.
To make garlic crumbs while cassoulet simmers:
Preheat oven to 350°F.
Toss bread crumbs with oil, garlic, and 1/4 teaspoon each of salt and pepper in a bowl until well coated. Spread in a baking pan and toast in oven, stirring once halfway through, until crisp and golden, 12 to 15 minutes. Cool crumbs in pan, then return to bowl and stir in parsley.
To finish cassoulet:
Discard herb sprigs and bay leaf. Mash some of beans in pot with a potato masher or back of a spoon to thicken broth. Season with salt and pepper. Just before serving, sprinkle with garlic crumbs.

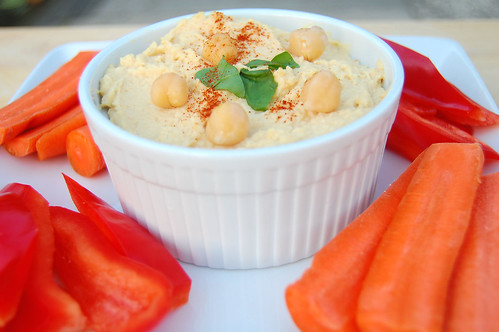 Homemade Hummus. Did you see this coming? After making tahini sauce, it was only natural to use it in a hummus recipe.
 The measurements here are estimates. The great thing about this recipe is you can add more of this and less of that depending on your tastes. Add some heat with a bit of cayenne, richness with more oil, or (my favorite) an extra kick with more garlic. Mmm...garlic breath.
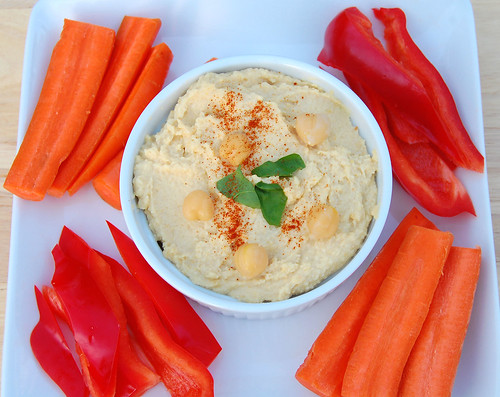 Hummus Recipe (adapted from Simply Recipes, makes about 2 cups)

