Showing posts with label cheese. Show all posts

Sunday, June 13, 2010

(Lighter) Spinach Artichoke Dip

I can't even remember the last time I've had spinach artichoke dip at a restaurant - it must have been at least 10 years ago. So I guess I can't completely attest that this version of the popular dip will be exactly like the kind you find at the restaurants, but I will say that this dip is truly delicious.

The flavors of this dip are so robust. The tart from the sour cream and the salty from the cheeses create a delicious contrast; the spinach and artichoke play so well together, you almost want to give them an award.

Below is my lightened version of this classic dip, which I think is just as good as the full-fat version. I say "lightened" instead of "light" because this dip is still rich, creamy, and cheesy. Use it as an accompaniment for bread, crackers, and carrot sticks, or do what I do: slather it on two pieces of good wholesome bread, add some sliced tomato, and call it lunch.

(Lighter) Spinach Artichoke Dip

* 1 1/2 cups thawed, chopped frozen artichoke hearts
* 1 cup thawed, chopped frozen spinach
* 1/2 cup sour cream (I use low-fat)
* 1/2 cup cream cheese, softened
* 1/4 cup grated Parmesan or Pecorino cheese (or combination of the two)
* 4 cloves garlic, chopped
* 1/2 cup grated mozzarella cheese

1. Preheat oven to 375 degrees F (190 degrees C).
2. In a 8x8 inch baking dish*, mix together artichoke hearts, spinach, sour cream, cream cheese, parmesan and pecorino cheese, and garlic.
3. Bake until heated through and bubbly, about 20 minutes.
4. Remove dish from oven and set oven to broil. Spread an even layer of mozzarella cheese over the top. Return to oven and broil until top is lightly browned and bubbly.
5. Cool for 5 minutes before serving.

*I baked this is a 8x8 inch dish and later transferred some to ramekins shown in the photos.

Wednesday, April 28, 2010

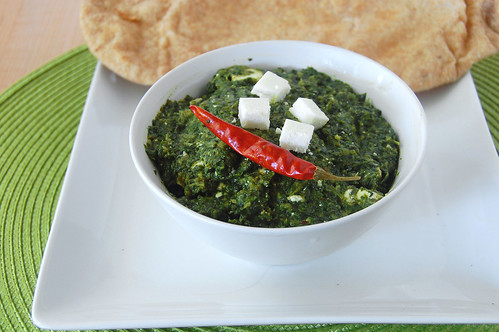
Palak Paneer (Indian Spinach and Cheese)


Palak Paneer. Funny sounding but yummy tasting. Palak paneer (or spinach and cheese) is a quintessential vegetarian dish of North India. It is the vegetarian dish that even meat-lovers crave. My mother makes some of the best palak paneer I have ever had. Unfortunately it is almost impossible to get the recipe from her since, well, she doesn't have one. Her technique is to add some of 'this' and 'that' until the taste and texture is perfect. Measurements are a mystery. See, my mother doesn't use measuring spoons for adding spices. I don't even think she uses spoons. She uses her hands and her fingers and her tastebuds. As I stand in my kitchen, measuring out ingredients, desperately trying to replicate her "recipes", I imagine what she'd think if she saw me there. She'd be proud for sure, but she'd probably be laughing too.


My (many) previous attempts to replicate her palak paneer have left me with a dish that was either too bitter, too sour, or lacking of a robust spinach flavor. Until now. This palak paneer has a great creamy spinach flavor, without the bitterness that many spinach dishes tend to have. The addition of spices also gives it a nice kick, so you know you're not just eating creamed spinach. The paneer is firm enough that it won't lose its form but soft enough that it almost melts in your mouth. I think Mama would approve.

Palak Paneer
*10 cups of chopped fresh spinach or 10 oz of frozen spinach
*2 tablespoons tomato paste
*2 teaspoons grated ginger
*3 cloves garlic
*1 tablespoon oil
*1/2 teaspoon cumin seeds
*1/2 teaspoon caraway seeds
*1 teaspoon coriander powder
*1/2 teaspoon turmeric powder
*1/2 teaspoon red chili powder
*1 teaspoon sugar
*1/3 cup heavy cream or (not skim) milk
*2 tablespoons flour
*salt and pepper, to taste
*1 1/2 cups of paneer, cut into 1/2 inch cubes

1. Place the spinach, tomato paste, ginger, and garlic in a food processor or blender and blend until smooth.
2. In a large pan, heat the oil until hot, then add the cumin and caraway seeds. Fry the seeds for about 30 seconds. Add the coriander, turmeric, and chili powder, and cook for about 2 minutes.
3. Add the spinach, sugar and milk. Stir to combine. Stir in the flour and season with salt and pepper. Cook, covered, for about 10 minutes.
4. Remove from heat and (with a rubber spatula) gently fold in the the paneer.

Tuesday, April 27, 2010

Homemade Paneer


I have been meaning to post about making paneer pretty much since I started this blog, more than a year ago. Paneer is traditional Indian cheese, similar in taste and texture to ricotta. While ricotta is traditionally made from whey, paneer is made from the curds produced from adding an acid to boiling milk. It is a very mild cheese that is popular in many savory and sweet Indian dishes. It is also not very difficult to make at home.

Here are the two most helpful tips I can give about making paneer. (1) Milk is not as innocent as it seems: it can go from hot, to boiling to burnt in a matter of seconds. (2) To achieve a nice, firm, paneer like the kind you can buy in Indian grocery stores, you must drain out ALL of the water from the cheese. The easiest way is to press the paneer under heavy weight.

To prepare, place a colander lined with cheesecloth in the sink.
Then begin heating a gallon of milk in a large heavy-bottomed pan. The milk must be heated slowly and stirred constantly until it comes to the boil. Be very careful to heat the milk slowly, and stir constantly to prevent it from burning.
Once the milk reaches a boil, stir in a half cup of lemon juice or vinegar. The milk will immediately begin to separate into a liquid (whey) and curds. Continue stirring for another minute or two.

Now carefully pour the contents of the pot into the lined colander. Be very carefully since the liquid will be extremely hot. Every time I do this step, it breaks my heart a little to have to throw out the whey. But even after lots of google searching, I still have not found a use for it.
Rinse the paneer with a bit of cold water just so it is warm enough to handle. Then try to squeeze out as much of the liquid as you can using your hands.

The paneer needs to be drained of its liquid, and depending on how firm you'd like it, this could take anywhere from 2 hours to overnight. Most savory Indian dishes require a firm block of paneer, but many desserts call for a softer paneer that can be achieved with 2-3 hours of draining.
My go-to method for draining is to place the paneer (still in the cheesecloth) on a cutting board that is slighty hanging over the sink. Then on top, I place as much weight as possible as I can -- some iron skillets, cans of tomato sauces, textbooks that I don't feel like reading, etc.

This is what the paneer should look like after being drained overnight. The texture will be just like the kind you find in the Indian grocery stores, but the taste will be at least 10 times better.


Here is what it looks like cut up. Anyone want to take a guess as to what I made with this?

Homemade Paneer

* 8 cups (half gallon) milk
* 1/2 cup lemon Juice or vinegar

1. Place a colander in the sink and line with a large piece of cheesecloth.
2. In a heavy bottomed pot, over medium heat, cook the milk, stirring occasionally, making sure not it does not burn.
3. As the milk comes to a boil, gradually stir in the lemon juice or vinegar. The curd will begin separating from the whey. Cook for an additional minute, then remove the pot from the heat.
4. Pour the liquid into the prepared colander. Wrap the curds in the cloth and gently rinse under cold water for a few seconds. Then, using your hands, squeeze the cloth to remove the excess water. This also helps to remove some of the sourness from the lemon juice/vinegar.
5. To drain the liquid, place the curds wrapped in the cheesecloth on a cutting board. Place a heavy pan (cast iron works well) on top. Then place a few cans in the pan. Drain for at least 2 hours and at most overnight. The longer the cheese is drained, the firmer the final product.

Thursday, December 10, 2009

Homemade Mascarpone

As part of last month's Daring Bakers challenge, I made mascarpone cheese to fill my cannoli. Homemade mascarpone is really simple, and I think much simpler than homemade paneer (or ricotta). The reason is that mascarpone is made with heavy cream (as opposed to whole milk) so it is much more resilient to heat. The first time I made paneer I burned a whole gallon of milk. Not fun.

These pictures are not so good as I made this at night, but hopefully they will explain the process.

You start with some heavy whipping cream and heat it in a double boiler (I use a make-shift double boiler by placing one saucepan on top of another) until it reaches 190F degrees (this took about 25 minutes for me):

In case you're wondering, yes, that is a thermometer clipped on with a clothespin (the BF's idea). Once the cream reaches 190F degrees, add fresh lemon juice and stir. The cream will eventually thicken, enough so that it coats the back of a wooden spoon:

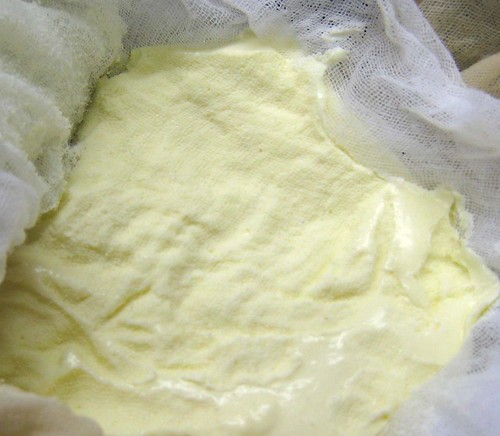
Let the cream cool for about 20 min. Then pour it in a sieve lined with cheesecloth, and refrigerate. Before the refrigeration, the cream is still well, creamy, and not as thick as you would expect a cheese to be, but don't fret. Refrigeration is key - after a night of refrigeration, you will have mascarpone. And it will taste divine!
Homemade Mascarpone (adapted from Baking Obsession)
Makes about 12 oz
  • 500 ml whipping (36 %) pasteurized (not ultra-pasteurized), preferably organic cream
  • 1 tbsp fresh lemon juice

1. Prepare a double boiler OR make your own by placing about 1-2 inches of water in a saucepan, then placing another saucepan (or bowl) inside the first. The bottom of the second saucepan should NOT be touching the water.

2. Bring the water to a boil, then reduce the heat to medium-low so the water is barely simmering. Pour the cream into the top saucepan.

3. Heat the cream, stirring often, to 190 F. It will take about 25-30 minutes.

4. Add the lemon juice and continue heating the mixture, stirring gently, until the cream curdles. Do not expect the same action as you see during ricotta cheese making. All that the whipping cream will do is become thicker. It will cover a back of your wooden spoon thickly.

5. Remove the top saucepan from from the water and let cool for about 20 minutes.

6. Meanwhile, line a sieve with four layers of dampened cheesecloth and set it over a bowl. Transfer the mixture into the lined sieve. Do not squeeze the cheese in the cheesecloth or press on its surface (be patient, it will firm up after refrigeration time). Once cooled completely, cover with plastic wrap and refrigerate (in the sieve) overnight or up to 24 hours.