Showing posts with label vegetables. Show all posts

Wednesday, May 26, 2010

Panzanella Salad


My lovely readers, I know I have been away for a while. I have been traveling on a road trip for the last week with no internet access and therefore have been unable to update this site and read up on all my favorite blogs. I finally have internet access (woot!) now and I promise I will catch up on all the posts I have missed.

I also have some news...I got a job! Yes, in a few months, I will be finishing up graduate school and moving to the Midwest to teach at a small liberal arts college. I am excited and terrified at the same time. Happy and sad. Relieved and nervous. I'm definitely feeling a mix of emotions right now and this is only the start. It is crazy for me to think about how remarkably different my life will be in a few months, how so many changes are about to take place. And as excited as I am about this opportunity, I sometimes wish things wouldn't change.

I've spent the last 5 years of my life in California, and although I'm ready for a change, I know there are many things I will miss about this place. I've mentioned before how great the local farmer's market is here, and I feel almost at a loss when I think about not being able to have fresh and local produce all year long. The best thing about this farmer's market is the variety of produce stands avaialble. Sure there are the ridiculously pricey vendors who try to sell you a tiny basket of organic strawberries for $7, but there are also several vendors that sell pesticide-free produce at prices that are reasonable even for a cheap and poor graduate student like me.

Shopping at the farmer's market gives me opportunities to make things like this panzanella salad which was inspired by one of my favorite food sites. The original recipe called for asparagus and leeks, but I substituted spring garlic for the leeks and added fava beans. That is the beauty of this salad. It can be easily tweaked to accommodate whatever vegetable you're craving or, in my case, happens to be on sale!

Spring Panzanella Salad (adapted from Smitten Kitchen)
For the croutons:
1/4 cup olive oil
2 cloves garlic, finely chopped
5 cups day-old bread, crust removed, cubed (I used whole wheat)
6 tablespoons finely grated Parmesan or Pecorino cheese
Salt and freshly ground black pepper

For the vinaigrette:
Half a red onion, finely diced
2 to 2 1/2 tablespoons red wine vinegar
Juice of half a lemon
1/4 cup olive oil
1/2 teaspoon Dijon mustard

For the salad:
2 cups shelled fava beans (from about 2 lbs of unshelled beans), steamed or blanched
1 pound asparagus, cut into 1 inch pieces
2 bulbs spring garlic (optional)
1 19-ounce can of white beans, rinsed and drained or 1 1/2 cups cooked white beans

Preheat oven to 400°F.

To make bread cubes:
Mix the bread cubes with the garlic, olive oil, cheese, salt and pepper in a large bowl. Toss to coat well. Transfer bread to a baking sheet and sprinkle with salt and pepper. Bake stirring once or twice, until the croutons are crisp and lightly colored on the outside but still soft within, about 10 to 15 minutes. Set aside and let cool.

To make vinaigrette:
Whisk together red onion, vinegar, lemon juice, olive oil, and mustard in a small bowl.
Set aside.

To prepare salad:
Combine the beans, asparagus, spring garlic (if using), and white beans in a large bowl. Mix in bread cubes, pour in vinaigrette, and toss well.

Wednesday, May 12, 2010

Vegetarian Cassoulet

One of the most rewarding perks of living in California is the amazing produce we can get pretty much all year round. Many Californians are fortunate enough to have year-long farmers markets that are fully stocked with fresh and local fruits and vegetables. So it's not surprising that one of my main goals for this blog was to post recipes for foods prepared with these seasonal ingredients. Sounds simple right? Maybe for some, but for me? Not so much. Things come up. Interviews, presentations, deadlines. A certain advisor sends a certain angry email regarding a certain thesis that should have been finished some three weeks ago. See, things come up, and although I made this cassoulet a while back, when it was more probable to find fresh local leeks, here I am weeks later finally posting about it, and guess what?...my thesis is still not done (ssh...don't tell the advisor!)


I have been fascinated by cassoulets ever since I saw a Julia Child recipe in her Menu Cookbook. Julia's recipe is definitely not for the faint of heart. It requires 3 types of meat- pork, sausage, and goose (I'm not even sure I know where to buy goose from). The recipe also states that it requires more than 4 hours of cooking time (plus more for preparation). That's the required time for normal people, so for someone like me, this recipe would take oh, roughly...4 days. Yup, that sounds about right.

One of these days (I'm thinking maybe sometime around retirement?) I'll try Julia's recipe, but until then I will definitely be making this simpler vegetarian version often. It takes about 2 1/2 hours from start to finish - including preparation (and yes, even for me!) and is so delicious and hearty that even my carnivorous BF didn't miss the meat. Although I'm sure a few chunks of chicken or sausage wouldn't hurt a thing, and would certainly bring you one tiny step closer to Julia's version.

Vegetarian Cassoulet (adapted from Smitten Kitchen and Gourmet)
For cassoulet:
2 medium leeks (spring leeks work well, white and pale green parts only)
1/2 large onion, diced
4 medium carrots, halved lengthwise and cut into 1-inch-wide pieces
3 celery ribs, cut into 1-inch-wide pieces
4 garlic cloves, chopped
1/4 cup olive oil
4 thyme sprigs (I used home-dried thyme sprigs)
4 parsley sprigs
2 Turkish or 1 California bay leaf
1/8 teaspoon ground cloves
3 (19-ounce) cans cannellini or Great Northern beans, rinsed and drained or 4 1/2 cups cooked dried beans
1 19-ounce can diced tomatoes, with their juice
3 tablespoons tomato paste
1 quart vegetable broth

For garlic crumbs
4 cups coarse fresh bread crumbs
1/3 cup olive oil
1 tablespoon chopped garlic
1/4 cup chopped parsley

To make cassoulet:
Halve leeks lengthwise and cut crosswise into 1/2-inch pieces, then wash well and pat dry.

1. Cook leeks, onion, carrots, celery, and garlic in oil with herb sprigs, bay leaves, cloves, and 1/2 teaspoon each of salt and pepper in a large heavy pot over medium heat, stirring occasionally, until softened and golden, about 15 minutes.
2. Stir in beans, tomatoes, tomato paste, then stock, and simmer, partially covered, stirring occasionally, until carrots are tender but not falling apart, about 30 minutes.

To make garlic crumbs while cassoulet simmers:
Preheat oven to 350°F.

Toss bread crumbs with oil, garlic, and 1/4 teaspoon each of salt and pepper in a bowl until well coated. Spread in a baking pan and toast in oven, stirring once halfway through, until crisp and golden, 12 to 15 minutes. Cool crumbs in pan, then return to bowl and stir in parsley.

To finish cassoulet:
Discard herb sprigs and bay leaf. Mash some of beans in pot with a potato masher or back of a spoon to thicken broth. Season with salt and pepper. Just before serving, sprinkle with garlic crumbs.

Wednesday, April 28, 2010

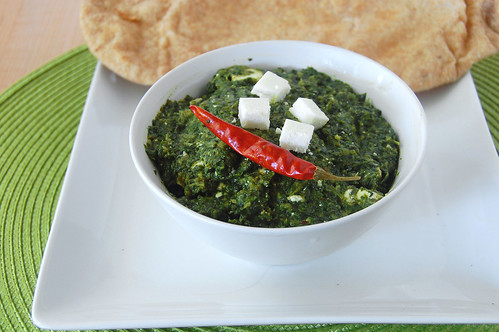
Palak Paneer (Indian Spinach and Cheese)


Palak Paneer. Funny sounding but yummy tasting. Palak paneer (or spinach and cheese) is a quintessential vegetarian dish of North India. It is the vegetarian dish that even meat-lovers crave. My mother makes some of the best palak paneer I have ever had. Unfortunately it is almost impossible to get the recipe from her since, well, she doesn't have one. Her technique is to add some of 'this' and 'that' until the taste and texture is perfect. Measurements are a mystery. See, my mother doesn't use measuring spoons for adding spices. I don't even think she uses spoons. She uses her hands and her fingers and her tastebuds. As I stand in my kitchen, measuring out ingredients, desperately trying to replicate her "recipes", I imagine what she'd think if she saw me there. She'd be proud for sure, but she'd probably be laughing too.


My (many) previous attempts to replicate her palak paneer have left me with a dish that was either too bitter, too sour, or lacking of a robust spinach flavor. Until now. This palak paneer has a great creamy spinach flavor, without the bitterness that many spinach dishes tend to have. The addition of spices also gives it a nice kick, so you know you're not just eating creamed spinach. The paneer is firm enough that it won't lose its form but soft enough that it almost melts in your mouth. I think Mama would approve.

Palak Paneer
*10 cups of chopped fresh spinach or 10 oz of frozen spinach
*2 tablespoons tomato paste
*2 teaspoons grated ginger
*3 cloves garlic
*1 tablespoon oil
*1/2 teaspoon cumin seeds
*1/2 teaspoon caraway seeds
*1 teaspoon coriander powder
*1/2 teaspoon turmeric powder
*1/2 teaspoon red chili powder
*1 teaspoon sugar
*1/3 cup heavy cream or (not skim) milk
*2 tablespoons flour
*salt and pepper, to taste
*1 1/2 cups of paneer, cut into 1/2 inch cubes

1. Place the spinach, tomato paste, ginger, and garlic in a food processor or blender and blend until smooth.
2. In a large pan, heat the oil until hot, then add the cumin and caraway seeds. Fry the seeds for about 30 seconds. Add the coriander, turmeric, and chili powder, and cook for about 2 minutes.
3. Add the spinach, sugar and milk. Stir to combine. Stir in the flour and season with salt and pepper. Cook, covered, for about 10 minutes.
4. Remove from heat and (with a rubber spatula) gently fold in the the paneer.

Wednesday, April 7, 2010

Crustless Asparagus Quiche

Phew...finally, I'm back! I know I haven't posted in a while, and it's because things have been pretty busy here. After 5 long years, I am (finally) getting my PhD, so the last few months have been: applying for jobs, interviewing, and now waiting for offers. In the middle of all this, I am writing my thesis and still working on papers and presentations. I know, I know...none of this is as important as blogging about food, but unfortunately I can't convince my thesis committee of that.

Maybe they would be convinced, however, if they tried this quiche. Full of asparagus and mushrooms, and a combination of three cheeses, it is amazingly tasty and very satisfying. It almost makes you forget about nerve-wrecking interviews, impending deadlines, and (what feels like) the thousands of hours of writing and editing that await you. Almost.

This recipe is for a crustless quiche, and it so simple to make, it can easily be a weekday dinner. Perfect for days full of nerve-wrecking interviews, impending deadlines, and lots of writing. Yup, I think it’s pretty clear I will be making this dish often in the months to come.
Crustless Asparagus & Mushroom Quiche (adapted from Smitten Kitchen and allrecipes)
*1 tablespoon olive oil
*1/2 shallot, diced
*1 pound asparagus, trimmed and cut into 1/2 inch pieces
*1/2 pound mushrooms, chopped
*4 large eggs
*1/4 cup milk
*1/2 cup Swiss cheese, grated
*1/3 cup gruyere, grated
*1/3 cup Pecorino, grated
*1 tablespoon flour

1. Preheat oven to 425 degrees. Heat the oil in a skillet, add shallots, and cook until just translucent.
2. Add the asparagus and cook for 3-4 minutes. Add mushrooms and cook for an additional 3-4 minutes. Pour into pie pan.
3. In a separate bowl, whisk together eggs, milk, cheese, and flour. Pour over asparagus mixture.
4. Bake for 25 minutes. Cool for 10 minutes before serving.

Wednesday, March 24, 2010

Creamy Buttermilk Coleslaw

I can't believe it has taken me this long to discover the greatness of cabbage. It is so versatile, extremely healthy, and amazingly cheap. Last week I found cabbage for 33¢ a pound. 33¢!! I was very excited. I made a Indian-style cabbage and potato curry, and this tri-color coleslaw.

The original recipe is from Cooks Illustrated, and although the texture was great, I felt it was lacking a bit in flavor. So I increased many of the ingredients -- a few more spoons of mustard, vinegar, and sugar, and used a mix of green and purple cabbage, and ended up with a deliciously creamy, flavorful, and colorful coleslaw.

I think this recipe begs to be tweaked according to taste. My suggestion is to start with the original and add more of this and that depending on how flavorful you like your slaw. Since I made so many changes to the original recipe, below I give both the original and note my changes.Creamy Buttermilk Coleslaw (adapted from Cooks Illustrated)

Serves 8-10

Ingredients

*2 pounds cabbage (about 1 large head), red or green (I used a combination of the two), shredded fine
*salt, to taste
*2 medium carrots, shredded
*1 cup buttermilk
*1/4 cup mayonnaise (I used low-fat)
*1/4 cup sour cream (I used ½ cup yogurt)
*2 small shallot, minced (I used red onion)
*4 tablespoons minced fresh parsley leaves
*1 teaspoon cider vinegar (I used 4 teaspoons)
*1 teaspoon granulated sugar (I used 4 teaspoons)
*1/2 teaspoon Dijon mustard (I used 4 teaspoons)
*1/4 teaspoon ground black pepper

1. Toss shredded cabbage and 1 teaspoon salt in colander or large mesh strainer set over medium bowl. Let stand until cabbage wilts, at least 1 hour or up to 4 hours. Rinse cabbage under cold running water. Press, but do not squeeze, to drain; pat dry with paper towels. Place wilted cabbage and carrot in large bowl. (The folks at CI recommend doing this to prevent a watery coleslaw. Unfortunately, I was in a rush so I skipped this step, but will probably do it next time as my coleslaw was a bit watery the next day).

2. Stir buttermilk, mayonnaise, sour cream, shallot, parsley, vinegar, sugar, mustard, salt (to taste), and pepper together in small bowl. Pour dressing over cabbage and carrots, and toss to combine; refrigerate until chilled, about 30 minutes.

Wednesday, February 24, 2010

Indian Cauliflower Curry (Gobi) and Raita

OK, I feel so badly about not putting a recipe on yesterday's post, that I decided to do another post today complete with not just one, but TWO recipes (oooh, ah). I made this cauliflower (or gobi) curry along with the Chicken (and Chickpea) Makhani when my friend E was over.

I was very proud of this dish because in the past when I've tried to make this, it always ended up not as cauliflower curry, but more like cauliflower mush - curry flavored cauliflower mush, to be exact. But this time was different. I made sure not to cut the cauliflower too small, cooked it for much less time, and tah dah! -- curry not mush. Woot!

What's the white stuff on top you ask? It is a Indian yogurt-based sauce called raita. It is traditionally used as a dip but I say dip shmip; I eat this stuff with just about everything. It has a mild tang that complements the heat of many Indian dishes, and it is served cold as to complement the heat (different "heat" this time) of many Indian dishes. Try it with the Makhani too. It won't disappoint.

Cauliflower Curry

*2 tablespoons olive oil
*1 large onion, chopped
*1 large head of cauliflower, chopped into 3 inch pieces
*3 cloves garlic, chopped
*1 cup water
*1 teaspoon fresh grated ginger
*1 teaspoon cumin
*1 tablespoon + 1 teaspoon tumeric powder
*1/2 teaspoon coriander
*1/4 teaspoon (or more if you can handle it) crushed red pepper
*1/2 teaspoon sugar
*1 1/2 cups fresh or frozen peas (I used frozen; if using frozen, do not thaw)
*salt, pepper to taste

1. Heat oil in a large skillet. Add onions and cook until softened. Add garlic and cook for about 1-2 minutes. Add water, and stir in ginger, cumin, tumeric, and coriander, and red pepper. Cook for about 3-4 minutes. Pour contents of skillet into a separate bowl. Do not discard any remnants in the skillet.
2. Add the cauliflower to the same skillet and cook for about 4-5 minutes, stirring occasionally. Pour in the water mixture and stir to coat the cauliflower evenly. Cover and cook for about 7-8 minutes until the cauliflower is softened.
3. Stir in the sugar and peas. Add salt and pepper to taste.

Raita
* 1 cup plain yogurt
*1 tablespoon water
*1/2 large cucumber chopped
*1/4 red onion, finely diced
*1/2 teaspoon cumin
*1/2 teaspoon salt (or more if you like)
*couple of grinds of fresh ground pepper

In a medium sized bowl, mix together yogurt and water until smooth. Stir in remaining ingredients.

Tuesday, February 2, 2010

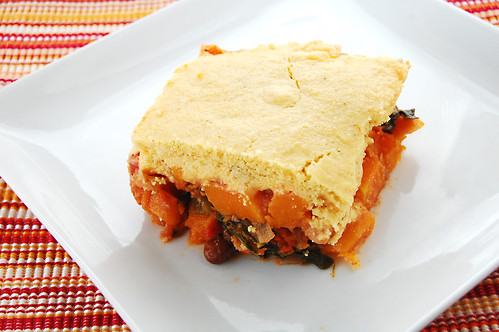
Winter-Time Tamale Pie


One of the best things about living in California is the plentitude of local fruits and vegetables we can get pretty much all year round. In the summer time, the farmers market in my town is THE place to be. The stands are always stocked with tons of zucchinis, peppers, and tomatoes. The winter months are a bit quieter, but offer a whole different array of produce – colorful squashes, tons of leafy greens, and lots of citrus. As much as I enjoy the summer produce, I actually think I enjoy Winter's creations even more. Something about those squashes and greens is so hearty and satisfying, especially when they mingle together in a warm dish.

I usually make this tamale pie with zucchini and peppers, but this time I decided to try a variation: butternut squash and kale; and let me tell you: this is better than the summer version. A key component of the deliciousness of a tamale pie is the cornbread-like topping, but I could seriously eat just the filling and call it dinner, happily.

Butternut Squash and Kale Tamale Pie

Filling
*1 large butternut squash, peeled, and cut into 1 inch cubes
*2 Tb olive oil
*1 large onion, diced
*4 cloves garlic, minced
*1 bunch kale, with large stems stripped and discarded, leaves chopped
*3 cups (or 2 15 oz. cans) cooked beans (pinto, black, kidney, I used pinto)
*1 1/2 cup shredded cheddar cheese
*1 15 oz can diced tomatoes, undrained
*1 tablespoon cumin
*2 teaspoons coriander
*1 teaspoon dried oregano
*salt and pepper to taste


Topping
*1 1/2 cup cornmeal
*2 Tb flour
*1 teaspoon salt
*2 teaspoons baking powder
*1/2 teaspoon baking soda
*2 eggs, beaten
*1 cup buttermilk
*2 tablespoons melted butter

For the Filling:
1. Preheat oven to 350 degrees. Lightly oil a baking pan. Add the squash and toss to coat. Roast the squash 35 minutes.
2. Heat the oil in a skillet over medium heat, add the onions, and cook for about 2 minutes until softened. Add the garlic and cook for about 1 minute.
3. Add the kale and cook for about 2-3 minutes until tender. Add the roasted squash and cook for about 3 minutes. Add beans and diced tomatoes. Stir in cumin, coriander, oregano, salt, and pepper. Heat for about 3 minutes.
4. Spread filling into lightly oiled 9x13 glass dish. Sprinkle cheese on top.

For the Topping:
1. Mix cornmeal, flour, salt, baking powder, and baking soda in a mixing bowl.
2. In a separate bowl, stir together buttermilk, melted butter, and eggs. Gently fold wet ingredients into dry ingredients.
3. Evenly spread the batter over the filling.
4. Bake 20 min or until top is lightly browned.

Saturday, January 16, 2010

Butternut Squash & Swiss Chard Lasagna

Oh my. Butternut Squash Lasagna. Where have you been my whole life?

Since I am a lover of all things tomato sauce, tomato-based lasagna is one of my favorite foods ever. So, when I heard about this butternut squash lasagna, I was skeptical. But I was wrong. This lasagna was fantastic. The butternut squash adds a sweetness much like tomato sauce does in traditional lasagna. The cheeses add a great savory contrast to the squash, and everything is enlivened with the addition of the herbs. I added some swiss chard to give it some more texture and increase the healthiness factor. I also used sage and a bit of rosemary instead of basil because I think they complement the squash better. I also roasted the squash instead of boiling it as I think that enhances the sweetness more. I added some tofu and cottage cheese to the cheese mixture to give it some extra protein.

This dish is so hearty and flavorful, and it is great with a side of toasted garlic bread which helps to sop up the yummy sauce. This will definitely be a staple winter-time meal at our place.

Butternut Squash & Swiss Chard Lasagna (adapted from Giada De Laurentiis)
  • 1 tablespoon olive oil
  • 1 (1 1/2 to 2-pound) butternut squash, peeled, seeded, and cut into 1-inch cubes
  • salt and freshly ground black pepper
  • 1/2 cup water
  • 2 Tb olive oil
  • 2 Tb butter
  • 1/4 cup all-purpose flour
  • 3 1/2 cups milk
  • Pinch nutmeg (freshly grated)
  • 3/4 cup (lightly packed) fresh sage leaves
  • 2 1/2 Tb fresh rosemary, chopped
  • 2 cups shredded mozzarella cheese
  • 1/3 cup grated Parmesan
  • 1/3 cup grated Pecorino
  • 1 cup cottage cheese
  • 1/2 cup firm tofu, chopped into small pieces
  • 2 cups (lightly packed) chopped swiss chard
  • 12 lasagna noodles, cooked to al dente
1. Lightly oil a baking pan. Add the squash and toss to coat. Roast the squash at 350 degrees for 35-40 min, or until softened. Cool slightly and then transfer the squash, along with 1/4 cup water to a food processor. Puree the squash, and season the puree, to taste, with salt and pepper.

2. Heat the 2 Tb of oil and melt the butter in a heavy medium-size saucepan over medium heat. Add the flour and whisk for 1 minute. Gradually whisk in the milk. Bring to a boil over medium-high heat. Reduce the heat to medium and simmer until the sauce thickens slightly, whisking often, about 5 minutes. Whisk in the nutmeg. Cool slightly. Transfer half of the sauce to a blender*. Add the sage and rosemary and blend until smooth. Return the sauce to the sauce in the pan and stir to blend. Season the sauce with salt and pepper, to taste.

3. Mix together 2 cups of mozzarella with the Parmesan, Pecorino, cottage cheese, and tofu. Season with salt and pepper, to taste.

3. Position the rack in the center of the oven and preheat to 375 degrees F. Lightly butter a 13 by 9 by 2-inch glass baking dish. Spread 3/4 cup of the sauce over the prepared baking dish. Arrange 3 lasagna noodles on the bottom of the pan. Spread 1/3 of the squash puree over the noodles. Spread a layer of the chard. Sprinkle with 1/2 cup of the cheese mixture. Repeat layering 3 more times.

5. Bake the lasagna for 40 minutes. Continue baking uncovered until the sauce bubbles and the top is golden, 15 minutes longer. Let the lasagna stand for 15 minutes before serving.

*When blending hot liquids: Remove liquid from the heat and allow to cool for at least 5 minutes. Transfer liquid to a blender or food processor and fill it no more than halfway. If using a blender, release one corner of the lid. This prevents the vacuum effect that creates heat explosions. Place a towel over the top of the machine, pulse a few times then process on high speed until smooth.

Wednesday, December 23, 2009

Vegetarian Gumbo

Gumbo is an extremely satisfying winter time meal. It is a thick stew, originating from louisiana, and often made with sausage, chicken, and seafood. Although I cannot attest for the meat version of this dish, the BF loves it, and I can't get enough of the vegetarian version. Even in the vegetarian version, the flavors are so complex, I often stop and think about all the ingredients while I'm eating it. There is the warmth from the vegetable broth, the kick from the spices, and the subtle sweetness from the Worcestershire sauce. To me, this gumbo is even better than what I've tried in New Orleans.

The BF and I have made this gumbo a few times, and although it is time consuming, much of the time is spent just waiting for it to simmer. There is a bit of work making the roux and cooking the vegetables, but after that it is almost 2 hours of just simmer time. I can be pretty impatient in the kitchen, but I will honestly say that this gumbo is worth every minute of preparation time...it is that good!

The original (meat-friendly) gumbo recipe comes from Paula Deen (but suprisingly doesn't have much butter). Below is my vegetarian version.

Vegetarian Gumbo (adapted from Paula Deen, 10 servings)
  • 2 tablespoons olive oil
  • 2 tablespoons butter
  • 1/2 cup all-purpose flour
  • 2 tablespoons butter
  • 1 large onion, chopped
  • 8 cloves garlic minced
  • 2 green bell pepper, seeded and chopped (I omitted this)
  • 3 stalks celery chopped
  • 1/4 cup Worcestershire sauce (vegetarian recipe below)
  • 1/4 bunch flat leaf parsley, stems and leaves, coarsely chopped, plus chopped leaves for garnish
  • 4 cups hot water
  • 4 vegetable bouillon cubes
  • 1 (14-ounce can) diced tomatoes with juice
  • 2 cups frozen sliced okra
  • 1/2 lb tofu, well drained and diced into cubes
1. Heat the 2 tablespoons of oil in a heavy bottomed pot over medium-high heat. Sprinkle the flour, add 2 tablespoons of butter, and cook over medium heat, stirring constantly, until brown, about 10 minutes. Let the roux cool.

2. Return the pot to low heat and melt the remaining 2 tablespoons butter. Add the onion, garlic, green pepper and celery and cook for 10 minutes.

3. Add the (vegetarian) Worcestershire sauce, salt and pepper, to taste and the 1/4 bunch parsley. Cook, while stirring frequently, for 10 minutes.

4. Add 4 cups hot water and bouillon cubes, whisking constantly. Add the tofu. Bring to a boil, then reduce the heat, cover, and simmer for 45 minutes.

5. Add tomatoes and okra. Cover and simmer for 1 hour. Just before serving add the green onions and remaining chopped parsley.

Vegetarian Worcestershire Sauce (about 1/4 cup)

1 1/2 Tablespoons water
1 Tablespoon soy sauce
1 Tablespoon apple cider vinegar
1 teaspoon blackstrap molasses or tamarind paste
1/2 teaspoon powdered ginger
1/2 teaspoon garlic powder
1/8 teaspoon ground cayenne pepper
a pinch of onion powder
a pinch of powdered cloves or pumpkin pie spice

Stir together all ingredients.

Tuesday, November 10, 2009

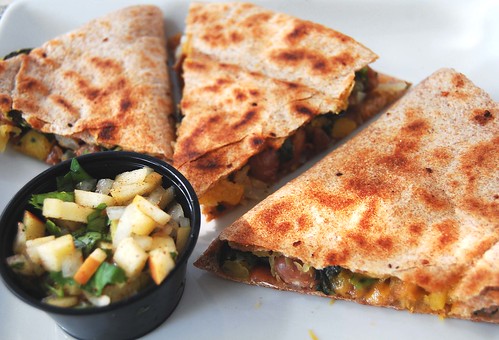
Acorn Squash Quesadillas with Apple Salsa

I love making quesadillas. They are super versatile since you can fill them with pretty much anything and they are just gosh darn tasty. The gooey warm fillings combined with a crisp exterior is just perfect with some cool salsa. I make quesadillas often in the summer time since there are so many awesome summer vegetables to stuff them with, plus yummy tomatoes for pico de gallo (aka salsa). This time, I wanted to try a more autumnized version of quesadillas, because hey, Fall has some great vegetables to offer too. I went with acorn squash and spinach. I also wanted to make a yummy autumnized salsa so I decided to make a sweet, spicy, and tangy apple salsa.

This combination was fabulous! The quesadillas rocked (as expected) but the salsa was AMAZING. No joke -- I seriously made a bunch of extra salsa and just ate it all on its own, it was that good. If you don't want to make the effort to make these 'dillas (although they are not difficult) you should still try this salsa. Even if you end up eating it out of the bowl like me.


Acorn Squash and Spinach Quesadillas with Apple Salsa
(makes 2 servings)
For the Quesadillas:
  • 1 Tb olive oil
  • 2 cups acorn squash, peeled and chopped
  • 1 onion, chopped
  • 2 handfuls of spinach, chopped
  • 4 cloves garlic, minced
  • 1 cup cooked beans (pinto, black, kidney)
  • 1/2 tsp cumin
  • salt, pepper to taste
  • 1 cup shredded cheddar cheese
  • 2 large tortillas (I used whole wheat)
For the Apple Salsa:
  • 1 medium crisp apple (I used fuji), diced
  • 1 handful of cilantro, chopped
  • 1/2 onion, chopped
  • 2 tablespoons fresh lemon or lime juice
  • salt, pepper to taste
For the Quesadillas:
1. Roast the acorn squash in the oven for about 20 min, until softened, but not mush.
2. Heat the oil in a skillet, and cook the onion for about 5 min. Add the squash, spinach, and garlic, and cook for about 10 minutes. Stir in the beans, cumin, and salt and pepper. (Here's a secret: I also do this step in...the microwave! Yes, when I don't have the patience to stand over the stove, I put all these ingredients in a bowl and nuke 'em for about 2 minutes. And you know what? I can't tell the difference).
3. Add a few drops of oil to a hot skillet. Place a tortilla on the skillet and add to one side half the squash mixture and half the cheese. Fold over and cook for about 5 minutes on each side, until crispy and browned. Repeat for other tortilla.

For the Apple Salsa:
1. Combine all ingredients in a large bowl and mix thoroughly.

Thursday, August 20, 2009

Indian Eggplant and Okra Curry

Note to self: I do not have the photography skills to make eggplant curry look good. And actually, that is really sad, because this stuff was sooo good. Out of all the Indian dishes I cooked up last weekend, this was probably my favorite. I bought the eggplant and the okra for 5 bucks (yes $5 TOTAL at the farmers market) and the tomatos were from my own garden. Now how's that for eating local?
I've made an eggplant and tomato curry a few times in the past since I really like that combo, but this time I decided to add in fresh okra. I'm so glad I did too. It really adds a nice flavor and more so an awesome texture to this curry. And guess what? My okra wasn't slimy! For reals!! I really thought it would be, and I was almost expecting it, preparing myself, being ready for it. But I read some tips online and somehow I was able to achieve the deliciousness of okra without the slime. Woot! Don't believe me? Try this recipe. And make it look pretty, and take a picture, and send it to me!

I think the tricks to cooking okra slime-free are (1) use fresh okra, when possible (I've made this recipe with frozen okra in the past and noticed it was definitely slimier) (2) be as gentle as possible when cooking it. Stirring it around like crazy will only bring out more slime, and (3) add an acidic ingredient (eg. tomatoes) to the recipe if possible -- something in the acid helps cut down the slime (don't you just love my very scientific explanations for things).

Indian Eggplant and Okra Curry
  • 2 Tb olive oil
  • 1/2 tsp cumin seeds
  • 1 large eggplant, chopped into 1 inch cubes
  • 5 medium tomatoes, chopped
  • 1 tsp tumeric
  • 1/4 tsp cumin
  • 1/4 tsp coriander
  • 1 1/2 lb okra, trimmed and chopped into 1 inch pieces
  • 2 handfuls of cilantro, chopped
  • salt and pepper, to taste
1. In a large pot, fry the cumin seeds in the olive oil over low heat.
2. Increase the heat, add the eggplant, and let cook for about 10-15 minutes just until it begins to soften.
3. Add the tomatoes and cook for another 10-15 minutes.
4. Add the tumeric, cumin, red pepper, and coriander, and stir the mixture.
5. Add the okra and stir gently so as not to break the pieces. Let cook for 8 minutes.
6. Stir in the cilantro and salt and pepper to taste.

Monday, August 17, 2009

Indian-Style Zucchini Patties with Tamarind Chutney


I'm back! Finally! Things have been pretty hectic this summer since I'm commuting home every weekend from my internship. The little time I've had on the weekends does not want to be spent cooking. So although I neglected my kitchen (and my blog) for a few weeks, last weekend, a sudden cooking urge came over me. So I threw on the old apron (yes, I wear one-I spill A LOT) and got to work. First, I noticed that the majority of the recipes on this site are desserts. Anyone else notice that? Although desserts do make a hefty portion of my diet (chocolate IS a food group, no?), I felt the need to prove to the world or at least all my readers ( all 11 of you) that yes, I do eat other things -- actual non-desserts. Since I've been missing my mom's cooking, I planned a big fat Indian menu and gave myself the whole weekend to make them. Of course I was fooling myself because 2 days is definitely not enough time to prepare all the dishes I had in mind (or at least not enough time for someone as inefficient as I sometimes am in the kitchen). I literally finished cooking at 10pm on Sunday night, right before I took a nap on the kitchen counter.
So here is Part I of my Indian menu: Indian Style Zucchini Patties with Tamarind Chutney. In Bengali, these are called 'chops' (pronounced chawps) and they are usually deep fried in oil. Sorry to mess with tradition, but something was calling me to try baking these. So I made up a batch of the patties, baked half of them (the ones in the photo are baked), and fried the rest. Both were very tasty. Of course the fried ones were a bit more indulgent, but the baked ones were just as satisfying.

Indian-Style Zucchini Patties (makes about 10 patties)

  • 3 medium zucchini, grated and drain (drain by wrapping grated zucchini in paper towels and squeezing out the excess water)
  • 1/2 tsp red pepper (add less if you can't handle the heat)
  • 1/2 tsp cumin
  • 1/8 tsp cinnamon
  • 1/2 tsp coriander
  • salt and pepper to taste
  • 1 + 1/4 cup fresh breadcrumbs, divided
  • 1/4 cup water
  • 2 Tb cornstarch
  • oil for frying or baking (I used canola for frying, olive for baking)
1. Mix the grated zucchini, red pepper, cumin, cinnamon, coriander, salt, pepper, and 1/4 cup of breadcrumbs in one bowl.
2. Mix the 1/4 cup water and cornstarch in a separate bowl.
3. Form the zucchini mixture into small patties (about 1 heaping tablespoon each). Dip each pattie into the cornstarch mixture, then into the remaining 1 cup of breadcrumbs.
4. If baking: Generously (really generously -- I didn't put enough oil, and got some major pan stuckage) grease a large baking sheet. Gently brush both sides of each pattie with olive oil. Bake at 350 degrees for 10 minutes, or until the tops are browned. Then, flip each pattie over, and bake again for an additional 10 minutes.
5. If frying: Fry in oil about 2 minutes on each side or until browned.

Tamarind Chutney (makes about 1 cup)
  • 1/4 tsp cumin seeds
  • 2 Tb tamarind paste (available in International Markets)
  • 3 1/2 cup water
  • 2 Tb tomato paste
  • 1/2 cup sugar
  • 1/4 tsp cumin
  • 3/4 tsp red pepper
Fry the cumin seeds in a bit of oil. Add water and tamarind paste, and cook for about 45 min, until mixture is reduced to about 1 cup. Add the tomato paste, sugar, cumin, and red pepper. Mix well until all is dissolved.

I am submitting this recipe for Weekend Herb Blogging hosted by Prof. Kitty at The Cabinet of Prof. Kitty. Checkout the lovely photos of her garden!

Thursday, June 11, 2009

Brown Rice Risotto with Asparagus and Mushrooms


Ok, I've realized that I cannot go to Trader Joe's without buying at least 2 pounds of cheese. Before I made this risotto, our fridge was stocked with 14 kinds of cheeses, that's right FOURTEEN: mozarella, white cheddar, orange cheddar, Swiss, Gruyère, goat, Comtè, Fontina, Parmesiano-Reggiano, Pecorino, Monterey jack, feta, parmesan, and Harvati. So as much as I love risotto, this recipe was more about clearing up some fridge room than satisfying a craving.

I know that Arborio rice is typically used for risotto, but I wanted to try making it a bit healthier by using brown rice. I wasn't sure how it would work out, or if it would at all, since brown rice is definitely not as starchy as Arborio, and the starchiness of the rice is what gives risotto its creaminess. I used a simple recipe for asparagus and shitake risotto and used brown rice instead of Arborio.

Using the brown rice required much more time since brown rice takes longer to cook, but the end result was totally worth it. This risotto was just as creamy as other risottos I've had with Arborio rice. I used Gruyère and Fontina, which added a ton of flavor.

Brown Rice Risotto with Asparagus and Mushrooms (adapted from Gourmèt, May 2003)
  • 5 cups vegetable broth
  • 1 cup water
  • 1 pound thin to medium asparagus, trimmed and cut into 1/4-inch-thick slices, leaving tips 1 1/2 inches long
  • 4 tablespoon olive oil
  • 1/4 pound fresh shiitake mushrooms, sliced
  • 1/2 pound fresh crimini mushrooms, sliced
  • 3 shallots, diced
  • 1 1/2 cups Brown rice (10 ounces)
  • 1/2 cup dry white wine
  • 1/2 cup Gruyere
  • 1/2 cup Fontina
1. Bring broth and water to a boil in a large pot. Add asparagus and cook, uncovered, until crisp-tender, 3 to 4 minutes. Transfer asparagus with a slotted spoon to a large bowl of ice and cold water to stop cooking, then drain and pat dry. Keep broth at a bare simmer, covered.
2. Heat 2 tablespoons of oil in a large heavy pot over moderately high heat, then sauté mushrooms, stirring occasionally, until browned, about 4 minutes. Transfer to a bowl.
3. Cook shallots in 2 tablespoons of oil in saucepan over moderate heat, stirring, about 1 minute. Add rice and cook, stirring, 1 minute. Add wine and cook, stirring, until absorbed, about 1 minute.
3. Ladle in 1 cup simmering broth and cook at a strong simmer, stirring, until absorbed, about 2 minutes. Continue simmering and adding broth, about 1/2 cup at a time, stirring frequently and letting each addition be absorbed before adding next, until rice is just tender and looks creamy, for about 1 hour.
4. Remove from heat and stir in cheese and salt and pepper to taste. Gently stir in asparagus and mushrooms. Serve immediately.

Thursday, May 28, 2009

Zucchini Boats with Purée of Parsnip

Can I just say that I love Julia Child? Ok, I know that must sound really cliché coming from a food blogger, but I am seriously in awe of the woman. I found some video clips of 'Baking with Julia', where in each episode she bakes with a featured guest chef. I have been watching these clips during my lunch breaks because I pretty much have to be eating while I'm watching them, otherwise it's just painful -- the cakes, breads, and cookies are totally stomach-grumbles and drool worthy. Anyway, it is so much fun to watch Julia on these shows. She is always asking questions, nibbling on the ingredients, and saying things about how cooking is great because you can eat your mistakes. I can attest to that -- many mistakes have been eaten in my kitchen.

Since zucchinis are now available at the farmers market here, I decided to try this recipe from Julia Child's Menu Cookbook. I modified it slightly to cut down the calories (I know, I know, Julia probably would not approve), but the result was still delicious. I guess I don't expect anything less from a Julia Child recipe.

Zucchini Boats with Purée of Parsnip (adapted from Julia Child)

For the Zucchinis:
  • 5 medium sized zucchinis, halved lengthwise
  • olive oil for brushing
  • salt, pepper
Remove the pulp from the zucchini(I resereved the pulp and added it to the purée). Place the zucchini in a pot with enough water to cover. Bring to a boil, and cook 5 minutes. Remove and wipe down excess water with a paper towel. Brush all over with a bit of olive oil.

For the
Purée:
  • 1 1/2 lb parsnips, peeled and chopped
  • 2 Tb cream
  • 1 Tb butter
  • pulp from zucchini (optional)
  • salt and pepper to taste
1. Place the parsnips in a pot with enough water to cover. Bring to a boil, and cook about 15 minutes, until tender.
2.
Purée parsnips (and zucchini pulp) in a blender or food processor until very smooth.
3. Place the purée in a double boiler. Add cream, butter, salt, and pepper. Cook on double boiler, stirring occasionally, for 10-15 minutes.

To assemble:
Fill each zucchini piece with a generous amount of
purée. Garnish with fresh parsley.

Wednesday, May 13, 2009

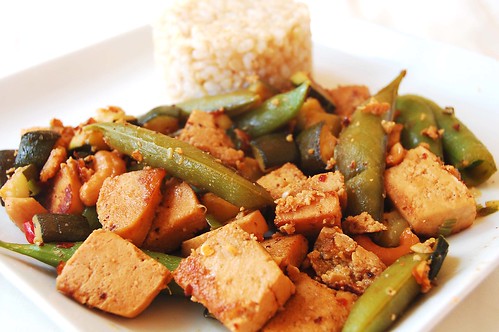
Zim Zim and Kung Pao

This will probably the strangest title I will ever give a post. But it makes perfect sense -- I promise. I realized that I have been slacking on posting about trips (which was really supposed to be what half this blog is about), so I decided to do a joint post: trips and chips. Well just one trip, and actually the following recipe doesn't have any chocolate chips -- so I guess it's a trip and non-chip post. Still with me?? <...crickets chirping...>

Let's start with the trip. A few weeks ago I went for a day hike near the coastal range mountains, here in Northern California. The weather was great and sights were beautiful.


Here is a shot of Zim Zim Creek.


Ok, now for the food. I found this great recipe for Kung Pao chicken on Rasa Malaysia, but made a few changes. I used tofu instead of chicken , and made some substitutions for some of the ingredients I didn't have. The recipe calls for peanuts, and I guess this is a staple ingredient of the dish, but guess what? I didn't have any -- so I substituted cashews, and I am so glad I did. I also added some fresh snow peas and zucchini. The end result was really delish and I think the cashews were a nice touch.
Kung Pao(ish) Tofu (adapted from Rasa Malaysia)
  • 1 1/2 lbs of tofu, drained, and cubed (see my tofu draining notes below)
  • 3 tablespoons roasted cashews
  • 8-12 dried red chilies
  • 3 tablespoons olive oil
  • 5 slices peeled fresh ginger
  • 2 cloves garlic, chopped
  • 1 cup snow peas
  • 2-3 zucchinis, diced
  • 1 stalk scallion (chopped)
  • 1 recipe marinade (see below)
  • 1 recipe sauce(see below)

Marinade:

  • 1 Tablespoon corn starch
  • 2 teaspoons soy sauce
  • 1 Tablespoon rice wine vinegar
  • 1 teaspoon peanut oil

Sauce:

  • 2 Tablespoons soy sauce
  • 2 teaspoons sugar
  • 1/4 rice wine vinegar
  • 2 Tablespoons water
  • 1 teaspoon corn starch
  1. Marinate tofu with the marinade for at least 30 minutes.
  2. Mix the sauce ingredients in a small bowl and set aside.
  3. Heat up a skillet wok with one tablespoon olive oil and stir-fry the marinated tofu until browned. Dish out and set aside.
  4. Add in the remaining 2 tablespoons of olive oil until hot.
  5. Add the ginger and garlic slices and quickly stir fry. Add the dried red chilies and stir fry with ginger and garlic for 3 minutes.
  6. Add in the snow peas, and cook for about 4 minutes. Add the zucchini and cook for an additional 5-6 minutes until the vegetables are just tender.
  7. Add in the tofu and stir.
  8. Add the roasted cashews and continue to stir for 2-3 minutes.
  9. Add the sauce and stir continuously until all ingredients are coated with the sauce.
  10. Add in the scallions and stir evenly.
*Tofu prep: Since I'm not a fan of mushy tofu, I like to drain as much water out as possible. To do this, I first freeze the tofu for a few hours (or overnight), then thaw it on the day I'm ready to use it. Something about the freezing and defrosting allows the water to drain out more easily. Finally, after it's done thawing, I put it on a plate with a towel over it and set an iron skillet on top. I usually add more weight by placing some large cans on in the skillet. The result is a firmer tofu with a heartier texture. Me likey. Try it!
Also, for all the tofu haters: the bf had the chicken version of this dish and also enjoyed it.

Wednesday, April 15, 2009

Roasted Butternut Squash Soup


Ok, I know it's spring and all, but when the BF brought home a bunch of these oh so pretty butternut squashes I knew I had to make something delish. He got these from the Plant Sciences department of our unversity -- apparently they were just giving them away. Since this department grows tons and tons of produce all year long, I'm guessing these were some leftovers from this winter.

I decided to make roasted butternut squash soup, because it's so good, easy, and healthy.

Butter Nut Squash Soup (very loosely adapted from Gourmet Feb 2009):
  • 4 small or 2 large butter nut squash, peeled and cut in half lenth-wise
  • 2 Tb olive oil + extra for brushing
  • 1 large onion, chopped
  • 4 large garlic cloves, chopped
  • 2 cups of vegetable broth (I only had one cup so I used it and 1 cup of water)
  • 5 - 6 fresh sprigs of thyme
  • 8 bay leaves
  • 1 tablespoon butter
  • 1 tablespoon sour cream
  • 3 tablespoons plain yogurt
  • salt and freshly ground pepper, to taste
1. Brush the cut side of the squash with a bit of olive oil. Sprinkle each half with about 1 tablespoon of water. Bake, cut side down, in large glass dish for 35min or until softened. Check half way through baking and add additional water if necessary to keep squash from scorching.
2. Heat olive oil in large skillet. Once hot, add chopped onion. Cook until browned. Add garlic. Cook for 3-4 minutes. Add squash and vegetable broth. Cook for 8-10 minutes over medium heat.
3. Remove from heat. Using a hand blender or regular blender, puree the mixture. Stir in butter, sour cream, and yogurt. Add thyme and bay leaves. Cook for 15 minutes over low to medium-low heat. Season with salt and pepper.
4. Remove thyme sprigs and bay leaves before serving.

Thursday, April 9, 2009

Pizza Two Ways

I've noticed something about myself: I ALWAYS crave desserts. It doesn't matter where I am or when it is, but I think I can always happily picture myself eating a brownie, or cookie, or cupcake. Of course some cravings are more uh, defiant, than others, and maybe these happen to occur around the same time every month...sorry, too much info?

I have to admit, though, if there is one non-dessert food item that I find myself craving -- dare I say -- as much as I crave brownies, it would have to be pizza.

I know there are a TON of great trendy and atypical pizza recipes out there: pizza bianca, pizza margherita, and even this new-fangled black and gold pizza, but I really prefer the typical (some might say boring) tomato sauce and mozarella cheese pizza.

See, this meanie was raised in New York City and grew up eating and loving New York City pizza. And although I had the occasional encounter with the non red-and-white pizzas, something always left me wishing I had a cup of tomato sauce for dipping and a sprinkle of mozarella cheese.

I never understood why pizza got such a bad rap as being unhealthy. Bread, tomatoes, and cheese...what's not healthy? For my version, I use a homemade whole wheat crust, part-skim mozarella, and tons of veggies. This pizza defies being labeled as junk food. The crust is crispy, wholesome, and sturdy -- which makes nice for holding up all those veggies. It is not like the typical chewy, floppy NYC pizza crust, but considering how frequently I make this recipe, I think this is a great healthy alternative.

I usually make my pizza the same way: dough, tomato paste/sauce, mozarella cheese - and then experiment with different toppings. And I ALWAYS make two pizzas, because you can never have too much.
This week I went with Pizza#1 - Greek style: fresh spinach, artichoke hearts, olives, and feta, and Pizza#2: roasted red pepper, roasted fennel, mushrooms, and fontina.


Pizza-making is an art, and I am far from mastering it, but with every pizza I make, I think I'm getting closer and closer to my idea of the perfect homemade pizza.


Whole Wheat Pizza Dough (makes enough for two pizzas; adapted from allrecipes):
  • 1 teaspoon honey
  • 1 1/2 cups warm water
  • 1 tablespoon active dry yeast
  • 1 tablespoon + 1 tsp olive oil
  • 1 teaspoon salt
  • 2 cups whole wheat flour
  • 1 1/2 cups all-purpose flour
  1. In a large bowl, dissolve sugar in warm water. Sprinkle yeast over the top, and let stand for about 10 minutes, until foamy.
  2. Stir the olive oil and salt into the yeast mixture, then mix in the whole wheat flour and all-purpose flour until dough starts to come together. Tip dough out onto a floured surface and knead until the ball of dough becomes smooth, about 10 minutes. Place dough in an oiled bowl, and turn to coat the surface. Cover loosely with a damp towel, and let stand in a warm place until doubled in size, about 1 hour.
  3. When the dough is doubled, tip the dough out onto a lightly floured surface. Form into a tight ball. Let rise for about 45 minutes, until doubled.
  4. Preheat the oven to 425 degrees F (220 degrees C). Divide dough into 2 pieces. Roll each ball of dough with a rolling pin until it will not stretch any further. Then, drape it over both of your fists, and gently pull the edges outward, while rotating the crust. When the circle has reached the desired size, place on a well oiled pizza pan.
  5. Bake for 8 minutes in the preheated oven, until the crust is slightly crisp and golden at the edges.
  6. Remove from oven. Increase oven to 500 degrees F. Add sauce, cheese, and toppings, and bake for 10 minutes.