Showing posts with label Mexican. Show all posts

Tuesday, February 2, 2010

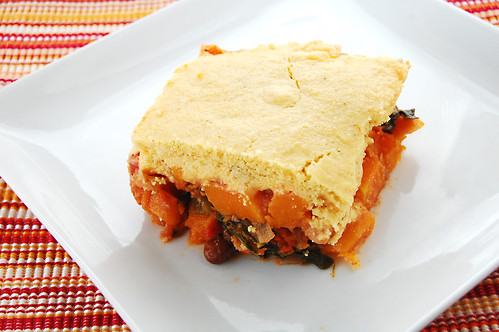
Winter-Time Tamale Pie


One of the best things about living in California is the plentitude of local fruits and vegetables we can get pretty much all year round. In the summer time, the farmers market in my town is THE place to be. The stands are always stocked with tons of zucchinis, peppers, and tomatoes. The winter months are a bit quieter, but offer a whole different array of produce – colorful squashes, tons of leafy greens, and lots of citrus. As much as I enjoy the summer produce, I actually think I enjoy Winter's creations even more. Something about those squashes and greens is so hearty and satisfying, especially when they mingle together in a warm dish.

I usually make this tamale pie with zucchini and peppers, but this time I decided to try a variation: butternut squash and kale; and let me tell you: this is better than the summer version. A key component of the deliciousness of a tamale pie is the cornbread-like topping, but I could seriously eat just the filling and call it dinner, happily.

Butternut Squash and Kale Tamale Pie

Filling
*1 large butternut squash, peeled, and cut into 1 inch cubes
*2 Tb olive oil
*1 large onion, diced
*4 cloves garlic, minced
*1 bunch kale, with large stems stripped and discarded, leaves chopped
*3 cups (or 2 15 oz. cans) cooked beans (pinto, black, kidney, I used pinto)
*1 1/2 cup shredded cheddar cheese
*1 15 oz can diced tomatoes, undrained
*1 tablespoon cumin
*2 teaspoons coriander
*1 teaspoon dried oregano
*salt and pepper to taste


Topping
*1 1/2 cup cornmeal
*2 Tb flour
*1 teaspoon salt
*2 teaspoons baking powder
*1/2 teaspoon baking soda
*2 eggs, beaten
*1 cup buttermilk
*2 tablespoons melted butter

For the Filling:
1. Preheat oven to 350 degrees. Lightly oil a baking pan. Add the squash and toss to coat. Roast the squash 35 minutes.
2. Heat the oil in a skillet over medium heat, add the onions, and cook for about 2 minutes until softened. Add the garlic and cook for about 1 minute.
3. Add the kale and cook for about 2-3 minutes until tender. Add the roasted squash and cook for about 3 minutes. Add beans and diced tomatoes. Stir in cumin, coriander, oregano, salt, and pepper. Heat for about 3 minutes.
4. Spread filling into lightly oiled 9x13 glass dish. Sprinkle cheese on top.

For the Topping:
1. Mix cornmeal, flour, salt, baking powder, and baking soda in a mixing bowl.
2. In a separate bowl, stir together buttermilk, melted butter, and eggs. Gently fold wet ingredients into dry ingredients.
3. Evenly spread the batter over the filling.
4. Bake 20 min or until top is lightly browned.

Wednesday, December 23, 2009

Mexican Wedding Cakes

These cookies are seriously amazing. Six ingredients (one of them is salt), no eggs or leavening, and they taste amazing. They are extremely easy to make and too easy to eat. The BF made these to bring to my family back in NY, and I think we will be making these every year now.

Mexican Wedding Cakes (also called Snowballs or Russian Tea Cakes; adapted from Joy of Cooking) makes 30 cookies
1/2 cup unsalted butter, softened
1/4 cup confectioners' sugar
1/8 teaspoon salt
1 teaspoons vanilla
1/2 cup pecans, lightly toasted, and finely ground
1 cups all purpose flour
1/3 cup confectioners' sugar

1. Preheat oven to 350F. Grease or line 2 cookie sheets.
2. Beat the butter, 1/4 sugar, salt, and vanilla in a large bowl until blended.
3. Stir in the pecans. Stir in the flour until well blended.
4. Shape into 1-inch balls and arrange about 1 1/4 inches apart on the cookie sheets. Bake each sheet at a time, for 12-15 minutes or until the cookies are lightly browned. Let stand for about 2 minutes, then remove to rack to cool.
5. Roll the cooled cookies in 1/3 cup confectioners' sugar.

Tuesday, November 10, 2009

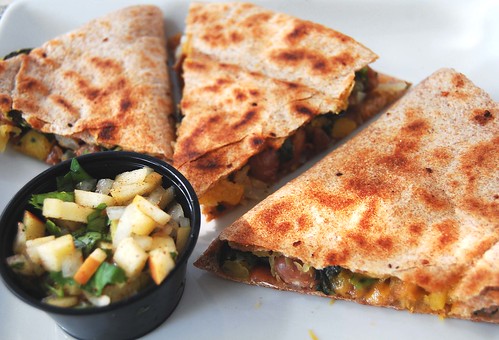
Acorn Squash Quesadillas with Apple Salsa

I love making quesadillas. They are super versatile since you can fill them with pretty much anything and they are just gosh darn tasty. The gooey warm fillings combined with a crisp exterior is just perfect with some cool salsa. I make quesadillas often in the summer time since there are so many awesome summer vegetables to stuff them with, plus yummy tomatoes for pico de gallo (aka salsa). This time, I wanted to try a more autumnized version of quesadillas, because hey, Fall has some great vegetables to offer too. I went with acorn squash and spinach. I also wanted to make a yummy autumnized salsa so I decided to make a sweet, spicy, and tangy apple salsa.

This combination was fabulous! The quesadillas rocked (as expected) but the salsa was AMAZING. No joke -- I seriously made a bunch of extra salsa and just ate it all on its own, it was that good. If you don't want to make the effort to make these 'dillas (although they are not difficult) you should still try this salsa. Even if you end up eating it out of the bowl like me.


Acorn Squash and Spinach Quesadillas with Apple Salsa
(makes 2 servings)
For the Quesadillas:
  • 1 Tb olive oil
  • 2 cups acorn squash, peeled and chopped
  • 1 onion, chopped
  • 2 handfuls of spinach, chopped
  • 4 cloves garlic, minced
  • 1 cup cooked beans (pinto, black, kidney)
  • 1/2 tsp cumin
  • salt, pepper to taste
  • 1 cup shredded cheddar cheese
  • 2 large tortillas (I used whole wheat)
For the Apple Salsa:
  • 1 medium crisp apple (I used fuji), diced
  • 1 handful of cilantro, chopped
  • 1/2 onion, chopped
  • 2 tablespoons fresh lemon or lime juice
  • salt, pepper to taste
For the Quesadillas:
1. Roast the acorn squash in the oven for about 20 min, until softened, but not mush.
2. Heat the oil in a skillet, and cook the onion for about 5 min. Add the squash, spinach, and garlic, and cook for about 10 minutes. Stir in the beans, cumin, and salt and pepper. (Here's a secret: I also do this step in...the microwave! Yes, when I don't have the patience to stand over the stove, I put all these ingredients in a bowl and nuke 'em for about 2 minutes. And you know what? I can't tell the difference).
3. Add a few drops of oil to a hot skillet. Place a tortilla on the skillet and add to one side half the squash mixture and half the cheese. Fold over and cook for about 5 minutes on each side, until crispy and browned. Repeat for other tortilla.

For the Apple Salsa:
1. Combine all ingredients in a large bowl and mix thoroughly.

Wednesday, October 14, 2009

Tres Leches Cake


On our way back from Peru last month, we had a 14 hour lay over in Mexico City. After we visited the lovely Chapultepec Castle, we walked downtown searching for a good authentic Mexican meal. While the BF was thinking about burritos and tacos, I was dreaming about dulce de leche, tres leches, flan and other types of creamy, milky desserts. So after lunch, I was on the hunt for a cute, authentic bakery that would satisfy all my creamy milky cravings. So we searched, and searched, and although we did find some cute bakeries, we could not find these authentic desserts that I had been dreaming about. We did find brownies, cookies, cheesecake, and apple pie. But nothing that seemed downright Mexican. Naturally, I had to satisfy my craving, so one of the first things I baked was this tres leches cake.

The original recipe is from Martha Stewart. Of course traditional tres leches is chocolate-free, but I find it hard to make a dessert that doesn't have chocolate (I'm trying to change, really), so I added some chocolate chips to the batter. To compensate, I also reduced the sugar.

There are literally millions of recipes for tres leches, and I chose this one because the cake part was a sponge cake as opposed to a yellow cake. I remember reading that sponge cakes are better for absorbing liquids. And I say the more creamy, milky, the better! I also cut the cake into hearts since I was feeling girly.

Chocolate Chip Tres Leches Cake (adapted from Martha Stewart)
  • Unsalted butter, room temperature, for baking dish
  • 6 large eggs, separated
  • 3/4 cup sugar
  • 1 cup all-purpose flour, sifted
  • 1/2 cup chocolate chips
  • 1 can (14 ounces) sweetened condensed milk
  • 1 can(12 ounces) evaporated milk
  • 1 cup whole milk
  • 1 1/2 cups heavy cream
  • 1 tablespoon confectioners' sugar
  1. Preheat oven to 325 degrees. Butter a 9-by-13-inch baking dish. In a mixing bowl, beat egg yolks and sugar on high speed until light and fluffy. In another bowl, beat egg whites to soft peaks. Using a rubber spatula, fold whites into yolks until almost combined. Gently fold in flour first, then chocolate chips (do not overmix).
  2. Spread batter in prepared dish. Bake until golden and pulling away from sides of dish, 20 to 25 minutes. Cool cake for at least 20 minutes. Once cool, use a fork to poke several holes all over the cake.
  3. In a medium bowl, whisk together the three milks; pour evenly over cake. Cover with plastic wrap; refrigerate at least 1 hour and up to 1 day.
  4. To serve, prepare topping: In a mixing bowl, whip heavy cream with sugar to soft peaks. Chill cake and cut into squares; serve topped with whipped cream.

Friday, July 17, 2009

Dulce De Leche


After making a half recipe of Magic Cookie Bars, I had some leftover condensed milk. I'd recently seen some dulce de leche recipes which use condensed milk, and although I've always wanted to make it, I was a bit intimidated. The possibility of exploding cans and spurting liquids combined with my luck in the kitchen was not a good combination. So I did some research and found a fool-proof, no explosions recipe for sweet delicious dulce de leche. Woot!

The recipe was really simple, and the ducle de leche came out great. My only advice with this recipe is to ditch the whisk and just use a spoon to stir it up. Although a whisk would still work, I found that much of the dulce de leche just ended up stuck in the wires of my whisk. Plus, licking the stuff off a spoon is so much easier than trying to lick a whisk clean.

Explosion Free Dulce de Leche (by David Lebovitz)

1. Preheat the oven to 425° F (220° C).
2. Pour one can (400 gr/14 ounces) of sweetened condensed milk (not evaporated milk) into a glass pie plate or shallow baking dish. Stir in a few flecks of sea salt.
3. Cover the pie plate snugly with aluminum foil and set the pie plate within a larger pan, such as a roasting pan, and add hot water until it reaches halfway up the side of the pie plate.
4. Bake for 1 to 1¼ hours. (Check a few times during baking and add more water to the roasting pan as necessary).
5. Once the Dulce de Leche is nicely browned and caramelized, remove from the oven and let cool. Once cool, stir with spoon until smooth.

Store in the refrigerator until ready to serve. Warm gently in a warm water bath or microwave oven before using.