Showing posts with label cake. Show all posts

Sunday, September 26, 2010

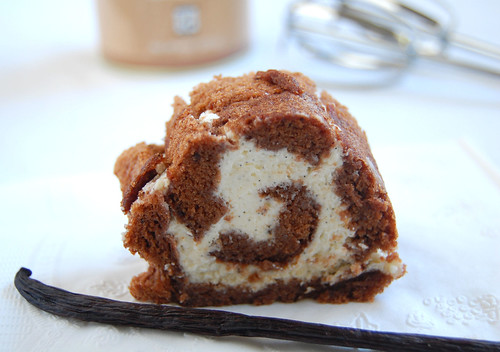
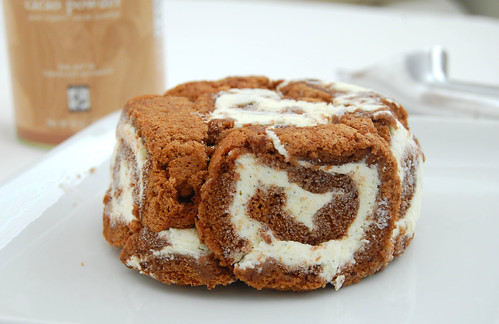
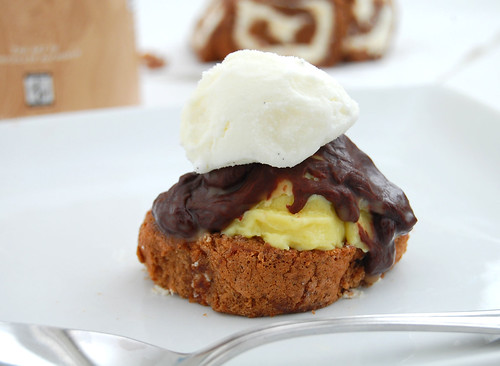
Swiss Roll Bombe

Wow. It has been a loooong time. Ready for my sob story? Because here it comes...
Over the last few months I've come to realize how precious is this thing that we call time. Time! What a sneaky thing you are. A few months ago I had so much of you -- almost too much. It was March and I had an offer for a job that didn't start until the end of August. I had 6 whole months to relish California while I slowly finished up my thesis. And now look at me...I barely have enough of you to sit down and write a post.

The last few months have been some of the craziest in my life. I went from being a graduate student on the verge of completely losing all motivation to an assistant professor. Sounds like a big change, but honestly, I don't think much has really changed. Sure, I'm in a different location, with a (dare I say it) real job, and a real (non-stipend) salary. But inside, I am still the same grad student -- stressing over deadlines, working late hours, and trying to hold on to every last bit of motivation I can find. It's been a challenge to say the least.

The hardest part is being away from those I love. I am in the middle of the country (literally) thousands of miles from anyone I love and sometimes I can't help but wonder if it's really worth it. Honestly, I'm still not sure. But this is what I've got myself into, so I might as well savor it while I've got it.

OK, enough rambling. I'm ready to talk food. I'm almost embarrassed to post this, but I'll do it anyway. This was supposed to be my submission for some past Daring Bakers challenge -- so long ago, I don't even remember the month, and right now I'm too lazy to look it up. The challenge was to create a Swiss bombe: basically cake-covered ice cream. That's right: Cake. And. Ice Cream. Together. Dessert doesn't get much better than this.

The swiss roll cake was really fantastic. Of course mine looked less than perfect, but the taste was phenomenal. Light and moist with the perfect amount of sweetness. I made two flavors of ice cream: vanilla bean and french vanilla (sorry, forgot which recipes I used), and added a layer of chocolate ganache. I made a mini bombe and a deconstructed version. Personally, I liked the deconstructed version better. But that's just me sometimes: disorganized and random (sshh...don't tell my students).

I also want to thank all my readers who left me the most endearing comments on my last post. After not blogging for so many months, I missed it terribly, and now I know why. Reading your comments and knowing that someone out there actually (somewhat?) cares about what's going on in my kitchen means so much to me. Seriously, your comments really touched me.
I really hope to be blogging regularly again soon.

Here are the recipes for the cake and ganache.

Monday, June 21, 2010

Applesauce Spice Cake

Can you tell I've had some free time on my hands? After making all the edits on my thesis, filling out a hundred forms about my graduate school experience, and setting up my meeting to officially submit my thesis (tomorrow at 10am!), I spent a few hours pimping up this blog. You like? Suggestions anyone?

I also thought and thought about what to write for this post. I know I have been trying to advocate local and seasonal recipes here on CCT, and as much as I try to eat locally and seasonally, I have a little confession everyone. Here goes...I eat apples. Every. Single. Day. Of the year. Just about. Fall? Yes, of course. Winter? Sure, cold storage apples are pretty awesome too. But then, I also eat apples in the spring...and summer (gasp!). Not sure why -- just trying to keep the doctor away, I guess.

And hence, the apples in the background of this picture. But here's the thing about this recipe...it doesn't call for apples, it calls for applesauce. So even if you abide by all the local and seasonal rules, you can still enjoy this cake all year long.

I'm not sure what prompted me to make this very autumn-esque cake in the middle of June. I was craving something sweet and spicy and nutty, and this just fit the bill. Maybe it was the countless number of yummy looking cake recipes I've been seeing on Grace's lovely site. Maybe I was just longing for Fall. Maybe I'm trying to use up what seems like hundreds of jars of Trader Joe's applesauce before I prepare for my big move across the country. Whatever the reason, I made this cake, and it made me happy.

Applesauce Spice Cake with Cream Cheese Frosting (adapted from Joy of Cooking, makes about 12 servings)

*This cake was very spicy and moist, but a bit dense. I think next time I will increase the oil to 1/2 cup and reduce the flour by about 1/4 cup.

For cake:
1 cup sifted all-purpose flour
1 cup sifted whole wheat flour
1 teaspoon baking soda
1 teaspoon ground cinnamon
1/2 teaspoon ground cloves
1/2 teaspoon ground allspice
1/2 teaspoon salt
1/3 cup oil (I used canola)
1 cup packed brown sugar
1 large egg
1/4 cup buttermilk or yogurt (I used a mix)
1 cup unsweetened applesauce
1 cup chopped walnuts

For Cream Cheese Frosting:
1 8oz package cream cheese
2 tablespoons softened butter
1 cup confectioners' sugar, sifted
1/2 teaspoon vanilla extract

To make cake:
1. Preheat oven to 350F. Grease and flour an 8-inch square baking pan.
2. In a large bowl, whisk together the sifted flours, baking soda, cinnamon, cloves, allspice, and salt.
3. In a separate bowl, using a mixer on high speed, beat together the oil and sugar for about 3 minutes.
4. Set the speed to low, and beat in the egg. Stir in the flour mixture in 3 parts, alternating with the applesauce. Do not overmix. Finally, stir in the walnuts.
5. Scrape batter into pan and spread evenly. Bake for 25-30 minutes or until a toothpick inserted into the center comes out clean. Once cool, top with cream cheese frosting.

To make frosting:
In a large bowl, cream together cream cheese and butter until creamy. Gradually beat in the sugar until smooth. Beat in vanilla extract.

Sunday, May 16, 2010

Classic Yellow Cupcakes

Oh goodness me. Can someone teach me how to frost a cupcake? Apparently, I suck at this. These cupcakes were so cute out of the oven, and then I pulled out my piping bag, tips and all. Next thing you know, there I was, "piping" globs of frosting on them, desperately trying to maintain some coherent design, but really just creating what I can only describe as poo-like piles. Sorry for the description, but I need some pointers! Fellow bakers, how do you frost your cupcakes so beautifully, and why do mine always look so...strange? I read all the tips in Joy of Baking, even watched some videos, but something always goes astray. Either I pull away too quickly and end up with skinny tubes, or pipe for too long and end up with big puddles. Maybe I just need a different piping tip. Yup, that must be it. Blame it on the tools, not the handy man woman.

Luckily, I was able to somewhat salvage these cupcakes by using the frosting as more of a glue and sticking on some little chocolate chips (another reason why I love chocolate chips!). And in all seriousness, these cupcakes were rich, moist, and just sweet enough with a subtle hint of vanilla. Utterly delicious - botched-up frosting and all.

Yellow Cupcakes with Chocolate Frosting (adapted from Hummingbird Bakery Cookbook, makes about 18 cupcakes)

*2 cups all-purpose flour
*1 1/2 cup sugar
*2 teaspoons baking powder
*1 teaspoon baking soda
*pinch of salt
*6 tablespoons unsalted butter, at room temperature
*1 cup whole milk
*2 eggs
*1 teaspoon vanilla extract

Chocolate Buttercream Frosting
* 2 1/4 cup confectioner's sugar
* 8 Tb cocoa powder
* 6 Tb butter, at room temperature
* 1 tsp vanilla
* 2 Tb milk

1. In a large bowl, sift together the confectioners sugar and cocoa, and set aside.
2. In another large bowl, cream butter until smooth. Gradually add in one quarter of the sugar mixture, 2 Tb at a time. Add in all of the vanilla, then another quarter of the sugar mixture, two tablespoons at a time. The mixture should be firm. At this point, gradually add the milk, about a 1/2 tablespoon at at a time, alternating with 2 tablespoons at a time of the rest of the sugar mixture.

1. Preheat oven to 350 degrees.
2. Put the flour, sugar, baking powder, salt and butter in an electric mixer with a paddle attachment (or use a hand-held electric whisk) and beat on slow until you get a sandy consistency and everything is combined. Gradually pour in half the milk and beat until the milk is just incorporated.
3. Whisk the eggs, vanilla extract, and remaining milk together in a separate bowl for a few seconds, then pour into the flour mixture and continue beating until just incorporated (scrape any unmixed ingredients from the side of the bowl with a rubber spatula). Continue mixing for a couple more minutes until the mixture is smooth. Do not over-mix.
4. Pour the mixture into a muffin pan lined with paper cases until two thirds full and bake in the preheated oven for 20–25 minutes, or until light golden and the sponge bounces back when touched (smaller cupcakes will need 3-5 minutes less baking time).
5. A toothpick inserted in the center should come out clean. Leave the cupcakes to cool slightly in the tray before turning out on to a wire cooling rack to cool completely.
6. When the cupcakes are cold, frost with chocolate buttercream frosting. To

Wednesday, May 5, 2010

Swedish Visiting Cake

I'd seen this cake made by the Tuesdays With Dorie group a few weeks ago, and I just could not resist. Maybe it was the simplicity of the recipe, or the rustic but oh-so-pretty pictures in Dorie's book, but something about this cake just called out to me.

This cake is seriously one of the most delicious cakes I have ever made and it probably took me about 15 minutes tops to prepare. Am I tooting my own horn? Sure, maybe a little, but not really, since the deliciousness of this cake is not a reflection of the baker, it is a reflection of the recipe. It is so simple to make and just wonderful to eat. Butter, flour, sugar, vanilla, and almonds...how can you go wrong? Plus, the batter is easily prepared in one bowl and doesn't require a mixer.

Best of all, this cake is just a blank canvas for so many variations I have in mind - maybe adding a touch of cinnamon and nutmeg, or topping it with a fruit compote, or folding in a handful of... chocolate chips (bet you didn't see that one coming). So rebellious yet so delicious too. The possibilities are seriously endless.


Swedish Visiting Cake (from Dorie Greenspan, Baking: From My Home to Yours)

*8 tbsp (1 stick) unsalted butter, melted and cooled, plus more for pan
*1 cup sugar, plus more for sprinkling
*Grated zest of 1 lemon
*2 eggs
*1/4 tsp salt
*1 tsp vanilla extract
*1/2 tsp almond extract
*1 cup flour
*1/4 cup sliced almonds (blanched or not)
*powdered sugar (optional, for serving)

1. Center a rack in oven and preheat to 350 degrees. Butter a seasoned 9-inch cast-iron skillet or other heavy oven-proof skillet, a 9-inch round cake pan or even a pie pan.

2. Pour sugar into a medium bowl. Add lemon zest and blend zest into sugar with your fingers until sugar is moist and aromatic. Whisk in eggs, one at a time, until well blended. Whisk in salt and vanilla and almond extracts.

3. Switch to a rubber spatula and stir in flour. Finally, fold in melted butter. Scrape batter into prepared skillet or pan and smooth top with rubber spatula.

4. Scatter sliced almonds over top and sprinkle with sugar. If using a cake or pie pan, place pan on baking sheet. Bake for 25 to 30 minutes, or until golden and a little crisp on outside; the inside will remain moist. Let cook slightly, and sprinkle with a bit of powdered sugar before serving.

Sunday, February 28, 2010

Daring Baker's Tiramisu

The February 2010 Daring Bakers’ challenge was hosted by Aparna of My Diverse Kitchen and Deeba of Passionate About Baking. They chose Tiramisu as the challenge for the month. Their challenge recipe is based on recipes from The Washington Post, Cordon Bleu at Home and Baking Obsession.

I LOVE tiramisu, and had previously never made it, so when I saw the February challenge, I was definitely excited. For this challenge, we were to make tiramisu from scratch -- meaning all of the components had to be made from scratch, including the lady fingers and the mascarpone cheese.

There were many components to this recipe. From experience, I've learned that for the sake of my mental health, I should never expect to complete a Daring Bakers challenges in one day. This dessert consisted of lady fingers, mascarpone cheese, zabaglione (Italian custard), pastry cream, and whipped cream. So, for this challenge, I split up the work over a span of a few days, and it worked out very nicely. I made the lady fingers and mascarpone one day, the zabaglione, pastry creams, and whipped creams 3 days later, assembled the dessert the following day, and let it chill overnight.


What I really loved about this recipe is that although there were many components, I didn't find any of them to be too difficult, just a bit time consuming. The lady fingers were pretty simple and very good, although next time I may add a bit of vanilla to give them more flavor. Since I had made mascarpone once before, this time around was definitely easier.

For my version of this decadent dessert, I made an extra chocolate layer by spiking the pastry cream with about 6 ounces of chopped bittersweet chocolate, and topped it with some shaved chocolate. I have a hard time saying no to chocolate. Sorry, it's a weakness.

Please check out Aparna's or Deeba's blogs for the recipe.

Saturday, February 13, 2010

Chocolate Cupcakes


As I've mentioned a few times on this blog, I am a lover of all things desserts. Brownies, cookies, and pies are high up on the list, but my all time favorite dessert is chocolate cake with vanilla frosting. OK, I know it's not the most exciting dessert, but something about the contrast of the rich chocolate and the creamy sweet frosting is incredibly satisfying.

This is the chocolate cake recipe that I always make. Although Ina Garten is a culinary genius, she is not known for making low-fat recipes (take a look at this). But as I was preparing the batter for these cupcakes, I realized they are actually relatively low in fat: 14 (unfrosted) cupcakes require just 1 egg, and only 1/4 cup of oil. So that's 1/14 of an egg and .85 teaspoons (NOT tablespoons) of oil per cupcake. The frosting is a bit more sinful, but only a small amount is needed per cupcake. Me? I start with a small amount, but always have more on the side for dipping. Yum.

I'm not a big fan of sprinkles, but since I was making these cupcakes for a birthday party, I decided to be festive.

Chocolate Cupcakes (adapted from Ina Garten)
*3/4 cup + 2 tablespoons all-purpose flour
*1 cups sugar
*1/4 cup + 2 heaping tablespoons cocoa powder
*1 teaspoon baking soda
*1/2 teaspoon baking powder
*1/2 teaspoon kosher salt
*1/2 cup buttermilk, shaken
*1/4 cup vegetable oil (I use canola)
*1 egg at room temperature
*1/2 teaspoon vanilla extract
*1/2 cup strong brewed
*sprinkles (optional)

Vanilla Buttercream Frosting (adapted from Smitten Kitchen)

*2 cups confections sugar
*1/2 stick butter, at room temperature
*1/2 tablespoons milk
*1/4 tsp pure vanilla extract

To make the Frosting:
1. Whip the butter in the bowl of an electric mixer, or with a hand mixer, for several minutes, until light and fluffy. Slowly add the powdered sugar, a few tablespoons at a time.
2. When the frosting looks thick enough to spread, add 2 more tablespoons of the confectioners sugar, one at a time. Drizzle in the milk, and mix it until combined. Add one more tablespoon of the sugar, then drizzle in the vanilla and mix until combined.

To make the cupcakes:
1. Preheat the oven to 350 degrees F. Line a muffin pan with cupcake liners.
2. Sift the flour, sugar, cocoa, baking soda, and baking powder into a large bowl. Add salt. Mix with an electric mixer (if using stand mixer, use paddle attachment) on low speed until combined.
3. In another bowl, combine the buttermilk, oil, eggs, and vanilla. With the mixer on low speed, slowly add the wet ingredients to the dry. With mixer still on low, add the coffee and stir just to combine, scraping the bottom of the bowl with a rubber spatula.
4.Pour the batter into the prepared pan and bake for 35 to 40 minutes, until a toothpick inserted in the center cupcake comes out clean. Place cupcakes out onto a cooling rack and cool completely.
5. Frost with vanilla frosting and top with sprinkles.

Wednesday, October 14, 2009

Tres Leches Cake


On our way back from Peru last month, we had a 14 hour lay over in Mexico City. After we visited the lovely Chapultepec Castle, we walked downtown searching for a good authentic Mexican meal. While the BF was thinking about burritos and tacos, I was dreaming about dulce de leche, tres leches, flan and other types of creamy, milky desserts. So after lunch, I was on the hunt for a cute, authentic bakery that would satisfy all my creamy milky cravings. So we searched, and searched, and although we did find some cute bakeries, we could not find these authentic desserts that I had been dreaming about. We did find brownies, cookies, cheesecake, and apple pie. But nothing that seemed downright Mexican. Naturally, I had to satisfy my craving, so one of the first things I baked was this tres leches cake.

The original recipe is from Martha Stewart. Of course traditional tres leches is chocolate-free, but I find it hard to make a dessert that doesn't have chocolate (I'm trying to change, really), so I added some chocolate chips to the batter. To compensate, I also reduced the sugar.

There are literally millions of recipes for tres leches, and I chose this one because the cake part was a sponge cake as opposed to a yellow cake. I remember reading that sponge cakes are better for absorbing liquids. And I say the more creamy, milky, the better! I also cut the cake into hearts since I was feeling girly.

Chocolate Chip Tres Leches Cake (adapted from Martha Stewart)
  • Unsalted butter, room temperature, for baking dish
  • 6 large eggs, separated
  • 3/4 cup sugar
  • 1 cup all-purpose flour, sifted
  • 1/2 cup chocolate chips
  • 1 can (14 ounces) sweetened condensed milk
  • 1 can(12 ounces) evaporated milk
  • 1 cup whole milk
  • 1 1/2 cups heavy cream
  • 1 tablespoon confectioners' sugar
  1. Preheat oven to 325 degrees. Butter a 9-by-13-inch baking dish. In a mixing bowl, beat egg yolks and sugar on high speed until light and fluffy. In another bowl, beat egg whites to soft peaks. Using a rubber spatula, fold whites into yolks until almost combined. Gently fold in flour first, then chocolate chips (do not overmix).
  2. Spread batter in prepared dish. Bake until golden and pulling away from sides of dish, 20 to 25 minutes. Cool cake for at least 20 minutes. Once cool, use a fork to poke several holes all over the cake.
  3. In a medium bowl, whisk together the three milks; pour evenly over cake. Cover with plastic wrap; refrigerate at least 1 hour and up to 1 day.
  4. To serve, prepare topping: In a mixing bowl, whip heavy cream with sugar to soft peaks. Chill cake and cut into squares; serve topped with whipped cream.

Wednesday, October 7, 2009

Chocolate Cupcakes with Chocolate Chocolate Chip Filling


Yes the title is correct and no there is not an extra 'Chocolate' in there. That's what these are: Chocolate cupcakes with a chocolate filling that has chocolate chips in it. Can you tell I was craving something when I made these?

These cupcake are a delicious conglomeration of two fantastic chocolate recipes: Beatty's Chocolate Cake (from Ina Garten) and Scharffenberger's Chocolate Pudding. My additions are a vanilla (just to keep things interesting) buttercream frosting and mini chocolate chips in the pudding. Simply bake the cupcakes, cook the pudding, add the chips, core the cupcakes, fill with pudding, and frost. Ok, so maybe a few more steps than your average cupcake, but I promise these are totally worth the effort. Being super rich and chocolatey, they are sure to satisfy even the fiercest of chocolate cravings.

(Please forgive this picture, I realize the filling doesn't look very creamy at all. But it was about 90 degrees when I decided to take these pictures and I couldn't get the frosting to drip off without throwing these guys in the fridge for a few minutes, hence the funky looking filling. But not refrigerated, this filling is super creamy.)

Chocolate Cupcakes with Chocolate Chocolate Chip Filling (makes about 28 cupcakes)

For the chocolate cupcakes:
I don't make any changes to the chocolate cake recipe, so the recipe is here.

Chocolate Chip Filling (adapted from John Scharffenberger via Wednesday Chef)
  • 1/4 cup cornstarch
  • 1/2 cup sugar
  • 1/8 teaspoon salt
  • 3 cups 2% milk
  • 8 ounces bittersweet chocolate, coarsely chopped
  • 1 teaspoon pure vanilla extract
  • 1/4 cup mini chocolate chips or coarsely chopped chocolate
Vanilla Buttercream Frosting (adapted from Smitten Kitchen)
  • 3 to 4 cups confections sugar
  • 1 stick butter, at room temperatue
  • 3 tablespoons milk
  • 1/2 tsp pure vanilla extract
To make the Filling:
1. Combine the cornstarch, sugar and salt in the top of a double boiler.
2. Slowly whisk in the milk, scraping the bottom and sides with a heatproof spatula to incorporate the dry ingredients. Place over gently simmering water and stir occasionally, scraping the bottom and sides. Use a whisk as necessary should lumps begin to form.
3. After 15 to 20 minutes, when the mixture begins to thicken and coats the back of the spoon, add the chocolate. Continue stirring for about 2 to 4 minutes, or until the pudding is smooth and thickened.
4. Remove from the heat and stir in the vanilla.
5. Let cool to room temperature, and add the chocolate chips.

To make the Frosting:
1. Whip the butter in the bowl of an electric mixer, or with a hand mixer, for several minutes, until light and fluffy. Slowly add the powdered sugar, a few tablespoons at a time.
2. When the frosting looks thick enough to spread, add 2 more tablespoons of the confections sugar, one at a time. Drizzle in the milk, and mix it until combined. Add one more tablespoon of the sugar, then drizzle in the vanilla and mix until combined.

To prepare the cupcakes:
1. Let the cupcakes cool to room temperature. Insert a paring knife into each cupcake at a slight angle, halfway between the center and the outside edge of the cupcake. Cut a circular cone out of the cake, being careful not to cut all the way to the bottom.
3. Chop the pointy ends of the cones off, and set the circular bases aside. These will be used to cover the cupcake holes once they are filled.
4. Using a small teaspoon or a piping bag, fill each cupcake with the filling. Cover each cupcake with a circular base, and frost.

Thursday, September 24, 2009

Carrot Cake with Dulce de Leche Cream Cheese Frosting


I remember growing up in New York, winter was always my favorite season. Snow -- I LOVED snow. Couldn't get enough of it, actually. I would spend literally hours outside running around in it, without even noticing that it was uhm, cold. What is it about kids and snow? Do they not feel how cold it is?
As I got older, either snow got colder, or I got weaker, because winter is no longer my favorite season. Don't get me wrong, I still love the snow (and totally miss it), and LOVE winter, but my favorite season has shifted to Fall.
Something about the crispness in the air and the colors in the trees is so comforting yet exhilarating at the same time. Wow, for a second there I almost forgot that here in California, on the 2nd day of Fall it is - ready for this ? 94 degrees!!?? 94 degrees??!!? Any other Californians out there longing for Fall to actually start?

This carrot cake has Fall written all over it. It's spicy and sweet, and comforting and exhilarating. Ok, maybe not exhilarating, but it is all of those other things and super delicious. Plus, it is good for you. I took one of Dorie Greenspan's fantastic recipes (I love her but does every recipe REALLY need 2 cups of butter?) and added some healthy tweaks (surprise) and extra spice. I also ditched the usual cream cheese topping, and swapped it for a super rich and decadent dulce de leche cream cheese frosting. The dulce de leche adds an awesome butterscotchy flavor that just...works. I can't explain but try it and you'll see.

Spicy Carrot Cake with Dulce de Leche Cream Cheese Frosting (adapted from Dorie Greenspan)

Cake:
  • 1/2 cups all purpose flour
  • 1/2 whole wheat pastry flour
  • 1 teaspoons baking powder
  • 1 teaspoon baking soda
  • 1 teaspoon ground cinnamon
  • 1/2 teaspoon ground ginger
  • 1/4 teaspoon salt
  • 1 1/2 cups grated carrots (about 5 carrots),
  • 1/2 cup coarsely chopped walnuts
  • 1/2 cup coarsely chopped pecans
  • 1/2 cup white sugar
  • 1/2 cup brown sugar
  • 1/4 cup canola oil
  • 1/4 cup applesauce
  • 2 large eggs
Frosting:
  • 8 ounces cream cheese, room temperature
  • 1 cup confectioners sugar, sifted (more or less to taste)
  • 2 Tb dulce de leche (homemade or store-bought)
1. Preheat the oven to 325 degrees Fahrenheit. Butter a 8 in square pan.
2. Whisk the flours, baking powder, baking soda, cinnamon, ginger, and salt. In another bowl, stir together the carrots and chopped nut.
3. Beat the sugar, oil, applesauce, and vanilla extract together on a medium speed until smooth. Add the eggs one by one and continue to beat until the batter is even smoother. Reduce the speed to low and add the flour mixture, mixing only until the dry ingredients disappear. Gently mix in the nuts ingredients. Pour in pan.
4. Bake for 40-50 minutes, rotating the pan from top to bottom and front to back at the midway point, until a thin knife inserted into the centers comes out clean.
5. For frosting, beat the cream cheese until smooth and creamy. Gradually add the sugar and continue to beat until the frosting is velvety smooth. Beat in the vanilla and dulce de leche. Allow cake to cool completely before spreading frosting.

Sunday, August 30, 2009

Daring Bakers Dobos Torte

The August 2009 Daring Bakers' challenge was hosted by Angela of A Spoonful of Sugar and Lorraine of Not Quite Nigella. They chose the spectacular Dobos Torte based on a recipe from Rick Rodgers' cookbook Kaffeehaus: Exquisite Desserts from the Classic Caffés of Vienna, Budapest, and Prague.

The Dobos Torte is a five-layer sponge cake filled with chocolate buttercream and topped with wedges of crunchy caramel. The orginal recipe called for a buttercream made with eggs and many of the other Daring Bakers had complained that it melted easily. Since I knew I'd be taking this cake to work, which is a 1 1/2 hr drive, I opted for a more resilient chocolate buttercream (recipe below). I added a bit of coffee to the buttercream and brushed on a simple syrup of kahlua and water to the cake layers. I finished off by covering the cake in toasted hazelnuts.

The most challenging part of the recipe was preparing the separate cake layers. I followed the recipe exactly but somehow ended up with 5 layers. They were still 5 layers of sponge cake and chocolate buttercream goodness. If I were to make this again I think I would skip the caramel topping. They were a bit too chewy and sweet for my taste.

Here are some comments from co-workers:

CW1: Fancy!
CW2: Wow! You made this from scratch? And the frosting is not from a can?!
CW3: Very yummy and not too sweet.

There you have it folks. Dobos definitely knew what he was doing when he came up with this cake. Check out the recipe here. Below is my favorite recipe for melt-free chocolate mocha buttercream (tried and tested after many many not-so-good recipes).

Chocolate Mocha Buttercream Frosting
  • 2 3/4 cup - 2 Tb confectioners sugar
  • 8 Tb cocoa powder
  • 6 Tb butter, NOT melted
  • 1 tsp vanilla
  • 2 Tb milk
  • 2 Tb strong coffee
1. In a large bowl, sift together the confectioners sugar and cocoa, and set aside.
2.
In another large bowl, cream butter until smooth. Gradually add in one quarter of the sugar mixture, 2 Tb at a time. Add in all of the vanilla, then another quarter of the sugar mixture, two tablespoons at a time. The mixture should be firm. At this point, gradually add the milk and coffee, alternating with 2 tablespoons at a time of the rest of the sugar mixture.

Saturday, June 27, 2009

Daring Bakers Bakewell Tart


The June Daring Bakers challenge was hosted by Jasmine of Confessions of a Cardamom Addict and Annemarie of Ambrosia and Nectar. They chose a Traditional (UK) Bakewell Tart/pudding that was inspired by a rich baking history dating back to the 1800’s in England.

This was my first Daring Bakers challenge, and I am dedicating it to the BF. Without a doubt, if it weren't for him, there is no way I would have completed this recipe. There were so many factors which tempted me to be a no-show for my very first challenge: (1) I was leaving to go out of town, and then out of the country, for 2 weeks, so would not be around to enjoy the results of the challenge (2) I really wanted to do something creative and I had the hardest time coming up with ideas (3) I had never heard of a Bakewell Tart, or even used almond flour, and (4) the recipe required a scale for measuring the ingredients, and my broke self does not own one.

With some much needed moral support from the BF, I finally decided to tough it out and complete the challenge, and I am so glad I did! Since I was not going to be around to enjoy it, I decided the next best thing would be to give it away. I wanted to give half the tart to a friend I was visiting who just finished business school, and since she is a major chocoholic I knew that I would have to incorporate chocolate into the recipe. So instead of the traditional fruit spread which the recipe calls for, I decided to go with a chocolate spread. They're almost the same, right? Cocoa is a fruit, right? Oh, it's not? Ok, well it grows on trees, right? Oh, not really? Ok, well it's sweet like fruit, right? No?! Ok, they're not similar, but they both make good spreads, so there.

The most popular chocolate-based spread I know of is nutella, which is made with chocolate and hazelnuts. But since this dessert uses almond flour, I decided to make my own version of nutella, with almonds instead of hazelnuts. The homemade almond "nutella" came out great, and was perfect for this dessert.

The Bakewell tart traditionally consists of a shortcrust pastry (like a pie crust), a layer of jam, and a frangipane (or almond cake) topping. I was a bit wary of this dessert, because I expected the frangipane to taste like marzipan, which I am not a fan of. Surprisingly, it tasted nothing like marzipan -- instead it was like a very rich, almost creamy, cake -- totally delicious. This was my first experience using almond flour and I loved it. It's a bit pricey compared to regular flour, but I will definitely be using it when I'm in the mood to splurge. Also, since I was short on time, I used my trusty pie crust recipe instead of the one given in the challenge. I really enjoyed this recipe. The butter, almond, and chocolate flavors came together really well to make a very rich and satisfying dessert.

As for measuring the ingredients -- the BF took them all to his lab and measured them for me using his lab scale! Ah, it's great to know a scientist, and even better when he's your boyfriend. :) As much as I appreciated his help, this challenge has definitely convinced me to invest in a kitchen scale, so this little baby will be sitting on my counter in 5 to 7 business days. Woot!


Bakewell Tart with Chocolate Almond Spread
  • One quantity sweet shortcrust pastry (recipe follows)
  • Bench flour
  • 250ml (1cup (8 US fl. oz)) jam or curd, warmed for spreadability
  • One quantity frangipane (recipe follows)
  • One handful blanched, flaked almonds

Assembling the tart
Place the chilled dough disc on a lightly floured surface. If it's overly cold, you will need to let it become acclimatised for about 15 minutes before you roll it out. Flour the rolling pin and roll the pastry to 5mm (1/4”) thickness, by rolling in one direction only (start from the centre and roll away from you), and turning the disc a quarter turn after each roll. When the pastry is to the desired size and thickness, transfer it to the tart pan, press in and trim the excess dough. Patch any holes, fissures or tears with trimmed bits. Chill in the freezer for 15 minutes.

Preheat oven to 200C/400F.

Remove shell from freezer, spread as even a layer as you can of jam onto the pastry base. Top with frangipane, spreading to cover the entire surface of the tart. Smooth the top and pop into the oven for 30 minutes. Five minutes before the tart is done, the top will be poofy and brownish. Remove from oven and strew flaked almonds on top and return to the heat for the last five minutes of baking.

The finished tart will have a golden crust and the frangipane will be tanned, poofy and a bit spongy-looking. Remove from the oven and cool on the counter. Serve warm, with crème fraîche, whipped cream or custard sauce if you wish.

When you slice into the tart, the almond paste will be firm, but slightly squidgy and the crust should be crisp but not tough.

Sweet shortcrust pastry
225g (8oz) all purpose flour
30g (1oz) sugar
2.5ml (½ tsp) salt
110g (4oz) unsalted butter, cold (frozen is better)
2 (2) egg yolks
2.5ml (½ tsp) almond extract (optional)
15-30ml (1-2 Tbsp) cold water

Sift together flour, sugar and salt. Grate butter into the flour mixture, using the large hole-side of a box grater. Using your finger tips only, and working very quickly, rub the fat into the flour until the mixture resembles bread crumbs. Set aside.

Lightly beat the egg yolks with the almond extract (if using) and quickly mix into the flour mixture. Keep mixing while dribbling in the water, only adding enough to form a cohesive and slightly sticky dough.

Form the dough into a disc, wrap in cling and refrigerate for at least 30 minutes.

Frangipane
125g (4.5oz) unsalted butter, softened
125g (4.5oz) icing sugar
3 (3) eggs
2.5ml (½ tsp) almond extract
125g (4.5oz) ground almonds
30g (1oz) all purpose flour

Cream butter and sugar together for about a minute or until the mixture is primrose in colour and very fluffy. Scrape down the side of the bowl and add the eggs, one at a time, beating well after each addition. The batter may appear to curdle. After all three are in, pour in the almond extract and mix for about another 30 seconds and scrape down the sides again. With the beaters on, spoon in the ground nuts and the flour. Mix well. The mixture will be soft, keep its slightly curdled look (mostly from the almonds) and retain its pallid yellow colour.