Wednesday, May 26, 2010

Panzanella Salad


My lovely readers, I know I have been away for a while. I have been traveling on a road trip for the last week with no internet access and therefore have been unable to update this site and read up on all my favorite blogs. I finally have internet access (woot!) now and I promise I will catch up on all the posts I have missed.

I also have some news...I got a job! Yes, in a few months, I will be finishing up graduate school and moving to the Midwest to teach at a small liberal arts college. I am excited and terrified at the same time. Happy and sad. Relieved and nervous. I'm definitely feeling a mix of emotions right now and this is only the start. It is crazy for me to think about how remarkably different my life will be in a few months, how so many changes are about to take place. And as excited as I am about this opportunity, I sometimes wish things wouldn't change.

I've spent the last 5 years of my life in California, and although I'm ready for a change, I know there are many things I will miss about this place. I've mentioned before how great the local farmer's market is here, and I feel almost at a loss when I think about not being able to have fresh and local produce all year long. The best thing about this farmer's market is the variety of produce stands avaialble. Sure there are the ridiculously pricey vendors who try to sell you a tiny basket of organic strawberries for $7, but there are also several vendors that sell pesticide-free produce at prices that are reasonable even for a cheap and poor graduate student like me.

Shopping at the farmer's market gives me opportunities to make things like this panzanella salad which was inspired by one of my favorite food sites. The original recipe called for asparagus and leeks, but I substituted spring garlic for the leeks and added fava beans. That is the beauty of this salad. It can be easily tweaked to accommodate whatever vegetable you're craving or, in my case, happens to be on sale!

Spring Panzanella Salad (adapted from Smitten Kitchen)
For the croutons:
1/4 cup olive oil
2 cloves garlic, finely chopped
5 cups day-old bread, crust removed, cubed (I used whole wheat)
6 tablespoons finely grated Parmesan or Pecorino cheese
Salt and freshly ground black pepper

For the vinaigrette:
Half a red onion, finely diced
2 to 2 1/2 tablespoons red wine vinegar
Juice of half a lemon
1/4 cup olive oil
1/2 teaspoon Dijon mustard

For the salad:
2 cups shelled fava beans (from about 2 lbs of unshelled beans), steamed or blanched
1 pound asparagus, cut into 1 inch pieces
2 bulbs spring garlic (optional)
1 19-ounce can of white beans, rinsed and drained or 1 1/2 cups cooked white beans

Preheat oven to 400°F.

To make bread cubes:
Mix the bread cubes with the garlic, olive oil, cheese, salt and pepper in a large bowl. Toss to coat well. Transfer bread to a baking sheet and sprinkle with salt and pepper. Bake stirring once or twice, until the croutons are crisp and lightly colored on the outside but still soft within, about 10 to 15 minutes. Set aside and let cool.

To make vinaigrette:
Whisk together red onion, vinegar, lemon juice, olive oil, and mustard in a small bowl.
Set aside.

To prepare salad:
Combine the beans, asparagus, spring garlic (if using), and white beans in a large bowl. Mix in bread cubes, pour in vinaigrette, and toss well.

Sunday, May 16, 2010

Classic Yellow Cupcakes

Oh goodness me. Can someone teach me how to frost a cupcake? Apparently, I suck at this. These cupcakes were so cute out of the oven, and then I pulled out my piping bag, tips and all. Next thing you know, there I was, "piping" globs of frosting on them, desperately trying to maintain some coherent design, but really just creating what I can only describe as poo-like piles. Sorry for the description, but I need some pointers! Fellow bakers, how do you frost your cupcakes so beautifully, and why do mine always look so...strange? I read all the tips in Joy of Baking, even watched some videos, but something always goes astray. Either I pull away too quickly and end up with skinny tubes, or pipe for too long and end up with big puddles. Maybe I just need a different piping tip. Yup, that must be it. Blame it on the tools, not the handy man woman.

Luckily, I was able to somewhat salvage these cupcakes by using the frosting as more of a glue and sticking on some little chocolate chips (another reason why I love chocolate chips!). And in all seriousness, these cupcakes were rich, moist, and just sweet enough with a subtle hint of vanilla. Utterly delicious - botched-up frosting and all.

Yellow Cupcakes with Chocolate Frosting (adapted from Hummingbird Bakery Cookbook, makes about 18 cupcakes)

*2 cups all-purpose flour
*1 1/2 cup sugar
*2 teaspoons baking powder
*1 teaspoon baking soda
*pinch of salt
*6 tablespoons unsalted butter, at room temperature
*1 cup whole milk
*2 eggs
*1 teaspoon vanilla extract

Chocolate Buttercream Frosting
* 2 1/4 cup confectioner's sugar
* 8 Tb cocoa powder
* 6 Tb butter, at room temperature
* 1 tsp vanilla
* 2 Tb milk

1. In a large bowl, sift together the confectioners sugar and cocoa, and set aside.
2. In another large bowl, cream butter until smooth. Gradually add in one quarter of the sugar mixture, 2 Tb at a time. Add in all of the vanilla, then another quarter of the sugar mixture, two tablespoons at a time. The mixture should be firm. At this point, gradually add the milk, about a 1/2 tablespoon at at a time, alternating with 2 tablespoons at a time of the rest of the sugar mixture.

1. Preheat oven to 350 degrees.
2. Put the flour, sugar, baking powder, salt and butter in an electric mixer with a paddle attachment (or use a hand-held electric whisk) and beat on slow until you get a sandy consistency and everything is combined. Gradually pour in half the milk and beat until the milk is just incorporated.
3. Whisk the eggs, vanilla extract, and remaining milk together in a separate bowl for a few seconds, then pour into the flour mixture and continue beating until just incorporated (scrape any unmixed ingredients from the side of the bowl with a rubber spatula). Continue mixing for a couple more minutes until the mixture is smooth. Do not over-mix.
4. Pour the mixture into a muffin pan lined with paper cases until two thirds full and bake in the preheated oven for 20–25 minutes, or until light golden and the sponge bounces back when touched (smaller cupcakes will need 3-5 minutes less baking time).
5. A toothpick inserted in the center should come out clean. Leave the cupcakes to cool slightly in the tray before turning out on to a wire cooling rack to cool completely.
6. When the cupcakes are cold, frost with chocolate buttercream frosting. To

Wednesday, May 12, 2010

Vegetarian Cassoulet

One of the most rewarding perks of living in California is the amazing produce we can get pretty much all year round. Many Californians are fortunate enough to have year-long farmers markets that are fully stocked with fresh and local fruits and vegetables. So it's not surprising that one of my main goals for this blog was to post recipes for foods prepared with these seasonal ingredients. Sounds simple right? Maybe for some, but for me? Not so much. Things come up. Interviews, presentations, deadlines. A certain advisor sends a certain angry email regarding a certain thesis that should have been finished some three weeks ago. See, things come up, and although I made this cassoulet a while back, when it was more probable to find fresh local leeks, here I am weeks later finally posting about it, and guess what?...my thesis is still not done (ssh...don't tell the advisor!)


I have been fascinated by cassoulets ever since I saw a Julia Child recipe in her Menu Cookbook. Julia's recipe is definitely not for the faint of heart. It requires 3 types of meat- pork, sausage, and goose (I'm not even sure I know where to buy goose from). The recipe also states that it requires more than 4 hours of cooking time (plus more for preparation). That's the required time for normal people, so for someone like me, this recipe would take oh, roughly...4 days. Yup, that sounds about right.

One of these days (I'm thinking maybe sometime around retirement?) I'll try Julia's recipe, but until then I will definitely be making this simpler vegetarian version often. It takes about 2 1/2 hours from start to finish - including preparation (and yes, even for me!) and is so delicious and hearty that even my carnivorous BF didn't miss the meat. Although I'm sure a few chunks of chicken or sausage wouldn't hurt a thing, and would certainly bring you one tiny step closer to Julia's version.

Vegetarian Cassoulet (adapted from Smitten Kitchen and Gourmet)
For cassoulet:
2 medium leeks (spring leeks work well, white and pale green parts only)
1/2 large onion, diced
4 medium carrots, halved lengthwise and cut into 1-inch-wide pieces
3 celery ribs, cut into 1-inch-wide pieces
4 garlic cloves, chopped
1/4 cup olive oil
4 thyme sprigs (I used home-dried thyme sprigs)
4 parsley sprigs
2 Turkish or 1 California bay leaf
1/8 teaspoon ground cloves
3 (19-ounce) cans cannellini or Great Northern beans, rinsed and drained or 4 1/2 cups cooked dried beans
1 19-ounce can diced tomatoes, with their juice
3 tablespoons tomato paste
1 quart vegetable broth

For garlic crumbs
4 cups coarse fresh bread crumbs
1/3 cup olive oil
1 tablespoon chopped garlic
1/4 cup chopped parsley

To make cassoulet:
Halve leeks lengthwise and cut crosswise into 1/2-inch pieces, then wash well and pat dry.

1. Cook leeks, onion, carrots, celery, and garlic in oil with herb sprigs, bay leaves, cloves, and 1/2 teaspoon each of salt and pepper in a large heavy pot over medium heat, stirring occasionally, until softened and golden, about 15 minutes.
2. Stir in beans, tomatoes, tomato paste, then stock, and simmer, partially covered, stirring occasionally, until carrots are tender but not falling apart, about 30 minutes.

To make garlic crumbs while cassoulet simmers:
Preheat oven to 350°F.

Toss bread crumbs with oil, garlic, and 1/4 teaspoon each of salt and pepper in a bowl until well coated. Spread in a baking pan and toast in oven, stirring once halfway through, until crisp and golden, 12 to 15 minutes. Cool crumbs in pan, then return to bowl and stir in parsley.

To finish cassoulet:
Discard herb sprigs and bay leaf. Mash some of beans in pot with a potato masher or back of a spoon to thicken broth. Season with salt and pepper. Just before serving, sprinkle with garlic crumbs.

Wednesday, May 5, 2010

Swedish Visiting Cake

I'd seen this cake made by the Tuesdays With Dorie group a few weeks ago, and I just could not resist. Maybe it was the simplicity of the recipe, or the rustic but oh-so-pretty pictures in Dorie's book, but something about this cake just called out to me.

This cake is seriously one of the most delicious cakes I have ever made and it probably took me about 15 minutes tops to prepare. Am I tooting my own horn? Sure, maybe a little, but not really, since the deliciousness of this cake is not a reflection of the baker, it is a reflection of the recipe. It is so simple to make and just wonderful to eat. Butter, flour, sugar, vanilla, and almonds...how can you go wrong? Plus, the batter is easily prepared in one bowl and doesn't require a mixer.

Best of all, this cake is just a blank canvas for so many variations I have in mind - maybe adding a touch of cinnamon and nutmeg, or topping it with a fruit compote, or folding in a handful of... chocolate chips (bet you didn't see that one coming). So rebellious yet so delicious too. The possibilities are seriously endless.


Swedish Visiting Cake (from Dorie Greenspan, Baking: From My Home to Yours)

*8 tbsp (1 stick) unsalted butter, melted and cooled, plus more for pan
*1 cup sugar, plus more for sprinkling
*Grated zest of 1 lemon
*2 eggs
*1/4 tsp salt
*1 tsp vanilla extract
*1/2 tsp almond extract
*1 cup flour
*1/4 cup sliced almonds (blanched or not)
*powdered sugar (optional, for serving)

1. Center a rack in oven and preheat to 350 degrees. Butter a seasoned 9-inch cast-iron skillet or other heavy oven-proof skillet, a 9-inch round cake pan or even a pie pan.

2. Pour sugar into a medium bowl. Add lemon zest and blend zest into sugar with your fingers until sugar is moist and aromatic. Whisk in eggs, one at a time, until well blended. Whisk in salt and vanilla and almond extracts.

3. Switch to a rubber spatula and stir in flour. Finally, fold in melted butter. Scrape batter into prepared skillet or pan and smooth top with rubber spatula.

4. Scatter sliced almonds over top and sprinkle with sugar. If using a cake or pie pan, place pan on baking sheet. Bake for 25 to 30 minutes, or until golden and a little crisp on outside; the inside will remain moist. Let cook slightly, and sprinkle with a bit of powdered sugar before serving.

Monday, May 3, 2010

Chocolate Chip and Pecan Oatmeal Cookies

Boyfriends are fun to mess with. Especially mine. I have a simple trick that I like to play on him: I take some of our favorite dessert recipes, make some healthy substitutions (without him knowing of course), and innocently watch him to see if he notices any differences. Yes, he is the official guinea pig of MsMeanie's Test Kitchen.

I'll admit it though, some recipes don't fool him, and he can detect a hint of healthy, but these oatmeal cookies? They get him - every, single, time.

The first time I made these cookies, I followed the recipe exactly and they were amazing - rich and chewy and just sweet enough. A few weeks later I made them again, this time with a few healthy tweaks, and guess what? They were STILL amazing. Deliciously rich from the chocolate and pecans, with a balance of crispy on the outside and chewy in the center. My tastebuds loved me, my arteries thanked me, and my test kitchen guinea pig devoured them without suspecting a thing. Now, that to me is cookie perfection.

Chocolate Chip and Pecan Oatmeal Cookies (adapted from Smitten Kitchen and David Lebovitz, makes about 36 cookies)

*4 tablespoons unsalted butter, at room temperature
*4 tablespoons unsweetened applesauce
*3/4 cup white sugar
*1 cup light brown sugar, firmly packed
*1 teaspoon salt
*1 teaspoon vanilla extract
*2 large eggs
*1/2 cup all purpose flour
*3/4 cup whole wheat pastry flour
*1 teaspoon baking soda
*1 1/2 cup quick-cooking oats
*2 cups chopped pecans
*12 ounces semisweet chocolate chips

1.Preheat oven to 350°F. Lightly butter a large cookie sheet or line with parchment paper.
2. Using an electric mixer, beat the butter and applesauce in a bowl until light and fluffy. Add both sugars, salt, and vanilla, and beat until well mixed, about three minutes. Stir in eggs, one at a time.
3. Sift together the flour and baking soda in a separate bowl. Stir in half of the flour mixture to the butter. Once the flour has been incorporated, add the second half. Stir in the oats, pecans, orange zest, and chocolate chips.
3. Place a small piece of plastic wrap over the dough and chill in the refrigerator for a few hours (at least 1 hour). This step gives the cookies a great texture and really enhances the flavor. The longer the cookies are chilled, the chewier and more flavorful they will be.
4. Allow the dough to sit at room temperature for a few minutes, then drop the dough, by the tablespoon, onto the cookie sheet and bake for 10 to 12 minutes or until golden. Remove from the oven and cool the cookies on a rack.

Wednesday, April 28, 2010

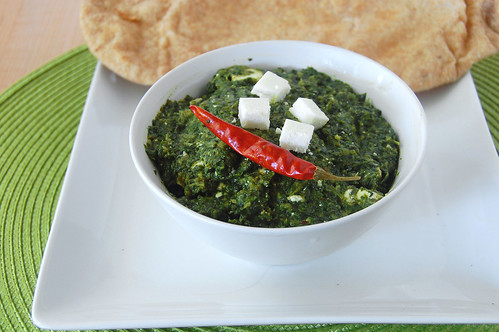
Palak Paneer (Indian Spinach and Cheese)


Palak Paneer. Funny sounding but yummy tasting. Palak paneer (or spinach and cheese) is a quintessential vegetarian dish of North India. It is the vegetarian dish that even meat-lovers crave. My mother makes some of the best palak paneer I have ever had. Unfortunately it is almost impossible to get the recipe from her since, well, she doesn't have one. Her technique is to add some of 'this' and 'that' until the taste and texture is perfect. Measurements are a mystery. See, my mother doesn't use measuring spoons for adding spices. I don't even think she uses spoons. She uses her hands and her fingers and her tastebuds. As I stand in my kitchen, measuring out ingredients, desperately trying to replicate her "recipes", I imagine what she'd think if she saw me there. She'd be proud for sure, but she'd probably be laughing too.


My (many) previous attempts to replicate her palak paneer have left me with a dish that was either too bitter, too sour, or lacking of a robust spinach flavor. Until now. This palak paneer has a great creamy spinach flavor, without the bitterness that many spinach dishes tend to have. The addition of spices also gives it a nice kick, so you know you're not just eating creamed spinach. The paneer is firm enough that it won't lose its form but soft enough that it almost melts in your mouth. I think Mama would approve.

Palak Paneer
*10 cups of chopped fresh spinach or 10 oz of frozen spinach
*2 tablespoons tomato paste
*2 teaspoons grated ginger
*3 cloves garlic
*1 tablespoon oil
*1/2 teaspoon cumin seeds
*1/2 teaspoon caraway seeds
*1 teaspoon coriander powder
*1/2 teaspoon turmeric powder
*1/2 teaspoon red chili powder
*1 teaspoon sugar
*1/3 cup heavy cream or (not skim) milk
*2 tablespoons flour
*salt and pepper, to taste
*1 1/2 cups of paneer, cut into 1/2 inch cubes

1. Place the spinach, tomato paste, ginger, and garlic in a food processor or blender and blend until smooth.
2. In a large pan, heat the oil until hot, then add the cumin and caraway seeds. Fry the seeds for about 30 seconds. Add the coriander, turmeric, and chili powder, and cook for about 2 minutes.
3. Add the spinach, sugar and milk. Stir to combine. Stir in the flour and season with salt and pepper. Cook, covered, for about 10 minutes.
4. Remove from heat and (with a rubber spatula) gently fold in the the paneer.

Tuesday, April 27, 2010

Homemade Paneer


I have been meaning to post about making paneer pretty much since I started this blog, more than a year ago. Paneer is traditional Indian cheese, similar in taste and texture to ricotta. While ricotta is traditionally made from whey, paneer is made from the curds produced from adding an acid to boiling milk. It is a very mild cheese that is popular in many savory and sweet Indian dishes. It is also not very difficult to make at home.

Here are the two most helpful tips I can give about making paneer. (1) Milk is not as innocent as it seems: it can go from hot, to boiling to burnt in a matter of seconds. (2) To achieve a nice, firm, paneer like the kind you can buy in Indian grocery stores, you must drain out ALL of the water from the cheese. The easiest way is to press the paneer under heavy weight.

To prepare, place a colander lined with cheesecloth in the sink.
Then begin heating a gallon of milk in a large heavy-bottomed pan. The milk must be heated slowly and stirred constantly until it comes to the boil. Be very careful to heat the milk slowly, and stir constantly to prevent it from burning.
Once the milk reaches a boil, stir in a half cup of lemon juice or vinegar. The milk will immediately begin to separate into a liquid (whey) and curds. Continue stirring for another minute or two.

Now carefully pour the contents of the pot into the lined colander. Be very carefully since the liquid will be extremely hot. Every time I do this step, it breaks my heart a little to have to throw out the whey. But even after lots of google searching, I still have not found a use for it.
Rinse the paneer with a bit of cold water just so it is warm enough to handle. Then try to squeeze out as much of the liquid as you can using your hands.

The paneer needs to be drained of its liquid, and depending on how firm you'd like it, this could take anywhere from 2 hours to overnight. Most savory Indian dishes require a firm block of paneer, but many desserts call for a softer paneer that can be achieved with 2-3 hours of draining.
My go-to method for draining is to place the paneer (still in the cheesecloth) on a cutting board that is slighty hanging over the sink. Then on top, I place as much weight as possible as I can -- some iron skillets, cans of tomato sauces, textbooks that I don't feel like reading, etc.

This is what the paneer should look like after being drained overnight. The texture will be just like the kind you find in the Indian grocery stores, but the taste will be at least 10 times better.


Here is what it looks like cut up. Anyone want to take a guess as to what I made with this?

Homemade Paneer

* 8 cups (half gallon) milk
* 1/2 cup lemon Juice or vinegar

1. Place a colander in the sink and line with a large piece of cheesecloth.
2. In a heavy bottomed pot, over medium heat, cook the milk, stirring occasionally, making sure not it does not burn.
3. As the milk comes to a boil, gradually stir in the lemon juice or vinegar. The curd will begin separating from the whey. Cook for an additional minute, then remove the pot from the heat.
4. Pour the liquid into the prepared colander. Wrap the curds in the cloth and gently rinse under cold water for a few seconds. Then, using your hands, squeeze the cloth to remove the excess water. This also helps to remove some of the sourness from the lemon juice/vinegar.
5. To drain the liquid, place the curds wrapped in the cheesecloth on a cutting board. Place a heavy pan (cast iron works well) on top. Then place a few cans in the pan. Drain for at least 2 hours and at most overnight. The longer the cheese is drained, the firmer the final product.