Sunday, January 31, 2010
Banana Crumb Muffins Take Two
I'm the kind of person who needs to have something sweet with every meal I eat. Breakfast is usually cereal, so that doesn't need dessert, but lunch and dinner is always supplemented with at least a piece of chocolate. I can't help it. This is me, and I need sweets. I've tried to change it, but now I just accept it. We are who we are, right? And I'm a dessertaholic. Anyone else in this club? Allowing myself at least a small treat with every meal prevents me from eating a whole pan of brownies in one sitting, something that I used to do often before I started this treat-a-meal approach.
I like to make these muffins when I need a break from some of the richer desserts I make often (cookies, brownies, cakes, etc). These muffins are satisfying in many ways -- they are made with whole wheat pastry flour and studded with walnuts, which makes them filling and they are topped with a sweet and crunchy crumb, which truly makes them dessert and not breakfast. I usually add chocolate chips which definitely satisfies my chocolate cravings, but this time I added white chocolate and dried cranberries. Some people complain about white chocolate not being "real chocolate", and I say "sure" - that just means more for me!
Chocolate Chip Banana Crumb Muffins (adapted from allrecipes)
(Makes 12 muffins)
* 3/4 cups all-purpose flour
* 3/4 cups whole wheat pastry flour
* 1 teaspoon baking soda
* 1 teaspoon baking powder
* 1/2 teaspoon salt
* 3 bananas, mashed
* 3/4 cup white sugar
* 1 egg, lightly beaten
* 1/6 cup canola oil
* 1/6 cup applesauce
* 1/2 cup chopped walnuts
* 3/4 cup white chocolate chips
1/2 cup chopped dried cranberries
Crumb Topping
* 1/3 cup packed brown sugar
* 2 tablespoons all-purpose flour
* 1/8 teaspoon ground cinnamon
* 1/8 teaspoon ground nutmeg
* pinch of ginger
* 1 tablespoon cold butter
1. Preheat oven to 375 degrees F (190 degrees C). Lightly grease 12 muffin cups, or line with muffin papers.
2. In a large bowl, mix together 3/4 cups all purpose flour, whole wheat flour, baking soda, baking powder and salt. In another bowl, beat together bananas, sugar, egg, oil, and applesauce. Stir the banana mixture into the flour mixture just until moistened. Stir in walnuts and chocolate chips. Spoon batter into prepared muffin cups.
3. Crumb Topping: In a small bowl, mix together brown sugar, 2 tablespoons flour, cinnamon, nutmeg, and ginger. Cut in 1 tablespoon butter until mixture resembles coarse cornmeal. Sprinkle topping over muffins.
4. Bake in preheated oven for 18 to 20 minutes, until a toothpick inserted into center of a muffin comes out clean.
Tuesday, January 26, 2010
Peanut Butter Nanaimo Bars
Wow. So simple yet so utterly delicious. This was one of my favorite Daring Baker's challenges for three important reasons -- 1) I didn't lose sleep over it 2) I didn't almost destroy my kitchen in the process of making it, and 3) it was super delicious.
This month we made Nanaimo Bars, a classic Canadian dessert created in Nanaimo, British Colombia. The bars have 3 layers: a base containing graham crackers, cocoa, coconut and nuts, a middle custard layer, and a topping of chocolate.
We had the option to make gluten-free graham crackers, but I stuck to original (flour) graham crackers (sorry, I forgot to take pictures of them). I wanted to make these desserts for the BF's birthday, and since he is a peanut butter fanatic, I swapped the traditional vanilla flavored custard for a peanut butter layer. I also swapped the almonds in the bottom layer for salted peanuts, and replaced some of the butter with peanut oil.
And OMG. The result was amazing: a bottom chewy yet crunchy layer of chocolatey goodness, a creamy and sweet peanut butter filling, and a hard chocolate shell on top -- AMAZING. Initially, I thought these bars were going to be just like the many American dessert bar recipes that I do love, but have tried several times. But no -- they were really different. The coconut in the bottom layer really added to taste and texture of these bars, making them very different than other bar recipes I've had. The addition of the peanut oil really added a lot of peanut flavor to this recipe, but of course can be replaced with butter.
The original recipe can be found on Lauren's lovely (and gluten-free) blog. Below is my peanut butter version.
Peanut-Butter Nanaimo Bars (loosely adapted from here)
Ingredients
Base
- 1/4 cup (115 g) (4 ounces) unsalted butter
- 2 tablespoons peanut oil
- 1/4 cup (50 g) (1.8 ounces) granulated sugar
- 5 tablespoons unsweetened cocoa powder
- 1 large egg, beaten
- 1 1/4 cups graham cracker crumbs
- 1/2 cup roasted peanuts, chopped
- 1 cup (130 g) (4.5 ounces) shredded sweetened coconut
- 1/2 cup peanut butter
- 1 tablespoon unsalted butter, at room temperature
- 1 tablespoon peanut oil
- 2 teaspoons cornstarch
- 1 teaspoon vanilla
- 2 cups confectioner’s sugar
- 3 tablespoons milk
Glaze
- 5 ounces semisweet chocolate chips or finely chopped baking chocolate
- 2 tablespoons unsalted butter
1. For bottom Layer: Melt unsalted butter, oil, sugar and cocoa in top of a double boiler. Add egg and stir to cook and thicken. Remove from heat. Stir in crumbs, nuts and coconut. Press firmly into an ungreased 8 by 8 inch pan.
2. For Middle Layer: Cream together peanut butter, butter, and oil until smooth well. Add the cornstarch and continue creaming. Gradually add half of the sugar, 2 tablespoons at a time until smooth. Add vanilla. Continue adding sugar and milk, alternating 2 tablespoons at a time of each. Spread over bottom layer. Spreading this will be a bit difficult at first, since the mixture is very sticky. I let the mixture sit for a while and used a offset spatula to spread it.
3. For Top Layer: Melt chocolate and unsalted butter over low heat. Cool. Once cool, pour over middle layer and chill.
Saturday, January 16, 2010
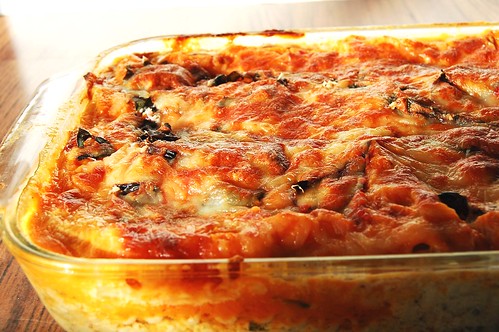
Butternut Squash & Swiss Chard Lasagna
Since I am a lover of all things tomato sauce, tomato-based lasagna is one of my favorite foods ever. So, when I heard about this butternut squash lasagna, I was skeptical. But I was wrong. This lasagna was fantastic. The butternut squash adds a sweetness much like tomato sauce does in traditional lasagna. The cheeses add a great savory contrast to the squash, and everything is enlivened with the addition of the herbs. I added some swiss chard to give it some more texture and increase the healthiness factor. I also used sage and a bit of rosemary instead of basil because I think they complement the squash better. I also roasted the squash instead of boiling it as I think that enhances the sweetness more. I added some tofu and cottage cheese to the cheese mixture to give it some extra protein.
This dish is so hearty and flavorful, and it is great with a side of toasted garlic bread which helps to sop up the yummy sauce. This will definitely be a staple winter-time meal at our place.
Butternut Squash & Swiss Chard Lasagna (adapted from Giada De Laurentiis)
- 1 tablespoon olive oil
- 1 (1 1/2 to 2-pound) butternut squash, peeled, seeded, and cut into 1-inch cubes
- salt and freshly ground black pepper
- 1/2 cup water
- 2 Tb olive oil
- 2 Tb butter
- 1/4 cup all-purpose flour
- 3 1/2 cups milk
- Pinch nutmeg (freshly grated)
- 3/4 cup (lightly packed) fresh sage leaves
- 2 1/2 Tb fresh rosemary, chopped
- 2 cups shredded mozzarella cheese
- 1/3 cup grated Parmesan
- 1/3 cup grated Pecorino
- 1 cup cottage cheese
- 1/2 cup firm tofu, chopped into small pieces
- 2 cups (lightly packed) chopped swiss chard
- 12 lasagna noodles, cooked to al dente
2. Heat the 2 Tb of oil and melt the butter in a heavy medium-size saucepan over medium heat. Add the flour and whisk for 1 minute. Gradually whisk in the milk. Bring to a boil over medium-high heat. Reduce the heat to medium and simmer until the sauce thickens slightly, whisking often, about 5 minutes. Whisk in the nutmeg. Cool slightly. Transfer half of the sauce to a blender*. Add the sage and rosemary and blend until smooth. Return the sauce to the sauce in the pan and stir to blend. Season the sauce with salt and pepper, to taste.
3. Mix together 2 cups of mozzarella with the Parmesan, Pecorino, cottage cheese, and tofu. Season with salt and pepper, to taste.
3. Position the rack in the center of the oven and preheat to 375 degrees F. Lightly butter a 13 by 9 by 2-inch glass baking dish. Spread 3/4 cup of the sauce over the prepared baking dish. Arrange 3 lasagna noodles on the bottom of the pan. Spread 1/3 of the squash puree over the noodles. Spread a layer of the chard. Sprinkle with 1/2 cup of the cheese mixture. Repeat layering 3 more times.
5. Bake the lasagna for 40 minutes. Continue baking uncovered until the sauce bubbles and the top is golden, 15 minutes longer. Let the lasagna stand for 15 minutes before serving.
*When blending hot liquids: Remove liquid from the heat and allow to cool for at least 5 minutes. Transfer liquid to a blender or food processor and fill it no more than halfway. If using a blender, release one corner of the lid. This prevents the vacuum effect that creates heat explosions. Place a towel over the top of the machine, pulse a few times then process on high speed until smooth.
Monday, January 11, 2010
New York Times CCC Again!
Change is a difficult thing. I'm always wanting to try new recipes, new desserts especially, but every time I contemplate which dessert to make next, I find myself craving the ones I'm most familiar with: brownies, chocolate cake, banana muffins, and of course -- chocolate chip cookies. I don't think there is ever a time when I don't want a chocolate chip cookie. Morning? Check. Before lunch? Check. After lunch? Check. Anyway, you get it...always!
If you are a food blogger or if you read food blogs, I am sure you have heard of the famous Chocolate Chip Cookie recipe published by the NY times last summer. I made the cookies shortly after the article was published, and unlike the other 4, 982, 623 food bloggers who have made this recipe, I was underwhelmed. The cookies were just too crispy for my taste, I prefer a soft, chewy cookie. Back then, however, I did not own a stand mixer (something the recipe calls for), and I complained a bit about recipes that required special ($200) appliances. Anyway, after all that complaining, I broke down, and bought myself a Kitchen Aid mixer a few months ago.
I tried these cookies again, this time of course using my KA, wondering if it would make a difference at all. And the verdict? YES this time around, I enjoyed the cookies much more. The texture was what everyone raves about. The cookies were much chewier than the first time, and they had the signature crisp edges that give away to a soft chewy center. BUT...I should point out that this doesn't necessarily mean that a stand mixer is essential for making these cookies properly. There is the hopeful part of me that believes that maybe these cookies were better because, well, maybe, just maybe, over the course of a year, I've gained some useful experience in the kitchen. Let's just say that's true.
So like the 4, 982, 623 others, I agree, this is a fantastic chocolate chip cookie. However, since I am a bigger fan of the chewy-all-over CCC, I personally prefer this cookie.
Here is a link to the recipe.