Sunday, July 26, 2009

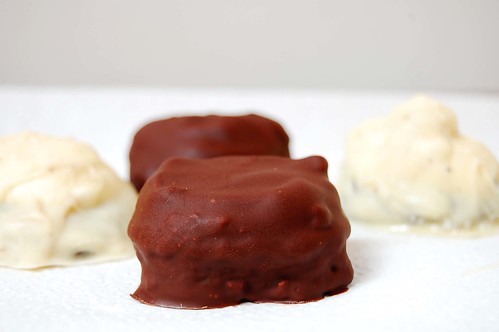
Daring Bakers: Mallomars


The July 2009 Daring Bakers challenge was hosted by Nicole at Sweet Tooth. She chose Chocolate Covered Marshmallow Cookies and Milan Cookies from pastry chef Gale Gand of the Food Network.

For this month's challenge, I chose the Chocolate Covered Marshmallow Cookies. I really wanted to try both, but I've been super busy with my internship and only had enough time to try one. The marshmallow cookies were intriguing because I've never made marshmallows before and definitely wanted to give it a try.

I wanted to make the marshmallows vegetarian (no gelatin), so I followed one of the recipes on the Daring Bakers Alternative Bakers forum. The recipe uses Xanthan Gum instead of gelatin to achieve the gelatin-like consistency, and it is fantastic! I read some reviews and was worried that the marshmallows would be too runny. But I followed all the steps and holy moly!
It was true...I had marshmallows. And they weren't runny piles of goop, they were just soft and fluffy, like little pillows...little pillows that were a magnet to uhm, everything. Literally. By the time I was done dipping the last cookie, my kitchen had become a marshmallow. Fortunately, it was worth it because this recipe makes some mighty good cookies, and a ton of them! I
only made a third of the recipe and still ended up with about 20 big cookies!

I made two variations of the cookie: for the first type, I added a layer of homemade dulce de leche (think: marshmallows, chocolate, and caramel...oh mama). The other variation was inside out Mallomars: I used a chocolate cookie base and dipped the cookies in white chocolate.

This recipe was definitely a challenge for me - although the individual parts were simple, putting them together was trickier. Also, trying to get the world's stickiest stuff to do what you want is not particularly easy. Still, these cookies were very very tasty and I would definitely recommend this recipe -- just be prepared, you might end up with marshmallow on your ceiling (I did).

The recipe for the cookies is here. Below is the recipe I used for vegetarian marshmallows. I followed the recipe exactly except piped the marshmallows onto the cookies instead of spreading it on a baking pan.

Vegetarian Marshmallows (by Elizabeth Falkner of Demolition Desserts)

Ingredients:
• 60 mL water
• pinch of cream of tartar
• 255 g sugar, granulated
• 255 g light corn syrup
• ½ vanilla bean
• 85 g egg whites (about 3 egg whites)
• 5 g xanthan (0.76%)

1. Ground xanthan with a tablespoon of sugar. Set aside.
2. Heat water, cream of tartar, remaining sugar, corn syrup and vanilla to 120ºC. Discard vanilla bean. Whisk egg whites for about 2 min until still soft. Continue whipping egg whites at slow speed while adding syrup slowly. Sprinkle xanthan mix while still whipping. Turn speed up and continue mixing for 2-3 min or until meringue pulls away from sides.
3. Sprinkle a pan or baking sheet generously with cornstarch and spread out the meringue. Sprinkle top with cornstarch, cover with plastic and leave to set for 4 hours in a refrigerator. Cut marshmallows into desired shapes and dip cut surfaces in cornstarch.

Friday, July 17, 2009

Dulce De Leche


After making a half recipe of Magic Cookie Bars, I had some leftover condensed milk. I'd recently seen some dulce de leche recipes which use condensed milk, and although I've always wanted to make it, I was a bit intimidated. The possibility of exploding cans and spurting liquids combined with my luck in the kitchen was not a good combination. So I did some research and found a fool-proof, no explosions recipe for sweet delicious dulce de leche. Woot!

The recipe was really simple, and the ducle de leche came out great. My only advice with this recipe is to ditch the whisk and just use a spoon to stir it up. Although a whisk would still work, I found that much of the dulce de leche just ended up stuck in the wires of my whisk. Plus, licking the stuff off a spoon is so much easier than trying to lick a whisk clean.

Explosion Free Dulce de Leche (by David Lebovitz)

1. Preheat the oven to 425° F (220° C).
2. Pour one can (400 gr/14 ounces) of sweetened condensed milk (not evaporated milk) into a glass pie plate or shallow baking dish. Stir in a few flecks of sea salt.
3. Cover the pie plate snugly with aluminum foil and set the pie plate within a larger pan, such as a roasting pan, and add hot water until it reaches halfway up the side of the pie plate.
4. Bake for 1 to 1¼ hours. (Check a few times during baking and add more water to the roasting pan as necessary).
5. Once the Dulce de Leche is nicely browned and caramelized, remove from the oven and let cool. Once cool, stir with spoon until smooth.

Store in the refrigerator until ready to serve. Warm gently in a warm water bath or microwave oven before using.

Monday, July 13, 2009

Magic Cookie Bars


This is it folks -- the mother of all desserts: Magic Bars. These little babies combine my three favorite dessert ingredients: chocolate (of course!), caramel, and nuts.

There are many different names for these bars: Magic Cookie Bars, Hello Dolly Bars, Seven-Layer Bars, and (the very creative) Chocolate Coconut Bars. But they all equal the same thing: a dessert so rich that you only need about one piece to satisfy your sweet tooth. Unless you have my sweet tooth, which means you'll eat until your stomach hurts.

I combined a few of the recipes I found to make a more wholesome version of this recipe. Notice I didn't say "lighter" version, just "wholesome". So even though they're still loaded with calories, they'll make you fuller, which means you'll eat less of them. Unless, of course, you're like me. I think I may have a problem.

Magic Cookie Bars
  • 1 cup whole wheat graham cracker crumbs
  • 1/2 cup oatmeal
  • 1 Tb brown sugar
  • 1/2 cup (1 stick) butter, melted
  • 1 (14-ounce) can sweetened condensed milk (NOT evaporated milk)
  • 1 1/2 cups bittersweet chocolate chips
  • 1 cups flaked coconut
  • 1 cup chopped pecans
1. Preheat oven to 325°F . Line a 8x8-inch baking pan.
2. In small bowl, combine graham cracker crumbs, oatmeal, brown sugar, and butter; mix well.
Press crumb mixture firmly on bottom of baking pan.
3. Sprinkle chocolate chips, coconut and pecans on top. Pour the condensed milk evenly.
4. Bake for 20 - 25 minutes until slightly golden on top.
5. Cool for 15 minutes before removing from pan.

Monday, July 6, 2009

100% Whole Wheat Bread

I was almost starting to believe it wasn't possible: 100% whole wheat bread made at home that doesn't taste like a stale crouton. I tried so many whole wheat bread recipes and either (1) they didn't make a 100% whole wheat bread (ie. they called for some all-purpose or bread flour) or (2) the bread had the texture and feel of something I want to throw at idiot drivers who cut me off when I'm riding my bike. And just as I was starting to lose hope that it was actually possible to make tasty, soft, 100% whole wheat bread at home, I found it -- THE perfect recipe.

The original recipe is from King Arthur Flour, but I found it at Cooking for Seven, which by the way has some great recipes which are tweaked to please us healthy-type folks.


100% Whole Wheat Bread (adapted from King Arthur Flour via Cooking for Seven)

Ingredients:

  • 1 1/2 cups (12 ounces) lukewarm water
  • 3 tablespoons melted butter, coconut oil, or olive oil
  • 2 tablespoons honey, molasses, or maple syrup
  • 3 1/2 cups Whole Wheat Flour
  • 1 tablespoon vital wheat gluten
  • 2 tablespoons flax meal, 10 grain cereal, wheat germ, etc. (optional and very good)
  • 1 1/2 teaspoons salt
  • 1 1/2 teaspoons instant yeast

To prepare the dough:

(Hand Method) Combine all of the ingredients, and mix them till you have a shaggy dough. The dough will seem wet, but remember: wetter is better. Let the dough rest, covered, for 20 minutes, then knead till smooth and elastic, about 10 minutes. Allow the dough to rise, covered, for 1 to 2 hours, or until it’s puffy and nearly doubled in bulk.

(Mixer Method) In the bowl of a stand mixer fitted with the dough hook, combine all ingredients and mix them till you have a shaggy dough. The dough will seem wet, but remember: wetter is better. Let the dough rest for 20 minutes, then knead by machine until fairly smooth, about 10 minutes. Allow dough to rise, covered, for 1 to 2 hours, or until it’s puffy and nearly doubled in bulk.

(Bread Machine Method) Place all ingredients in bread machine pan and set to dough cycle.

To Shape the Loaves

After the dough has risen, gently deflate the dough, shape it into a log, and place it in a lightly greased large (9×5 inch) bread pan or two small bread pans. Cover the pan with a towel*(see note below) or lightly greased plastic wrap, and allow it to rise in a warm place for about 30 minutes-1 hour, till it’s crowned about 2 inches over the rim of the pan. Preheat your oven to 350°F about halfway through the rising time.

Bake the bread in a preheated 350°F oven for 45 minutes or until it turns a deep brown and sounds hollow when tapped on the bottom.

Yield: 1 large or 2 small loaves.

* I've found that if I place the towel directly on the dough, it sometimes causes the loaf to deflate when I take the towel off. I think a better approach (the BF discovered this) is to prop the towel over the bread (using 4 small jars on each corner of the bread pan) to make sure there is no direct contact between the towel and the dough.

Saturday, June 27, 2009

Daring Bakers Bakewell Tart


The June Daring Bakers challenge was hosted by Jasmine of Confessions of a Cardamom Addict and Annemarie of Ambrosia and Nectar. They chose a Traditional (UK) Bakewell Tart/pudding that was inspired by a rich baking history dating back to the 1800’s in England.

This was my first Daring Bakers challenge, and I am dedicating it to the BF. Without a doubt, if it weren't for him, there is no way I would have completed this recipe. There were so many factors which tempted me to be a no-show for my very first challenge: (1) I was leaving to go out of town, and then out of the country, for 2 weeks, so would not be around to enjoy the results of the challenge (2) I really wanted to do something creative and I had the hardest time coming up with ideas (3) I had never heard of a Bakewell Tart, or even used almond flour, and (4) the recipe required a scale for measuring the ingredients, and my broke self does not own one.

With some much needed moral support from the BF, I finally decided to tough it out and complete the challenge, and I am so glad I did! Since I was not going to be around to enjoy it, I decided the next best thing would be to give it away. I wanted to give half the tart to a friend I was visiting who just finished business school, and since she is a major chocoholic I knew that I would have to incorporate chocolate into the recipe. So instead of the traditional fruit spread which the recipe calls for, I decided to go with a chocolate spread. They're almost the same, right? Cocoa is a fruit, right? Oh, it's not? Ok, well it grows on trees, right? Oh, not really? Ok, well it's sweet like fruit, right? No?! Ok, they're not similar, but they both make good spreads, so there.

The most popular chocolate-based spread I know of is nutella, which is made with chocolate and hazelnuts. But since this dessert uses almond flour, I decided to make my own version of nutella, with almonds instead of hazelnuts. The homemade almond "nutella" came out great, and was perfect for this dessert.

The Bakewell tart traditionally consists of a shortcrust pastry (like a pie crust), a layer of jam, and a frangipane (or almond cake) topping. I was a bit wary of this dessert, because I expected the frangipane to taste like marzipan, which I am not a fan of. Surprisingly, it tasted nothing like marzipan -- instead it was like a very rich, almost creamy, cake -- totally delicious. This was my first experience using almond flour and I loved it. It's a bit pricey compared to regular flour, but I will definitely be using it when I'm in the mood to splurge. Also, since I was short on time, I used my trusty pie crust recipe instead of the one given in the challenge. I really enjoyed this recipe. The butter, almond, and chocolate flavors came together really well to make a very rich and satisfying dessert.

As for measuring the ingredients -- the BF took them all to his lab and measured them for me using his lab scale! Ah, it's great to know a scientist, and even better when he's your boyfriend. :) As much as I appreciated his help, this challenge has definitely convinced me to invest in a kitchen scale, so this little baby will be sitting on my counter in 5 to 7 business days. Woot!


Bakewell Tart with Chocolate Almond Spread
  • One quantity sweet shortcrust pastry (recipe follows)
  • Bench flour
  • 250ml (1cup (8 US fl. oz)) jam or curd, warmed for spreadability
  • One quantity frangipane (recipe follows)
  • One handful blanched, flaked almonds

Assembling the tart
Place the chilled dough disc on a lightly floured surface. If it's overly cold, you will need to let it become acclimatised for about 15 minutes before you roll it out. Flour the rolling pin and roll the pastry to 5mm (1/4”) thickness, by rolling in one direction only (start from the centre and roll away from you), and turning the disc a quarter turn after each roll. When the pastry is to the desired size and thickness, transfer it to the tart pan, press in and trim the excess dough. Patch any holes, fissures or tears with trimmed bits. Chill in the freezer for 15 minutes.

Preheat oven to 200C/400F.

Remove shell from freezer, spread as even a layer as you can of jam onto the pastry base. Top with frangipane, spreading to cover the entire surface of the tart. Smooth the top and pop into the oven for 30 minutes. Five minutes before the tart is done, the top will be poofy and brownish. Remove from oven and strew flaked almonds on top and return to the heat for the last five minutes of baking.

The finished tart will have a golden crust and the frangipane will be tanned, poofy and a bit spongy-looking. Remove from the oven and cool on the counter. Serve warm, with crème fraîche, whipped cream or custard sauce if you wish.

When you slice into the tart, the almond paste will be firm, but slightly squidgy and the crust should be crisp but not tough.

Sweet shortcrust pastry
225g (8oz) all purpose flour
30g (1oz) sugar
2.5ml (½ tsp) salt
110g (4oz) unsalted butter, cold (frozen is better)
2 (2) egg yolks
2.5ml (½ tsp) almond extract (optional)
15-30ml (1-2 Tbsp) cold water

Sift together flour, sugar and salt. Grate butter into the flour mixture, using the large hole-side of a box grater. Using your finger tips only, and working very quickly, rub the fat into the flour until the mixture resembles bread crumbs. Set aside.

Lightly beat the egg yolks with the almond extract (if using) and quickly mix into the flour mixture. Keep mixing while dribbling in the water, only adding enough to form a cohesive and slightly sticky dough.

Form the dough into a disc, wrap in cling and refrigerate for at least 30 minutes.

Frangipane
125g (4.5oz) unsalted butter, softened
125g (4.5oz) icing sugar
3 (3) eggs
2.5ml (½ tsp) almond extract
125g (4.5oz) ground almonds
30g (1oz) all purpose flour

Cream butter and sugar together for about a minute or until the mixture is primrose in colour and very fluffy. Scrape down the side of the bowl and add the eggs, one at a time, beating well after each addition. The batter may appear to curdle. After all three are in, pour in the almond extract and mix for about another 30 seconds and scrape down the sides again. With the beaters on, spoon in the ground nuts and the flour. Mix well. The mixture will be soft, keep its slightly curdled look (mostly from the almonds) and retain its pallid yellow colour.

Thursday, June 25, 2009

Chocolate Almond Spread (Nutella)


Some people say that Nutella is the peanut butter of Europe. I'd have to agree. When I backpacked through Europe in 2005, I too often found myself in the 'exotic foods' section of the grocery store desperately searching the shelves for a jar of peanut butter. Usually there were just one or two jars of creamy unsalted for about twice as much as I would pay in the U.S. But price was not an issue, because denying oneself of a peanut butter craving for an entire month is not healthy, at least not for me.

My German friend has told me she's had a similar experience with buying Nutella in California. The stuff is way more expensive here than it is in Europe, and usually there is just that one brand - Nutella, whereas European groceries offer far more options.
Since I just got back from a week long European excursion through Germany and Prague, I am dedicating this post to Europe and it's delicious culinary invention of Nutella, or more generally, chocolate hazelnut spread.

I was curious about making my own chocolate hazelnut spread, but I wanted to try it with almonds instead of hazelnuts (I'll explain why in the next post). I found this recipe on Baking Bites and made a few adjustments.

Ok, I'm not going to lie -- this was not easy. Well, the original recipe is easy, but since I was looking for a smooth spread, I had to strain it all through a sieve to get rid of the chunkiness from the ground almond. But the taste? It was amazing and totally worth the effort. This spread had a strong almond flavor which was very nicely balanced with a sweet chocolatey flavor. All in all, this was chocolate almond heaven.

Chocolate Almond Spread
(adapted from Baking Bites)
  • 1/3 cup almond meal (ground almonds)
  • 1/2 cup dry nonfat milk powder
  • 1/3 cup brown sugar
  • 1/3 cup white sugar
  • 1/2 cup unsweetened cocoa powder
  • 1 tbsp + 1 tsp cornstarch
  • 3/4 cup milk (2% or whole)
  • 1 tbsp canola oil
  • 1/4 tsp almond extract

1. In a medium saucepan, combine almond meal, dry milk powder, brown sugar, white sugar, cocoa powder and cornstarch. Add in milk and vegetable oil and whisk until smooth.

2. Cook over medium heat, whisking frequently, until mixture begins to thicken and just starts to bubble. Remove from heat and stir in almond extract.

3. To get a smooth spread, strain the mixture by placing small portions of it, one at a time, in a strainer. Use a spoon and the strainer to separate the mixture and the almond meal.

4. Transfer the spread to a heatproof container, preferably one with an airtight lid. Cool to room temperature and, if not eating right away, store in the fridge with an airtight lid on the container.

Thursday, June 11, 2009

Brown Rice Risotto with Asparagus and Mushrooms


Ok, I've realized that I cannot go to Trader Joe's without buying at least 2 pounds of cheese. Before I made this risotto, our fridge was stocked with 14 kinds of cheeses, that's right FOURTEEN: mozarella, white cheddar, orange cheddar, Swiss, Gruyère, goat, Comtè, Fontina, Parmesiano-Reggiano, Pecorino, Monterey jack, feta, parmesan, and Harvati. So as much as I love risotto, this recipe was more about clearing up some fridge room than satisfying a craving.

I know that Arborio rice is typically used for risotto, but I wanted to try making it a bit healthier by using brown rice. I wasn't sure how it would work out, or if it would at all, since brown rice is definitely not as starchy as Arborio, and the starchiness of the rice is what gives risotto its creaminess. I used a simple recipe for asparagus and shitake risotto and used brown rice instead of Arborio.

Using the brown rice required much more time since brown rice takes longer to cook, but the end result was totally worth it. This risotto was just as creamy as other risottos I've had with Arborio rice. I used Gruyère and Fontina, which added a ton of flavor.

Brown Rice Risotto with Asparagus and Mushrooms (adapted from Gourmèt, May 2003)
  • 5 cups vegetable broth
  • 1 cup water
  • 1 pound thin to medium asparagus, trimmed and cut into 1/4-inch-thick slices, leaving tips 1 1/2 inches long
  • 4 tablespoon olive oil
  • 1/4 pound fresh shiitake mushrooms, sliced
  • 1/2 pound fresh crimini mushrooms, sliced
  • 3 shallots, diced
  • 1 1/2 cups Brown rice (10 ounces)
  • 1/2 cup dry white wine
  • 1/2 cup Gruyere
  • 1/2 cup Fontina
1. Bring broth and water to a boil in a large pot. Add asparagus and cook, uncovered, until crisp-tender, 3 to 4 minutes. Transfer asparagus with a slotted spoon to a large bowl of ice and cold water to stop cooking, then drain and pat dry. Keep broth at a bare simmer, covered.
2. Heat 2 tablespoons of oil in a large heavy pot over moderately high heat, then sauté mushrooms, stirring occasionally, until browned, about 4 minutes. Transfer to a bowl.
3. Cook shallots in 2 tablespoons of oil in saucepan over moderate heat, stirring, about 1 minute. Add rice and cook, stirring, 1 minute. Add wine and cook, stirring, until absorbed, about 1 minute.
3. Ladle in 1 cup simmering broth and cook at a strong simmer, stirring, until absorbed, about 2 minutes. Continue simmering and adding broth, about 1/2 cup at a time, stirring frequently and letting each addition be absorbed before adding next, until rice is just tender and looks creamy, for about 1 hour.
4. Remove from heat and stir in cheese and salt and pepper to taste. Gently stir in asparagus and mushrooms. Serve immediately.